

Slide Into Success A Guide to Installing Kitchen and Heavy Duty Slides
Why Getting Attaching Drawer Slides Right Makes or Breaks Your Cabinets
Attaching drawer slides correctly is the difference between drawers that glide effortlessly for decades and ones that stick, bind, and frustrate you every single day.
Here’s a quick overview of how to attach drawer slides:
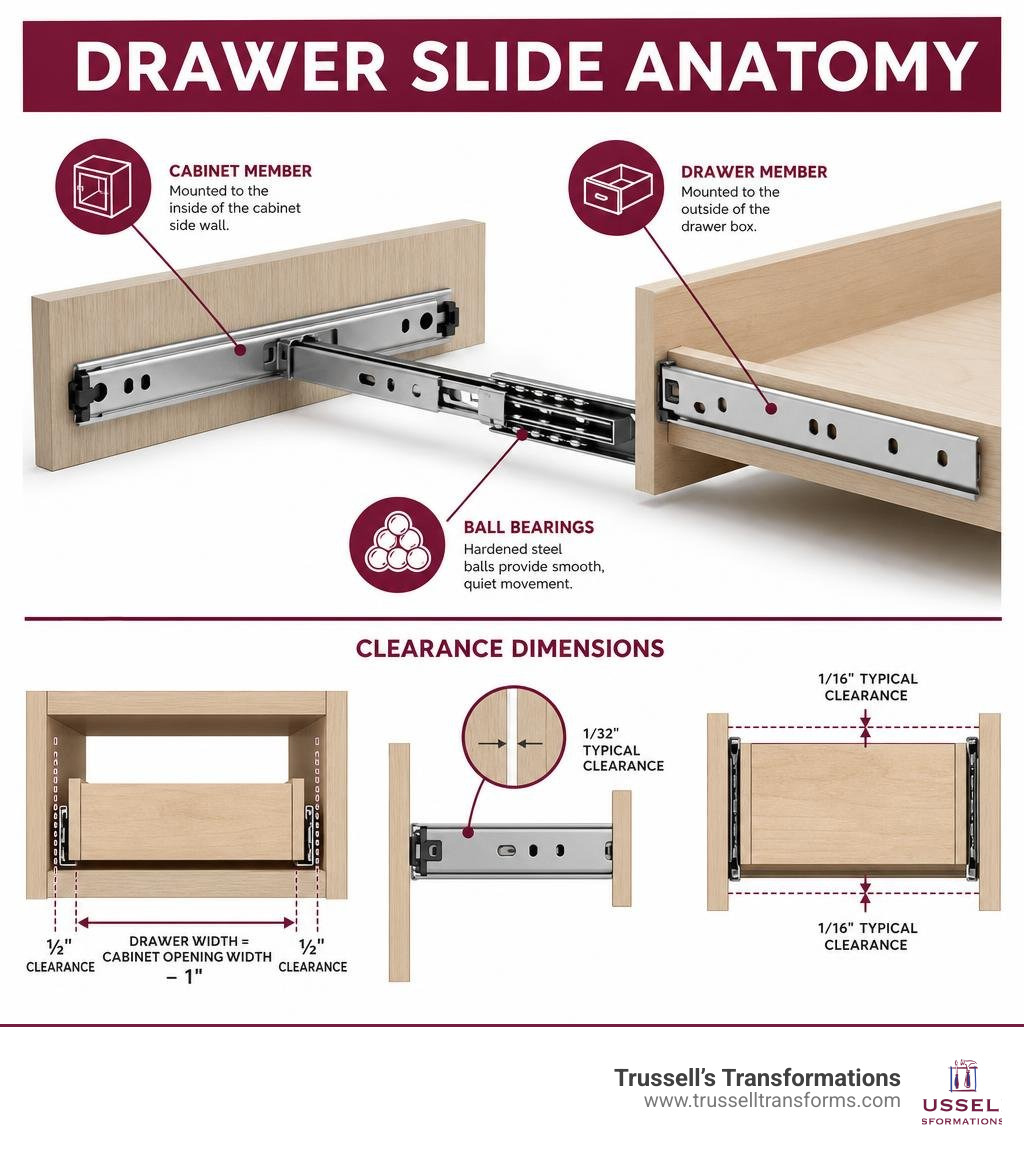
- Measure the cabinet opening width and subtract 1 inch for side-mount slide clearance (½ inch per side)
- Mark level lines on both cabinet walls at the correct height
- Mount the cabinet member using horizontal slots for adjustability — screws through round holes first
- Attach the drawer member to the drawer box sides, flush and parallel
- Insert the drawer by aligning the members and sliding forward until they click
- Adjust vertically using the cam adjuster, then drive permanent screws
It sounds straightforward. And it can be — if you get the measurements right and keep everything level.
But here’s the reality: even a 1/32-inch misalignment can cause noticeable binding by the time the drawer reaches full extension. Small errors get amplified. That’s why so many homeowners end up with drawers that work fine on day one and become a headache by month three.
Whether you’re upgrading an Albuquerque kitchen with new cabinetry or adding storage to a bathroom, understanding how drawer slides work — and how to install them precisely — is the foundation of a result you’ll actually be happy with.
This guide walks you through every step, from choosing the right slide type to nailing the final drawer face alignment.
Essential attaching drawer slides terms:
Understanding Drawer Slide Types and Sizing
Before we pick up a drill, we have to talk about the hardware itself. Choosing the right slide type is about balancing aesthetics, weight limits, budget, and the physical reality of how wood behaves in our unique High Desert climate.
Here in the Albuquerque and Rio Rancho areas, our relative humidity can swing wildly between seasonal transitions. Wood is a hygroscopic material, meaning it absorbs and releases moisture to match its environment. A solid wood drawer box can swell or shrink by up to 1/8 inch or more across its width. If you don’t account for this seasonal movement when attaching drawer slides, your drawers may glide beautifully in winter but stick fast during our summer monsoon season.
Using highly stable materials like Baltic birch plywood or premium engineered cores for your drawer boxes minimizes this issue, as plywood experiences negligible seasonal movement (often less than 1/32 inch). However, the hardware you choose still dictates how much margin for error you have. To ensure your entire cabinetry project is off to a flawless start, it helps to understand how the slides interface with the best way to install cabinets in your home.
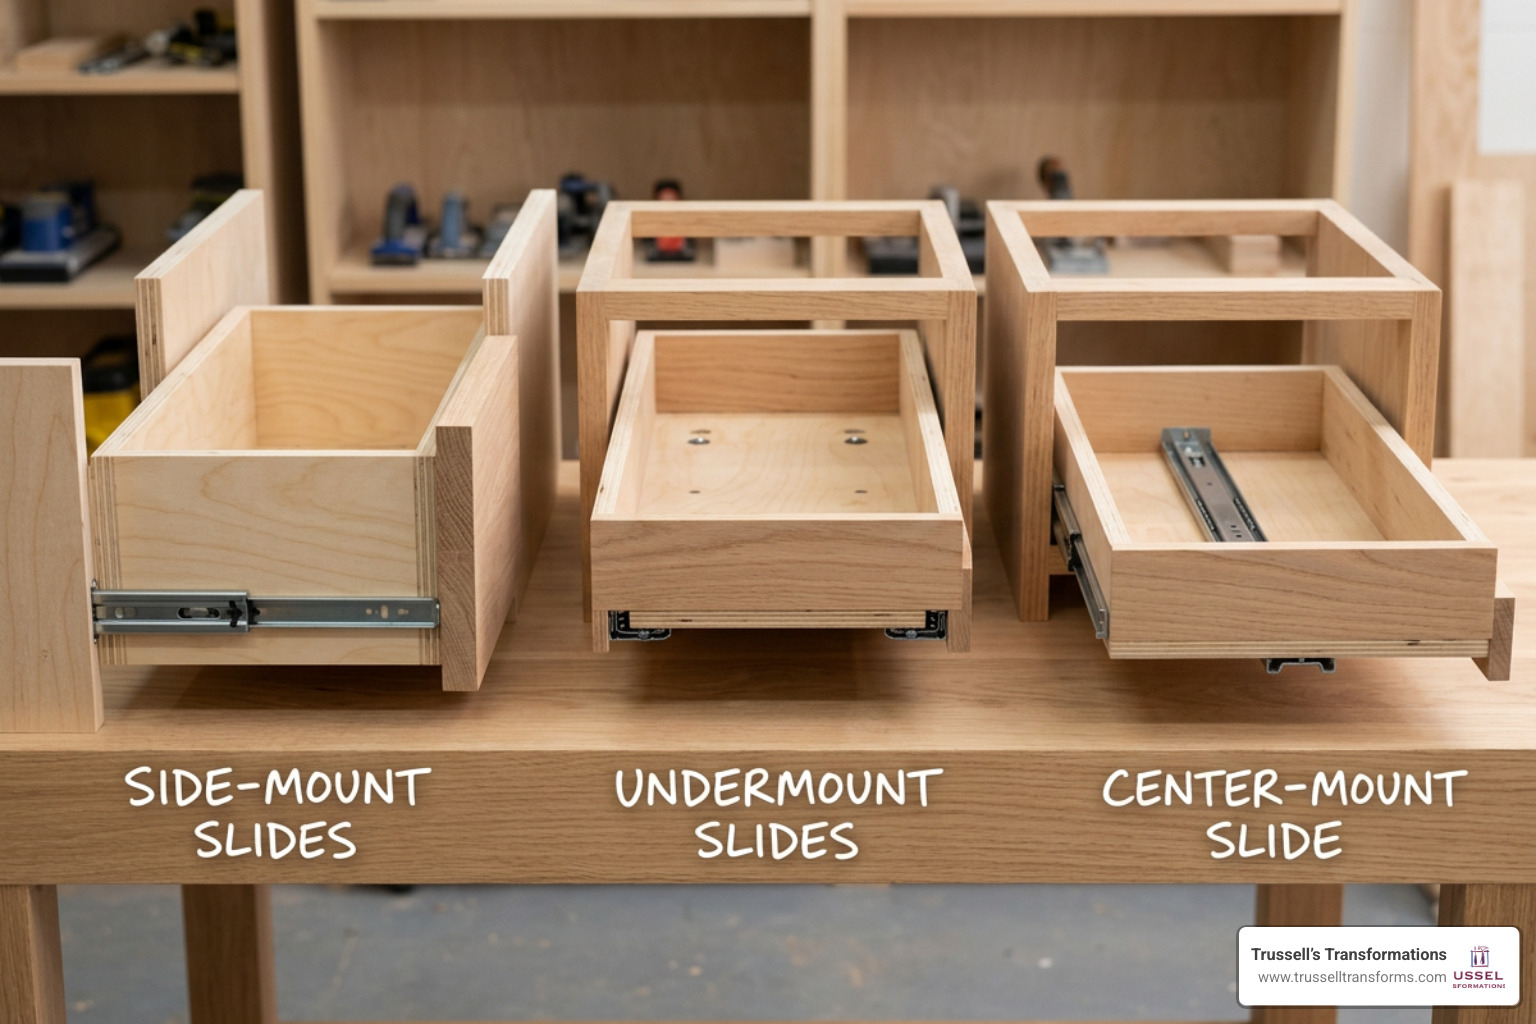
Side-Mount vs. Undermount and Center-Mount Slides
Each mounting style has distinct clearance rules, load ratings, and visual profiles. Let’s compare them directly:
| Feature | Side-Mount Slides | Undermount Slides | Center-Mount Slides |
|---|---|---|---|
| Clearance Required | 1/2 inch per side (1 inch total) | 3/8 inch to 1/2 inch total | Under 1/4 inch overall |
| Standard Load Rating | 75 to 100 lbs | 100 to 150 lbs | 35 to 50 lbs |
| Visibility | Fully visible when open | Completely hidden | Hidden underneath |
| Extension Options | 3/4, Full-Extension, Over-Travel | Full-Extension | 3/4 Extension |
| Relative Cost | Budget-friendly ($15–$40/pair) | Premium ($30–$80/pair) | Economical |
Side-mount slides are the absolute workhorses of the cabinetry world. They attach to the outer sides of the drawer box and the inner walls of the cabinet. They are highly tolerant of slight construction discrepancies, making them a beginner-friendly option. Most side-mounts feature heavy-duty ball-bearing tracks that deliver incredibly smooth, linear travel.
Undermount slides (like the industry-standard Blum TANDEM system) are the premium choice for high-end kitchens. Because they attach underneath the drawer box, they are completely invisible when the drawer is open. This allows the beautiful joinery of your drawer box—like half-blind dovetails—to take center stage. They also offer unmatched stability and support up to 100 lb loads (or more for heavy-duty variants) while incorporating integrated soft-close dampening. If you are curious about upgrading your kitchen’s usability, you can research how much do soft-close drawers cost to install to see how they fit your budget.
Center-mount slides are an older style, consisting of a single track running down the center-bottom of the drawer. They are generally reserved for light-duty furniture applications and lack the weight capacity or smooth action of modern ball-bearing systems.
Sizing and Calculating Drawer Box Dimensions
The golden rule of building drawers is that the slide dictates the box size, not the other way around. If you build the box first without consulting your hardware specifications, you are setting yourself up for a very frustrating weekend.
For standard side-mount slides, you must leave exactly 1/2 inch of clearance on each side of the drawer box (1 inch total subtraction from the cabinet opening width).
- Formula: Drawer Box Width = Cabinet Opening Width – 1 inch
If you are building high-quality dovetail drawers, some manufacturers recommend a slightly tighter tolerance, subtracting exactly 1-1/16 inches from the cabinet opening width to ensure a frictionless glide. If you are building your own drawers, follow a detailed guide on how to build drawers to guarantee your math is perfect before cutting your wood.
For drawer height, aim to leave at least 1/2 inch of clearance at the bottom and 1/2 inch at the top of the rough opening. Drawer depth should match the slide length exactly. Slides are typically sold in even 2-inch increments (from 6 to 28 inches), with 20-inch and 22-inch slides being the standard for typical 24-inch-deep kitchen base cabinets.
The Step-by-Step Process of Attaching Drawer Slides

Now that you have selected your slides and built or purchased your drawer boxes to the exact required dimensions, it is time for the installation. Having the right tools on hand will save you time and prevent alignment headaches.
Essential Tools and Materials:
- Power drill and driver
- 1/16-inch self-centering hinge drill bit (Vix bit)
- 24-inch level or digital level
- Cabinet clamps
- Pencil and tape measure
- #6 x 5/8-inch pan-head wood screws
- A “story stick” or scrap wood spacers
Before dive-bombing into your cabinets with a drill, let’s look at the foundational steps. If you are tackling a larger kitchen upgrade, you might also ask yourself: can I install cabinets myself? If so, mastering slide installation is a critical part of that journey. Learn more about essential woodworking techniques for attaching slides to build your confidence.
Preparing the Cabinet and Drawer Box
First, verify that your cabinet box is completely square and free of “racking” (twisting). Measure diagonally from corner to corner across the front and back openings. If the diagonal measurements are equal, your cabinet is square. If they are off by more than 1/16 of an inch, you will need to shim or adjust the cabinet installation before mounting your slides.
Next, make sure your wood is acclimated. If you brought new Baltic birch plywood drawer boxes into a home in Bernalillo County during a dry spell, let them sit in the house for a week to stabilize.
When you are ready to mount the hardware, pre-drilling pilot holes is non-negotiable. Driving screws directly into hardwood or plywood with pre-drilled pilot holes ensures a clean, secure fit and prevents the wood grain from splitting, keeping your drawer box and cabinet walls perfectly intact. Use a 1/16-inch drill bit to drill pilot holes exactly 1/2 inch deep.
Attaching Drawer Slides to the Cabinet Walls
We always install the cabinet members (the outer, larger portion of the slide) first.
- Mark Your Lines: Decide where the bottom of your drawer will sit. Measure up from the cabinet floor and mark this height on both the left and right interior walls. Use a level to draw a straight, horizontal line across the entire depth of the cabinet wall.
- Use a Spacer (The Pro Shortcut): Instead of measuring and drawing lines for every single drawer, cut a piece of scrap plywood to act as a spacer block. Rest the spacer on the cabinet floor, place your slide on top of it, and clamp it in place. This guarantees that both the left and right slides sit at the exact same height.
- Set the Setback: For overlay drawers (where the drawer face sits on top of the cabinet frame), mount the slide so its front edge is set back exactly 1/16 inch from the front edge of the cabinet. For inset drawers (where the face sits flush inside the frame), set the slide back by the thickness of your drawer front plus 1/16 inch.
- Secure the Slide: Drive your first screw through the horizontal slotted hole near the front, and your second screw through the slotted hole near the back. Do not use the round permanent holes yet! The slotted holes allow you to slide the hardware forward or backward to fine-tune the alignment.
Attaching Drawer Slides to the Drawer Box
Now, let’s attach the drawer members (the inner profile of the slide) to the drawer box itself.
- Separate the Slide: Locate the small plastic disconnect lever on the slide. Push or lift the lever to separate the drawer member from the cabinet member.
- Position on the Box: Place the drawer member flat against the side of your drawer box. For most standard installations, the slide should run parallel to the bottom edge of the box, positioned either dead-center or flush with the bottom.
- Check for Parallel: Measure from the top of the slide to the top edge of the drawer box at both the front and back. The measurements must be identical. If the slide is tilted even slightly, the drawer will bind when pushed into the cabinet.
- Pre-Drill and Screw: Use your self-centering hinge bit to drill pilot holes through the vertical slotted adjustment holes. Drive #6 x 5/8-inch pan-head screws into the slots.
Once both sides are secured, align the drawer members with the cabinet tracks and gently push the drawer into the cabinet until you hear them click together. Slide the drawer in and out a dozen times to check for smooth operation.
Aligning, Adjusting, and Mounting the Drawer Face
With your drawer box sliding smoothly, you are ready to install the drawer face (the decorative front panel). This is where the magic happens. Achieving uniform gaps—known as “reveals”—around all four sides of the drawer face is what separates a professional cabinet installation from a rushed DIY job.
If you are working with high-quality cabinets, you can read about perfect reveals with mechanical drawer slides to see how professional makers achieve seamless lines. For general cabinetry rules, check out our guide on proper cabinet installation.
Achieving Perfect Reveals and Alignment
Whether you have overlay or inset drawers, you want a consistent 3/32-inch or 1/8-inch gap around the perimeter of every drawer front.
An easy way to do this is by using spacer blocks or plastic shims. If you are installing a bank of multiple drawers, always start from the bottom drawer and work your way up. This allows you to stack spacers on top of the lower drawer front to perfectly support the next one as you attach it.
Installing and Adjusting the Drawer Front
The easiest way to mount a drawer front without losing your alignment is by using double-sided woodworking tape.
- Apply Tape: Stick two small pieces of heavy-duty double-sided tape to the front face of your installed drawer box.
- Position the Front: Place your spacer shims on the cabinet frame or the drawer below. Carefully align the drawer front, checking the reveals on all sides. Once it is perfectly positioned, press it firmly against the drawer box so the tape grips.
- Secure Temporarily: Gently pull the drawer open. Because the tape only holds temporarily, clamp the drawer front to the box to ensure it doesn’t shift.
- Drive Permanent Screws: From the inside of the drawer box, drill two pilot holes through the front of the drawer box and into the backside of the drawer front. Be extremely careful not to drill all the way through your beautiful finished drawer face! Drive 1-1/4 inch drawer front screws through the box to lock the face in place.
If you want an even easier adjustment method, use mechanical drawer-front adjusters. These small plastic disks sit in 20mm holes drilled into the back of the drawer front. They allow you to loosen the mounting screws slightly and shift the drawer front up, down, left, or right by up to 3/16 of an inch to dial in a perfect reveal before tightening everything down.
Frequently Asked Questions about Drawer Slides
What is the standard clearance needed for attaching drawer slides?
For standard ball-bearing side-mount slides, the universal standard clearance is 1/2 inch on each side of the drawer box, requiring a total of 1 inch of clearance inside the cabinet opening. Undermount slides generally require less side clearance but demand specific vertical clearance beneath the drawer box (usually 1/2 inch from the bottom edge of the drawer side to the bottom of the drawer box floor). Always consult your slide manufacturer’s spec sheet before building your drawer boxes.
Why is my drawer sticking or binding after attaching drawer slides?
If your drawer is sticking, binding, or making grinding noises, it is almost always due to one of three issues:
- Out of Square: The cabinet walls or the drawer box itself are racked, causing the slides to pinch at certain points of travel.
- Clearance Discrepancies: If your drawer box is even 1/16 of an inch too wide, it will compress the ball bearings and cause binding. If it is too narrow, the slides won’t engage smoothly.
- Protruding Screws: If your mounting screws are not driven perfectly flush, the screw heads will catch on the intermediate slide member as the drawer glides past.
How do I choose between ball-bearing and roller slides?
Always choose ball-bearing slides for kitchen cabinets, heavy-duty storage, and high-use areas. They offer significantly higher load capacities, full-extension travel (allowing you to access the very back of the drawer), and smoother, quieter operation. Roller slides (which use plastic wheels riding on epoxy-coated metal tracks) are cheaper but are limited to 3/4 extension, have lower weight capacities, and offer a shorter operational lifespan compared to durable ball-bearing options.
Conclusion
Getting drawer slides perfectly aligned, level, and gliding smoothly requires patience, precise math, and a steady hand. While it is a rewarding DIY project, achieving those flawless, uniform reveals across an entire kitchen of custom cabinetry can be incredibly time-consuming.
If you would rather skip the math and enjoy a flawless, professional result, our team at Trussell’s Transformations is here to help. With over 25 years of home renovation experience in Albuquerque, Rio Rancho, and Bernalillo County, we are a true one-stop shop.
Come visit our Edith Blvd showroom to explore our premium cabinet selections from industry leaders like Durasupreme Cabinetry, Waypoint Living Spaces, Sollid Cabinetry, and Kitchen Cabinet Distributors. We also offer gorgeous countertop options from Caesarstone, Cambria, Silestone, and The Stone Collection to complete your dream kitchen. Whether you want to purchase high-quality materials for your own DIY build or hire our licensed contractors for a professional, worry-free installation with 0% financing options, we have you covered.
Ready to transform your home? Explore our professional cabinet services or contact us today to schedule your consultation!
Recent Comments