

Cabinet Hardware Installation: A Quick Path to a Finished Look
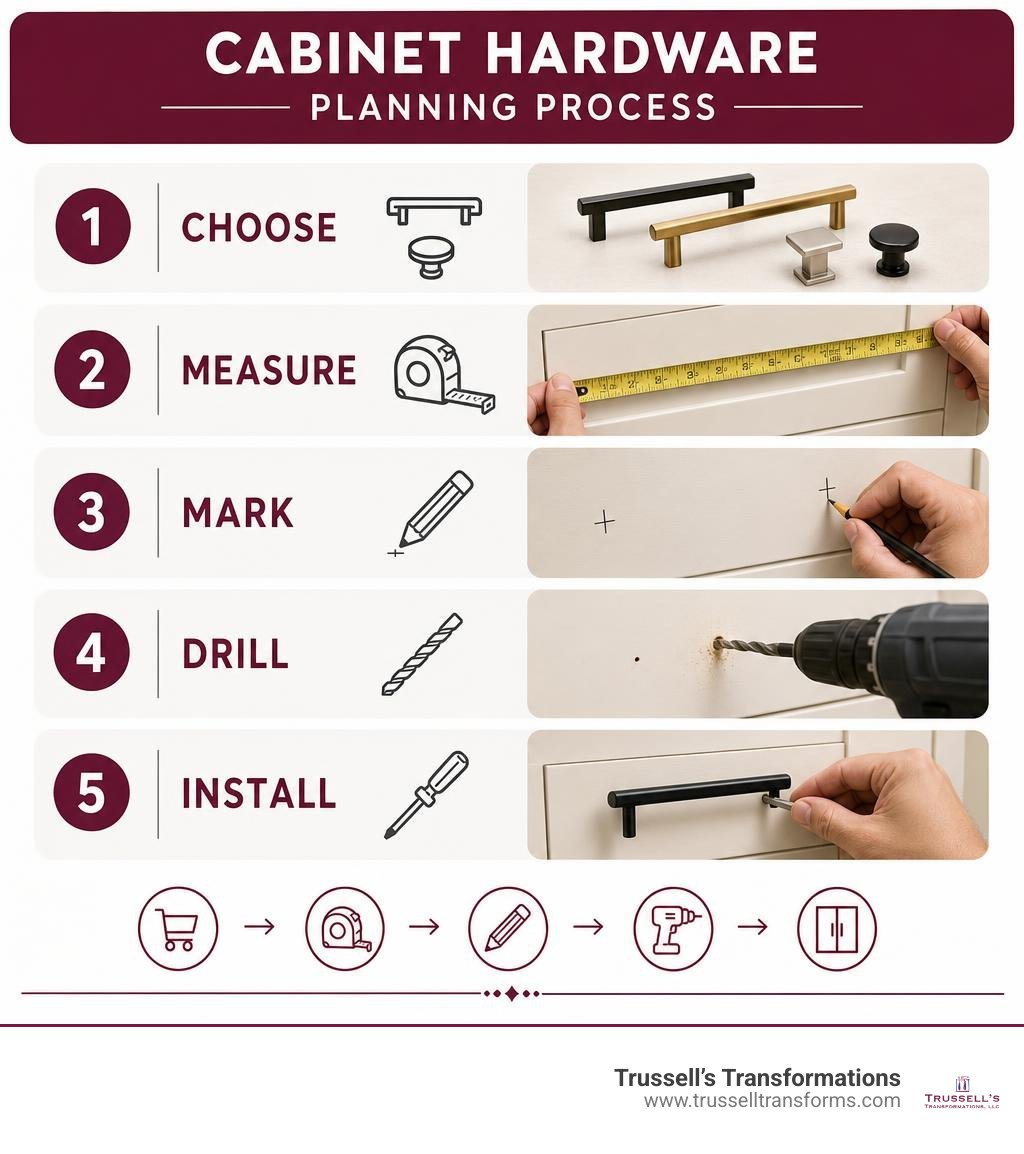
Cabinet hardware installation is a small upgrade that can make kitchen or bathroom cabinets feel more polished and easier to use. The basic process is simple: choose hardware that fits the cabinet style, mark consistent locations, drill clean holes, and fasten each knob or pull by hand.
For a quick, professional-looking result:
- Choose knobs, pulls, or a mix that fits your cabinet doors and drawers.
- Measure each pull’s screw spacing from center to center before drilling.
- Use a template or jig so every piece lands in the same position.
- Drill carefully with the correct bit size for the mounting screws.
- Tighten hardware by hand, then check that doors and drawers open freely.
The details matter. A pull that is even slightly off can stand out across a full cabinet run. Careful planning helps new hardware complement shaker, slab, or raised-panel cabinets while bringing a fresh finish to the room.
For Albuquerque homeowners investing in a kitchen or bathroom update, precise installation is also a smart place to bring in an experienced, licensed remodeling professional when the project includes new cabinetry, countertops, or other coordinated work.
Essential Tools and Planning for DIY Cabinet Hardware Installation
Before diving into drilling holes into your unboxed cabinet doors, gathering the right setup saves immense time and prevents layout errors. Performing a successful cabinet hardware installation comes down to basic measuring tools, accurate drill bits, and secure fasteners.
Here is the essential kit we recommend having on hand:
- Tape Measure & Combination Square: Essential for finding exact drawer centers and calculating stile margins.
- 3/16-Inch High-Speed or Brad-Point Drill Bit: Standard 8-32 machine screws require a 3/16-inch hole so threads slide through smoothly without binding or forcing the cabinet wood.
- Low-Tack Painter’s Tape: Placed over drill sites to safeguard fine painted or stained surfaces for a clean drill entry.
- Manual Screwdriver: A standard Phillips head screwdriver lets you feel when a fastener is seated without over-tightening.
- Blue Loctite (Thread Locker): Applied to the screw tips so knobs and pulls stay firmly anchored over years of daily handling without needing lock washers.
- Cabinet Hardware Jig or Template: Ensures every hole is identically positioned across dozens of doors and drawers.

Understanding center-to-center spacing is vital when choosing decorative handles. While single-screw knobs only require one hole, pulls rely on two mounting holes spaced at a specific distance apart. Common imperial center-to-center measurements include 2-1/2 inches, 3 inches, 3-3/4 inches, 4 inches, 5 inches, and 6-1/4 inches. Metric spacings—such as 96mm, 128mm, and 160mm—are also standard across modern designs. Standard 3/4-inch-thick cabinet doors use 1-inch-long 8-32 machine screws, while 5/4-inch drawer fronts with interior drawer boxes usually require 1-1/2-inch to 1-3/4-inch long screws to clear both layers.
Choosing Between Knobs and Pulls for Cabinet Hardware Installation
Selecting hardware for your space involves balancing visual aesthetics with functional ergonomics. Knobs offer a compact, classic look anchored by a single screw, making them intuitive for upper cabinet doors. Pulls provide a broader gripping surface secured by two screws, which offers improved leverage for heavy lower drawers.
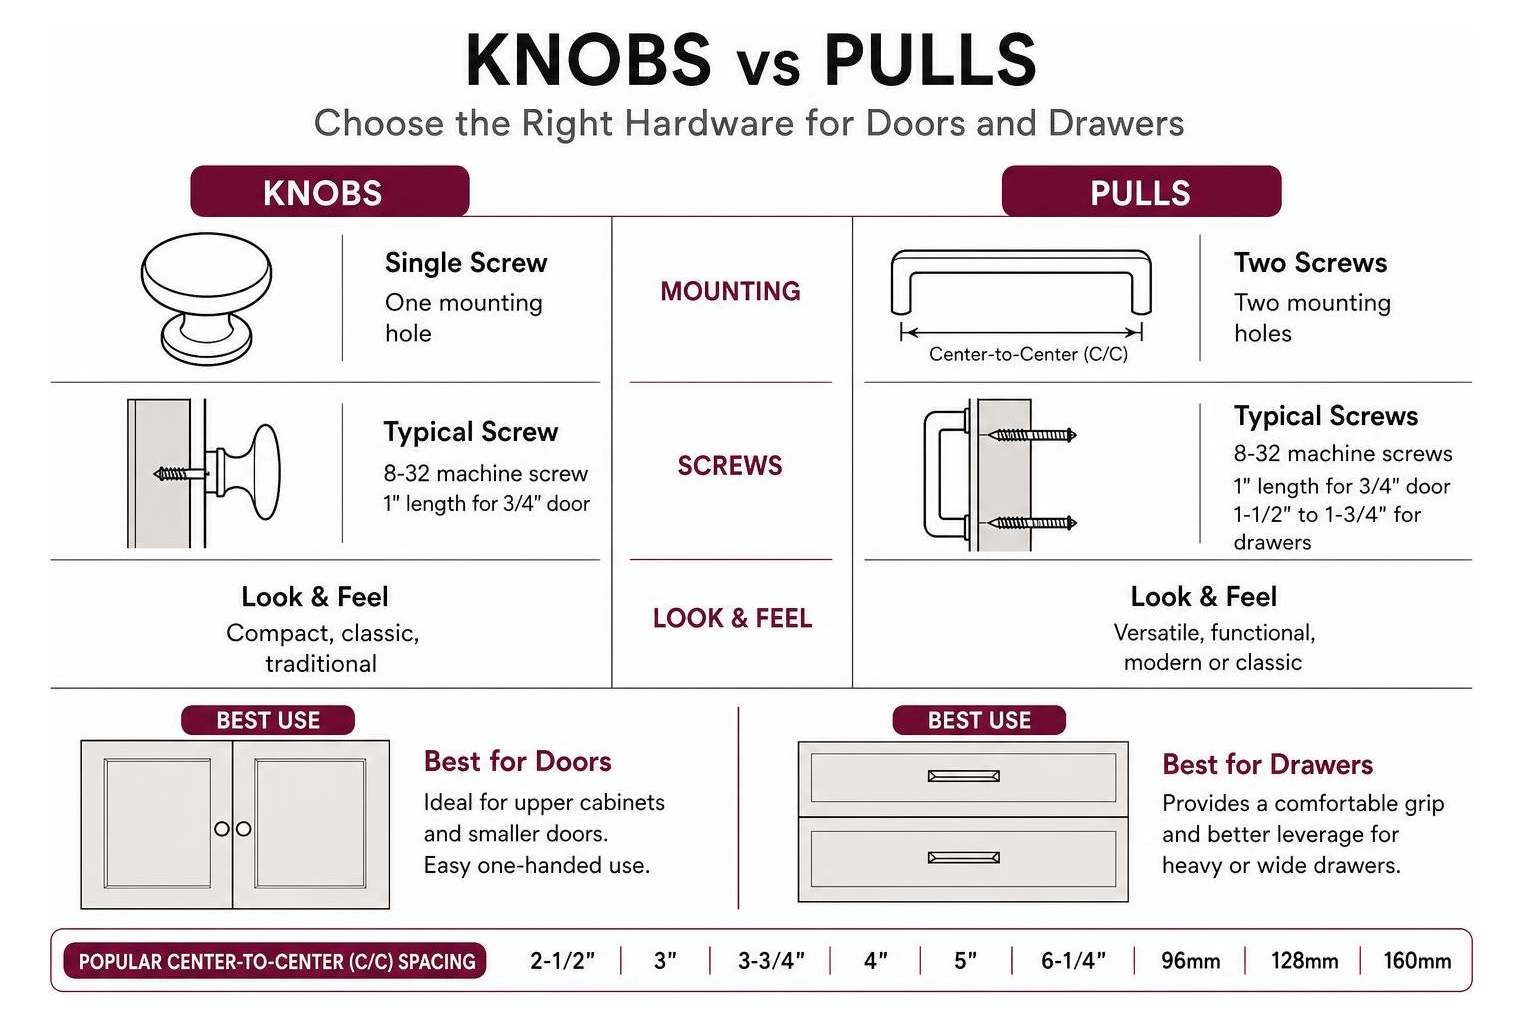
When establishing your design concept, consider these functional guidelines:
- Knobs on Doors, Pulls on Drawers: A timeless combination that maintains visual balance across standard kitchen layouts.
- All Pulls for Modern Aesthetics: Using linear handles across both doors and drawers highlights clean horizontal and vertical lines in contemporary homes.
- Hardware Finish Coordination: Align finish selections (such as matte black, brushed brass, or polished nickel) with nearby fixtures like faucets and lighting for a cohesive room design.
To dive deeper into matching hardware profiles with room design, read our full article Get a Grip: The Ultimate Guide to Adding Knobs and Handles to Your Cabinets.
Using Templates and Jigs for Precision Cabinet Hardware Installation
Attempting to measure, mark, and align hardware individually on 30 different cabinet doors without a guide is a recipe for visual misalignment. Investing in a simple mounting template or an adjustable hardware jig ensures identical positioning across your entire layout.
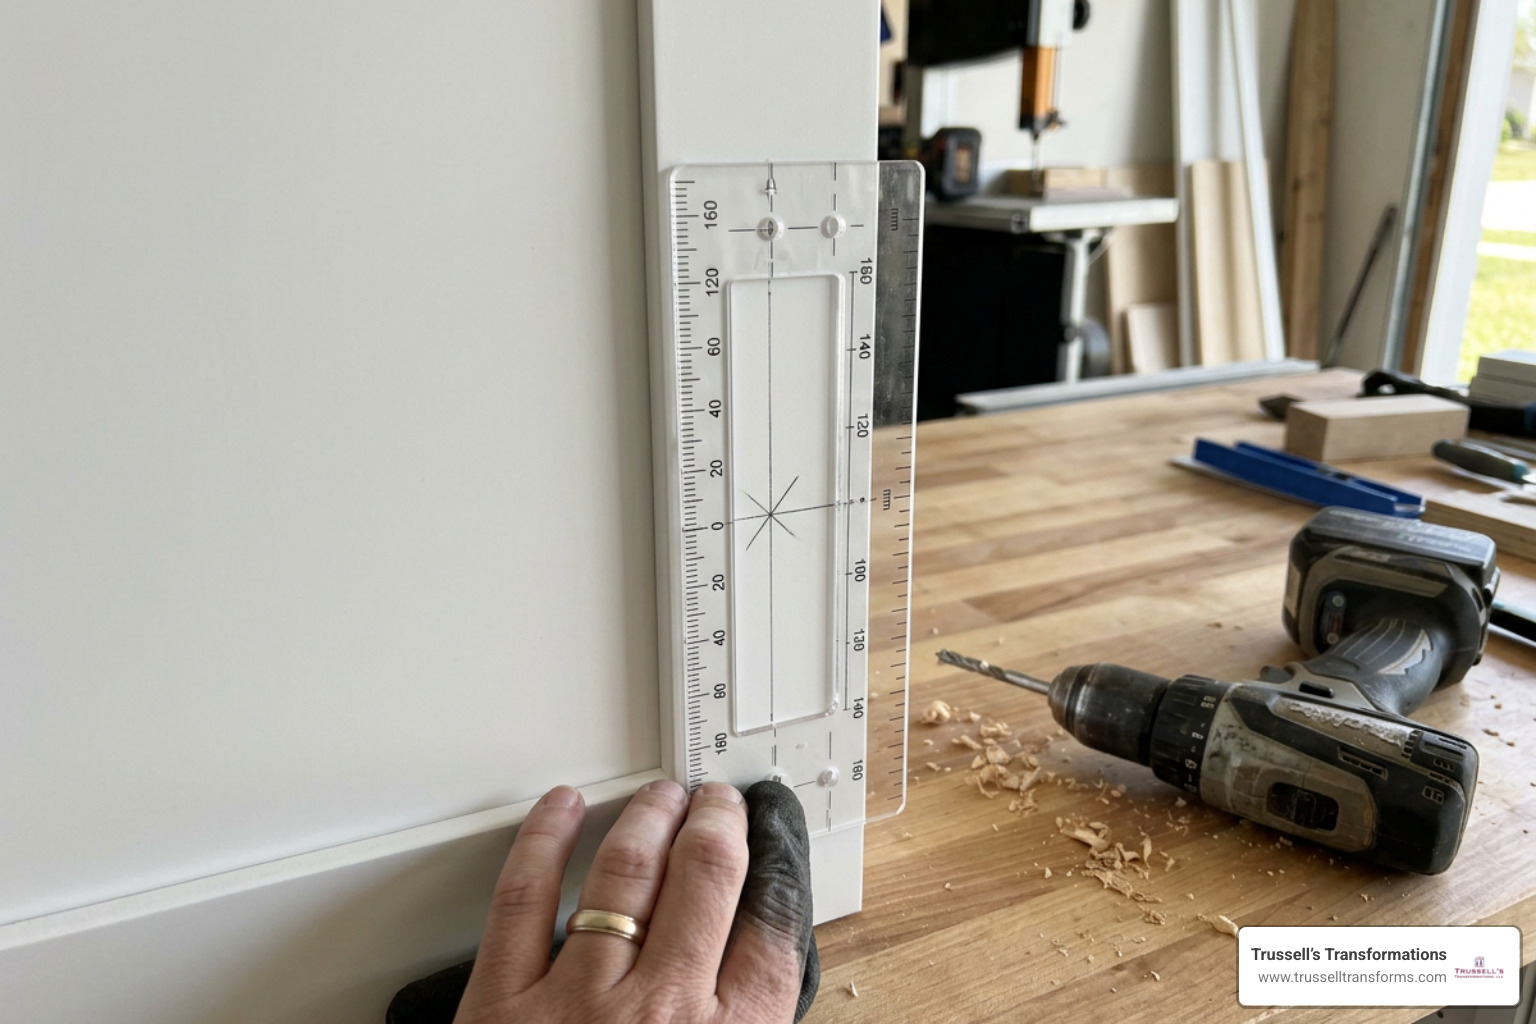
Budget-friendly plastic templates—such as the MeasurePro Cabinet Hardware Template Kit (priced around $9.89 with a 4.5 out of 5 rating across nearly 4,000 user reviews)—feature clear plastic bodies with pre-punched holes for standard imperial and metric spacings. Clear, smoky-colored plastic helps you visually align marked reference points underneath the template before marking drill spots.
For contractors and dedicated home improvers, specialized aluminum jigs offer built-in drill guides and sliding edge stops. Professional tool systems like the True Position Tools Cabinet Hardware Jig line range from standard models ($199, rated 4.87/5 from 627 reviews) to PRO ($249) and PRO MAX ($299) editions. These metal jigs incorporate hardened steel bushings, peephole centerlines, and integrated drill stop collars that enforce identical hole spacing without measuring every piece by hand.
If you are planning your drilling layout, review our step-by-step guide on How to Place and Install Cabinet Hardware Without Making Extra Holes. Additional industry insights can also be found in How To Install Cabinet Hardware – This Old House .
Placement Guidelines Across Shaker, Slab, and Raised Panel Cabinets
Cabinet door profiles dictate where hardware looks most visually balanced. Placing a pull too far into a recessed panel breaks the door’s symmetry, while positioning it too close to the outer edge makes the frame look cluttered.
| Cabinet Style | Upper Door Placement | Base Door Placement | Drawer Front Placement |
|---|---|---|---|
| Shaker | Centered on vertical stile, aligned with top edge of bottom rail | Centered on vertical stile, aligned with bottom edge of top rail | Centered in middle recessed panel (or top-third on deep drawers) |
| Slab | 1 to 2 inches from side edge; 2 to 3 inches from bottom corner | 1 to 2 inches from side edge; 2 to 3 inches from top corner | Dead center horizontally and vertically across drawer face |
| Raised Panel | Centered on outer vertical stile, 2 to 3 inches from bottom rail corner | Centered on outer vertical stile, 2 to 3 inches from top rail corner | Centered on flat top rail strip or centered across main panel |
Door Hardware Positioning
On cabinet doors, decorative hardware should always be positioned on the vertical frame piece (stile) located on the side opposite the hinges.
For standard wall-mounted upper cabinets, knobs and pulls are typically positioned so their lower edge aligns flush with the top edge of the door’s bottom horizontal rail. On base cabinets, hardware aligns with the bottom edge of the top rail.
Vertical pull orientation is standard for cabinet doors because it mirrors the natural up-and-down motion used to swing open a hinges-bound door. As highlighted in standard woodworking guides like the Family Handyman Hardware Installation Guide, maintaining a consistent offset—typically 1 to 4 inches from the upper or lower corner along the stile centerline—creates clean visual continuity throughout the kitchen.
Drawer Hardware Positioning
Drawer pulls are installed horizontally to complement the pulling motion required to slide a drawer open. For standard drawers under 24 inches wide, center the hardware both horizontally and vertically across the drawer face.
When dealing with wider or deeper drawer fronts, follow these proportional guidelines:
- Drawers Under 24 Inches Wide: Use a single knob or centered pull that spans roughly 1/3 of the total drawer width.
- Drawers 24 Inches and Wider: Apply the “rule of thirds.” Divide the total drawer face into three equal horizontal segments and place two separate knobs or pulls centered within the outer left and right thirds. Alternatively, select a single long appliance pull that spans 1/3 to 2/3 of the drawer width.
- Deep Drawers (Over 12 Inches Tall): Placing hardware in the geometric center of tall lower drawers forces you to reach uncomfortably low. Instead, offset hardware toward the upper third of deep drawer faces for more natural reach.
For more technical layout standards on framed cabinet configurations, consult the official Cabinetry Installation Guide.
The 5-Step Cabinet Hardware Installation Method
Executing a clean cabinet hardware installation comes down to five methodical steps. Taking your time during measurement and setup guarantees smooth drilling with optimal results.
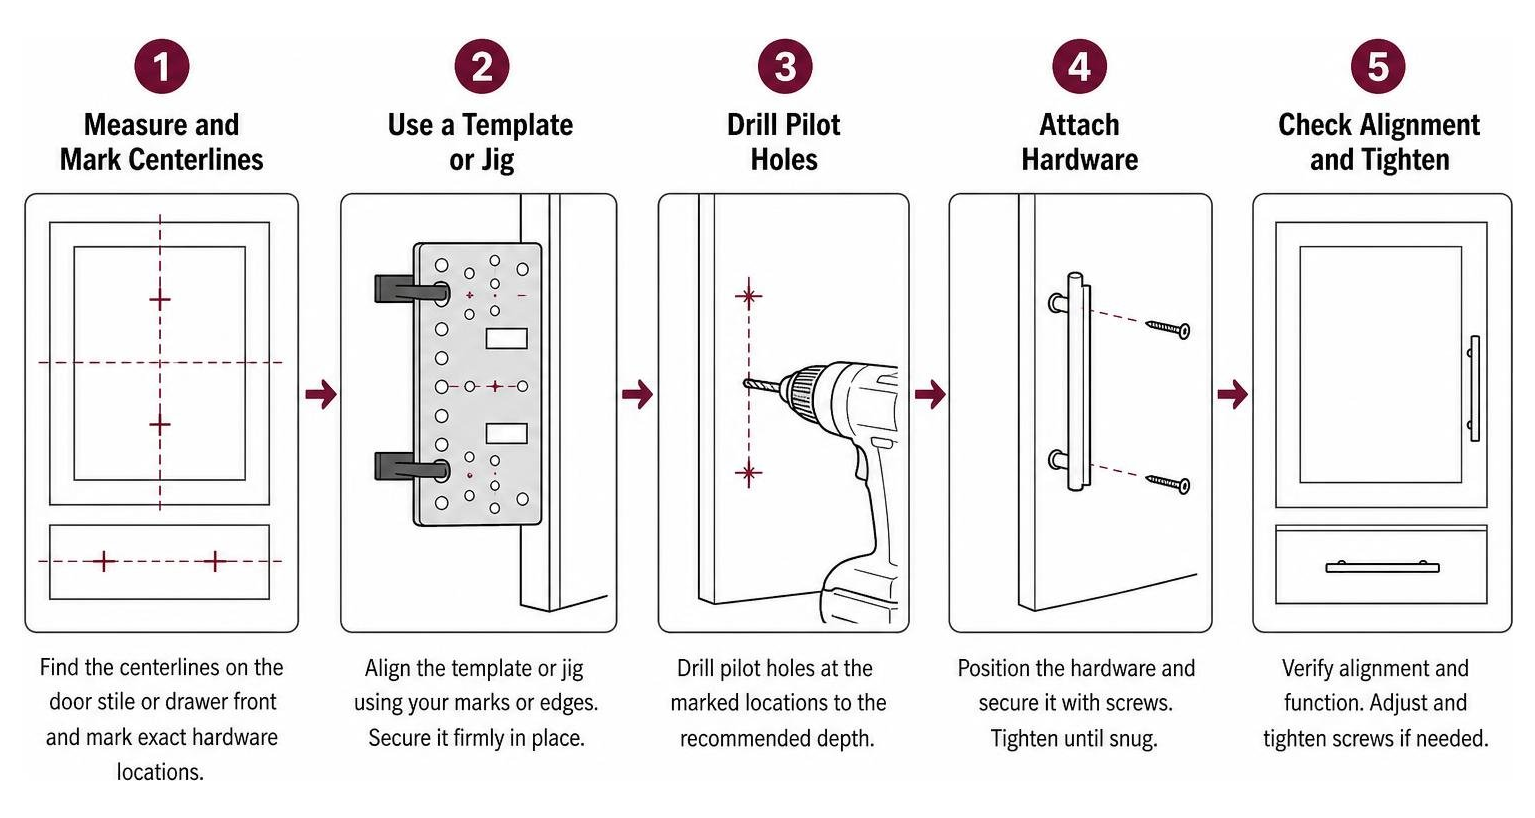
Step 1: Measure and Mark Centerlines
Begin by measuring your cabinet door stiles or drawer fronts with a combination square to locate exact centerlines. If installing a pull with a 128mm (approx. 5-1/16 inch) center-to-center spacing on a drawer front, locate the geometric center point of the drawer face first. Measure half the total spacing distance out to the left and right along a level horizontal reference line to mark your two drill centers.
When installing hardware across multiple identical doors, avoid measuring every door from scratch. Configure your plastic template or aluminum hardware jig with built-in stop blocks set to your target offset. Test the alignment by placing the jig flush against the corner of a door edge to confirm the marked drill points land on your intended centerlines.
Step 2: Set Up Front and Rear Blowout Protection
Using proper technique when drilling into finished wood or lacquered MDF ensures crisp edges as the drill bit enters and exits.
To achieve a pristine finish:
- Apply low-tack painter’s tape directly over the planned drill zone on the front face of the cabinet door.
- Re-mark your drill center point directly onto the painter’s tape surface.
- Hold a scrap wooden backer block firmly against the rear face of the cabinet door, directly behind where the drill bit will exit.
Pressing a sacrificial piece of solid wood tightly against the back side supports the wood fibers as the bit punches through, ensuring smooth, clean exit holes on the inside of your cabinet doors.
Step 3: Drill Holes Straight and Clean
Insert a sharp 3/16-inch brad-point drill bit into your power drill. Brad-point bits feature a small center tip that embeds into the wood before the cutting flutes engage, preventing the drill bit from walking across the surface.
Hold the drill perpendicular (at a strict 90-degree right angle) to the face of the cabinet door. Keep steady, moderate pressure on the drill as it passes through the door face into the wooden backer block behind it. Never force or lean heavy weight onto the drill, ensuring steady control throughout.
Step 4: Secure Fasteners with Thread Locker
Remove the painter’s tape from the front face and clean away wood dust around the hole. Select the appropriate length 8-32 machine screws for your assembly.
Before inserting the screw from the back of the cabinet door, place a tiny drop of blue Loctite (thread locker) onto the tip of the screw threads. Blue thread locker creates a resilient semi-permanent bond that prevents hardware handles from loosening or spinning from daily use, eliminating the need for metallic lock washers against interior cabinet surfaces.
Step 5: Hand-Tighten and Test Alignment
Push the mounting screw through the back of the drilled hole and engage the threads into your decorative pull or knob by hand.
Use a manual screwdriver to finish tightening the screw from behind while holding the hardware still on the front face. Never use a power drill or impact driver to tighten hardware screws. Power drivers spin with excessive torque that can strip machine threads or snap screw heads.
Once tightened, check that the hardware sits level and flush against the cabinet face. Open and close the cabinet door to ensure the handle does not rub against adjoining door frames, appliance panels, or wall casings. For additional tips on professional project execution, review the Donizo Pro Hardware Guide.
Post-Installation Adjustments and Care Guidelines
Even when holes are drilled cleanly, cabinet doors can sometimes appear slightly misaligned across long cabinet runs. This visual discrepancy is usually caused by natural variations in wall plumbness or hinge seating rather than misdrilled hardware holes.
Modern cabinetry utilizes 6-way adjustable concealed European hinges that allow micro-adjustments in three dimensions. If doors sit unevenly after your cabinet hardware installation, adjust the built-in hinge screws using a screwdriver:
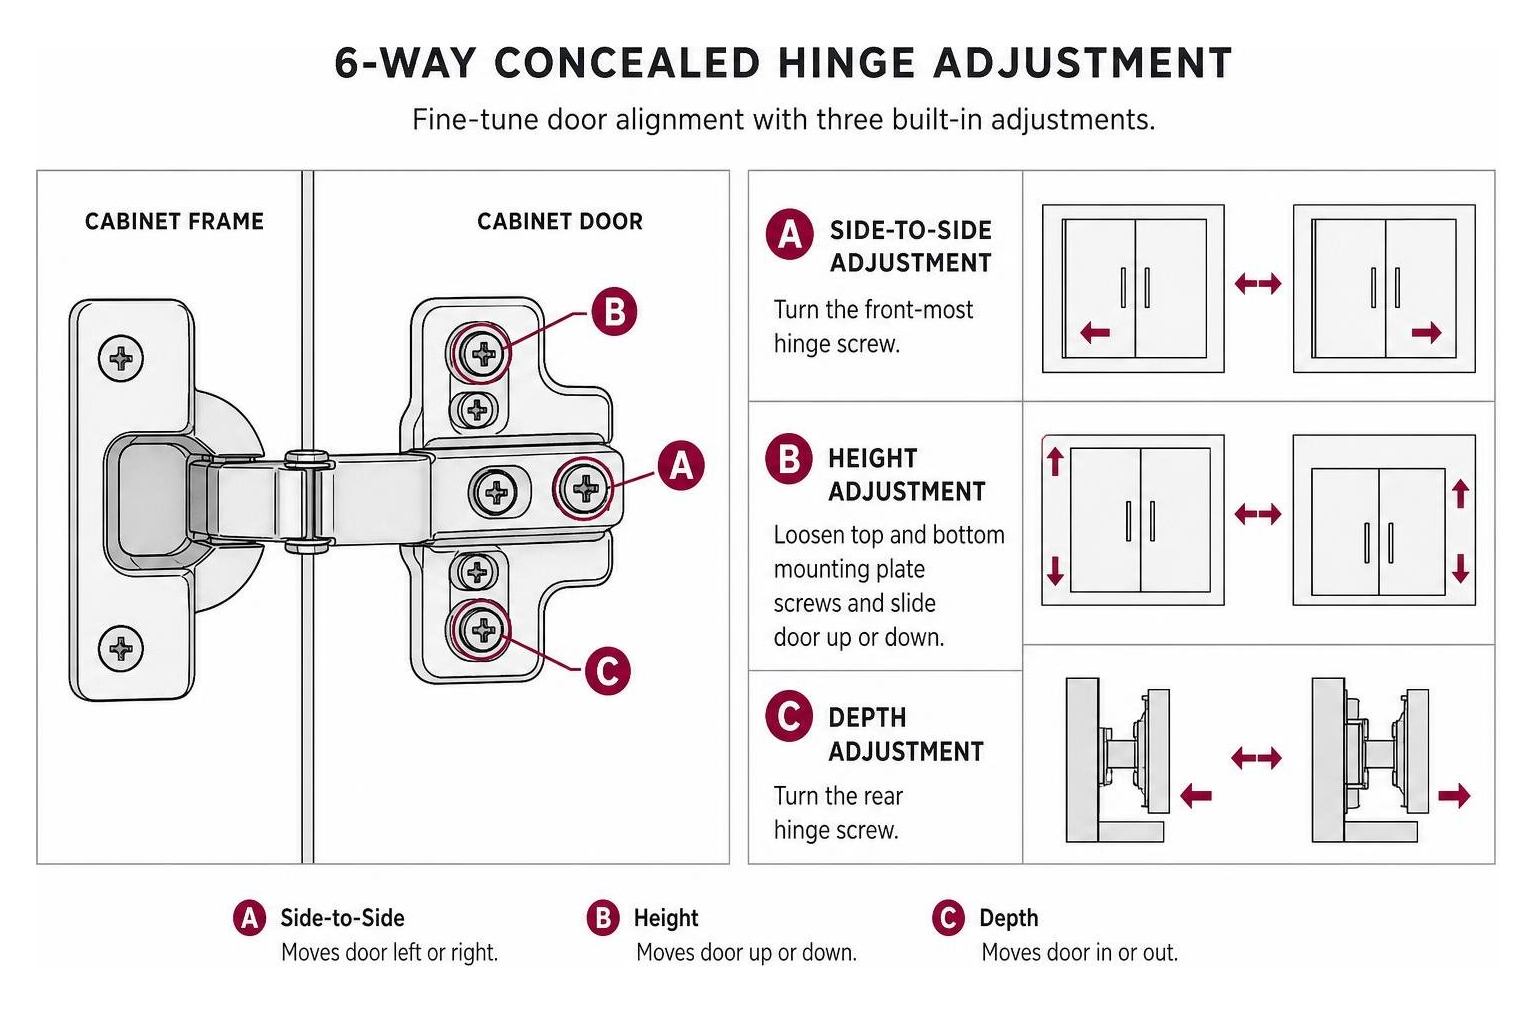
- Side-to-Side Adjustment (Screw A): Turning the front-most hinge screw moves the door left or right, shifting the reveal gap between adjacent doors.
- Height Adjustment (Screw B): Loosening the top and bottom mounting plate screws allows the door to slide vertically up or down for top-edge alignment.
- Depth Adjustment (Screw C): Turning the rear hinge screw moves the door closer to or farther away from the cabinet box frame, ensuring flush closure.
Similarly, undermount concealed drawer glides feature bottom lever cams that allow you to raise or shift drawer faces up to 1/8 inch for consistent gaps.
When maintaining your newly installed cabinet knobs and pulls, clean them regularly using a soft cloth dampened with warm water and mild dish soap. Avoid chemical glass sprays or abrasive pads to preserve the factory-applied protective clear coats on decorative metal finishes.
For deeper insights into proper door alignment and cabinet box levelling, consult our resource on Proper Cabinet Installation: 3 Things You Need to Know as well as the manufacturer Bathroom Cabinet Installation & Care Guide.
Professional Installation Options vs. DIY Savings
While installing hardware on a single vanity door is an accessible DIY afternoon project, installing handles across an entire kitchen renovation involving dozens of custom doors requires time and precision.
Homeowners evaluating project options can choose between self-installation and hiring professional installers:
Third-party installation pricing models—such as the services detailed on the Pulls Plus Hardware Installation Service page—typically charge per-piece rates starting around $7.00 per installed knob or handle. Retail programs like The Home Depot Pro Referral Service also connect homeowners with local licensed trade pros for broader installations.
When planning a full kitchen update in Albuquerque, Rio Rancho, or Bernalillo County, hardware installation is usually part of a broader vision that includes custom cabinetry, quartz or granite countertops, and updated flooring.
Investing in a paid professional remodeling estimate is an essential first step for larger projects. Paying for a comprehensive estimate ensures you receive 3D design renderings, detailed line-item planning, and exact material quotes. This thorough planning process minimizes unexpected jobsite delays, eliminates ordering mistakes, and delivers significant long-term savings by ensuring every element—from base cabinet boxes to decorative pulls—is installed accurately the first time.
When selecting cabinetry for your home renovation, we highlight leading manufacturer lines in our showroom, including:
- Durasupreme Cabinetry: Premium custom and semi-custom framed and frameless cabinetry.
- Waypoint Living Spaces: Durable, classic door styles built for everyday living.
- Sollid Cabinetry: High-quality solid wood construction with modern finish options.
- Kitchen Cabinet Distributors: Affordable, stylish cabinetry lines for fast turnaround projects.
To complete your space, pair your cabinetry with premium stone countertop surfaces that outperform traditional laminate:
- Quartz Countertops: Engineered stone options like Caesarstone, Cambria, and Silestone offer non-porous surfaces with exceptional durability and hygienic benefits without needing routine sealing.
- Granite Countertops: Natural stone options from The Stone Collection provide unique visual depth, high heat resistance, and long-lasting durability that elevate home value far beyond old laminate surfaces.
If you are evaluating contractors for your upcoming kitchen or bath upgrade, review our essential guide on 5 Questions to Ask Before Hiring Cabinet Installers. For official manufacturer guidelines on cabinet rail hanging specs, review the Allen & Roth Cabinet Installation Guide.
Frequently Asked Questions About Cabinet Hardware Installation
What drill bit size is standard for cabinet hardware installation?
A 3/16-inch drill bit is the standard industry size used for standard cabinet hardware installation. Standard cabinet knobs and pulls use 8-32 machine screws, which measure slightly less than 3/16 inch in diameter. Drilling a 3/16-inch hole allows the screw to slide smoothly through the cabinet door or drawer front without binding, while keeping the hole narrow enough for screw heads and decorative post bases to cover cleanly.
How do you place hardware on wide or deep drawers?
For drawers 24 inches wide or larger, apply the rule of thirds: divide the drawer width into three equal segments and place two separate handles centered within the left and right outer thirds. Alternatively, install a single long pull that covers 1/3 to 2/3 of the total drawer width. For deep drawers taller than 12 inches, offset hardware position into the top third of the drawer face rather than dead center for more comfortable ergonomics.
How do you achieve clean holes when drilling cabinet doors?
To ensure clean drill entry and exit, place low-tack painter’s tape over the drill site on the front face of the door. When drilling, hold a solid wood backer block tightly against the rear exit face of the door. Use a sharp 3/16-inch brad-point drill bit and maintain steady right-angle pressure without forcing the bit through the wood.
Conclusion
Upgrading your home’s kitchen or bathroom with a fresh cabinet hardware installation brings both immediate style and functional ease to your space. By choosing hardware that complements your door profiles, taking time to set up precise templates, and following clean drilling techniques, you can achieve level results across every door and drawer front.
When your home improvement plans extend beyond hardware updates to encompass new cabinetry, luxury quartz or granite countertops, flooring, or full room transformations, working with experienced local professionals makes all the difference.
At Trussell’s Transformations, we are a full-service, licensed home renovation company serving homeowners across Albuquerque, Rio Rancho, and Bernalillo County from our showroom located at 8023 Edith Blvd NE, Albuquerque, NM 87113. With over 25 years of local remodeling experience, we provide a true one-stop-shop experience—offering expert professional installation alongside 0% financing options to bring your dream kitchen or bath to life.
Explore our full range of custom cabinet and countertop solutions by visiting our Services: Cabinets page, or contact our team today to schedule your design consultation!
Recent Comments