

Key Qualities to Look for in Floor Installation Contractors
Hiring a team to update your floors is one of the most rewarding steps in any home transformation. Whether you are refreshing a sunlit kitchen or curating a spa-like master bathroom, your new surfaces ground the entire design. When vetting professional floor installation contractors, verifying technical qualifications and operational standards protects your investment.
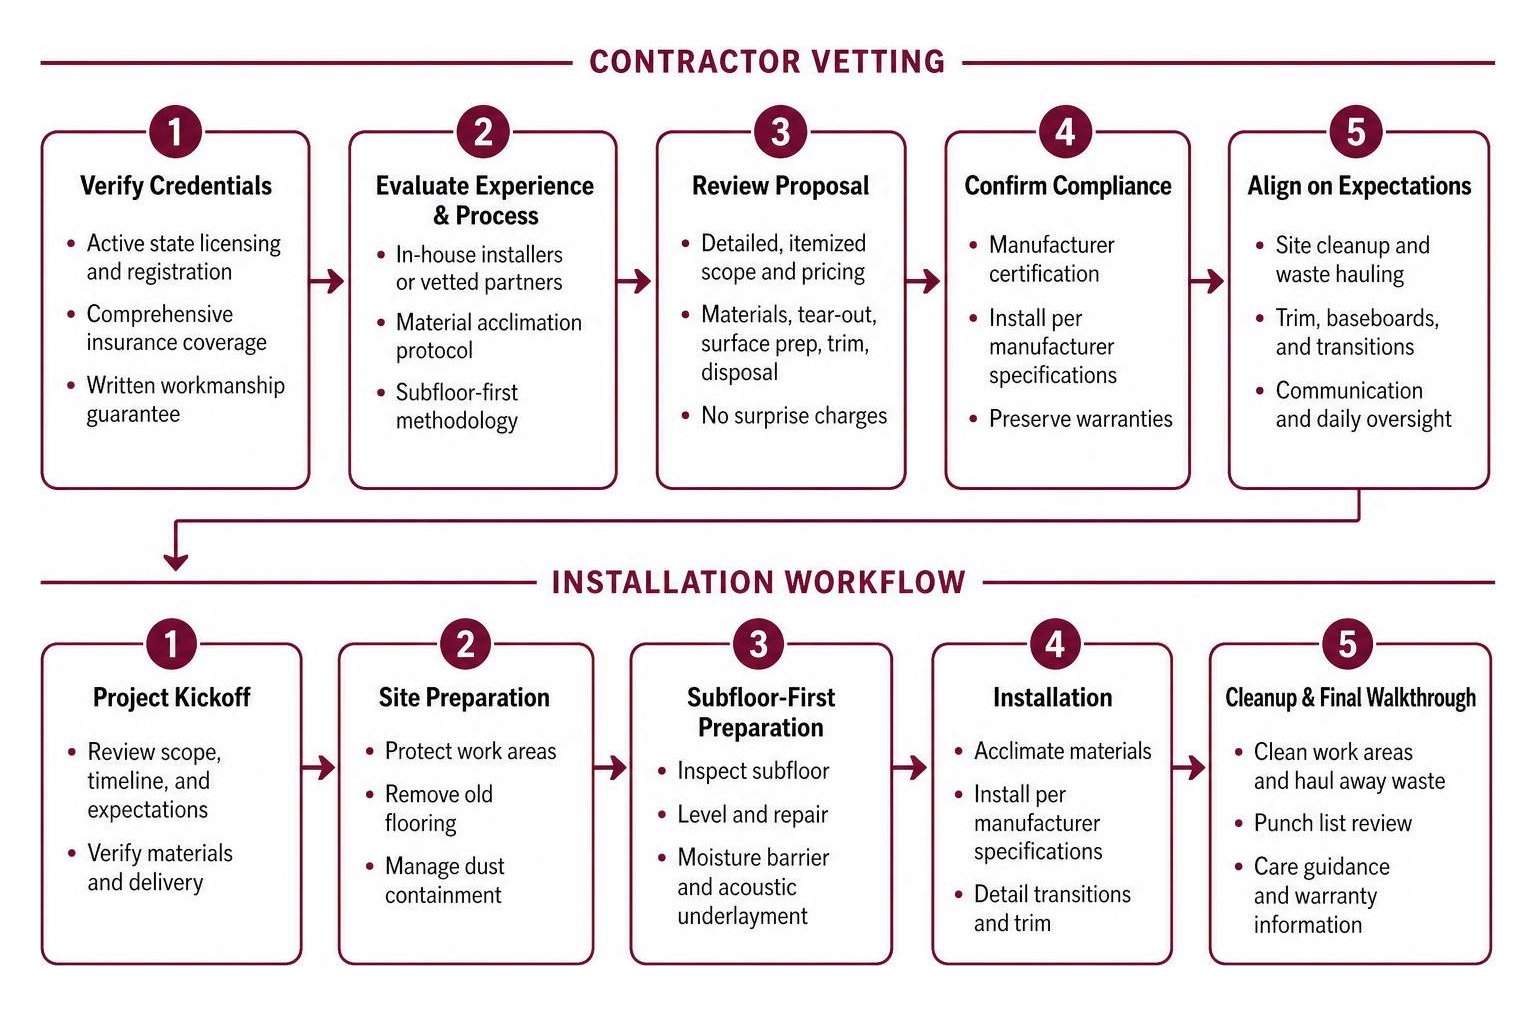
A dependable contractor demonstrates competency through upfront documentation, transparent communication, and comprehensive planning:
- Active State Licensing and Registration: Verifiable credentials ensure your installation complies with local building codes across Albuquerque, Rio Rancho, and Bernalillo County.
- Comprehensive Insurance Coverage: Active general liability and workers’ compensation policies protect your property and the installation crew throughout the project.
- Detailed, Itemized Proposals: Clear quotes separate material procurement, tear-out, surface prep, trim profiles, and disposal fees so you never face surprise charges.
- Subfloor-First Methodology: Experienced tradespeople prioritize structural leveling, moisture barrier placement, and acoustic underlayment before opening a single box of flooring.
- Manufacturer Certification and Compliance: True specialists install products according to strict manufacturer specifications, preserving your product warranties.
Verifying Licensing, Insurance, and Workmanship Guarantees
In New Mexico, residential specialty contracting requires verified licensing and bonding. Always ask for a contractor’s license number and verify it through the state licensing database. Active general liability insurance safeguards your home during construction, while workers’ compensation covers the crew on-site.
Beyond baseline insurance, reputable installers provide a written workmanship guarantee. While manufacturer warranties protect the materials themselves according to factory specifications, an independent labor guarantee—typically ranging from one to two years—ensures that every transition, perimeter expansion space, and finish detail adheres to the highest professional installation standards.
Questions to Ask Floor Installation Contractors Before Signing
Before finalizing an agreement, interview your prospective installer to evaluate their process:
- Who manages the daily installation crew? Verify whether the company employs dedicated in-house installers or utilizes vetted trade partners.
- What is the material acclimation protocol? Hardwood, laminate, and certain vinyl products require on-site temperature and humidity stabilization prior to installation.
- How are site cleanup and waste hauling managed? Confirm whether the estimate covers daily sweep-downs, dust containment, and complete hauling of old materials and scrap.
- How will existing trim, baseboards, and door casings be handled? Inquire whether the team removes and reinstalls baseboards or integrates coordinating quarter-round molding.
The Step-by-Step Subfloor-First Installation Standard
A flawless floor installation is only as good as the foundation beneath it. Skipping subfloor prep can cause floating planks to flex underfoot. Dedicated floor installation contractors treat subfloor preparation as the most critical stage of the installation process.

Moisture Testing and Subfloor Leveling Protocols
Concrete slabs and wooden joists react differently to seasonal shifts and atmospheric conditions. Even in arid climates, concrete slabs emit vapor that can affect adhesive performance and plank stability if unaddressed.
Professional installers execute calibrated diagnostic testing before laying down materials:
- Relative Humidity (RH) and Moisture Testing: In-situ probes and calcium chloride testing identify moisture emissions in concrete substrates, determining whether an epoxy moisture mitigation barrier or vapor retarder is required.
- Flatness Tolerances: Installers use a 10-foot straightedge to identify high spots and low dips. Most rigid floating floors and large-format porcelain tiles require a strict tolerance of no more than 3/16-inch variance over a 10-foot radius (or 1/8-inch over 6 feet).
- Subfloor Grinding and Self-Leveling Underlayments: High spots in concrete are mechanically ground down, while low areas receive high-strength, cementitious self-leveling compounds to establish a true, flat plane.
- Deflection Checks on Wood Subfloors: For natural stone and ceramic installations, installers verify that the subfloor meets standard L/360 or L/720 deflection criteria to prevent structural flexing.
Why Certified Floor Installation Contractors Deliver Superior Value
Investing in professional installation safeguards your home’s architectural continuity. Experienced specialists coordinate transitions between disparate surfaces—such as bringing thick hardwood flush with sleek bathroom tile—eliminating awkward step-ups and tripping hazards.
When planning a holistic kitchen or bathroom renovation, coordination between surfaces is essential. Your floors must seamlessly integrate with surrounding cabinetry and countertops. Premium materials like quartz and granite provide exceptional durability, heat resistance, and structural elegance compared to traditional laminate surfaces. Quartz offers a non-porous, maintenance-free surface with uniform patterns, while natural granite delivers one-of-a-kind movement and organic depth. Pairing these superior solid surfaces with professionally leveled, expertly installed flooring elevates the entire room’s aesthetic and long-term property value.
Investing in a paid, comprehensive remodeling estimate that includes professional design renderings ensures that cabinet footprints, stone countertop overhangs, and flooring layouts align perfectly. Detailed design planning minimizes installation errors, eliminates costly mid-project change orders, and streamlines the entire construction timeline.
Material-Specific Installation Challenges and Solutions
Every flooring category requires specialized handling, unique underlayment pairings, and tailored expansion considerations.
| Flooring Material | Subfloor Flatness Tolerance | Primary Moisture Barrier Requirement | Typical Acclimation Requirement | Key Installation Method |
|---|---|---|---|---|
| Luxury Vinyl Plank (LVP/SPC) | 3/16″ over 10 ft | 6-mil poly vapor barrier over concrete | 24–48 hours in room conditions | Floating click-lock or direct glue-down |
| Engineered Hardwood | 1/8″ over 10 ft | Vapor-retarding underlayment / adhesive | 48–72 hours in living conditions | Nail-down, full glue-down, or floating |
| Large-Format Porcelain Tile | 1/8″ over 10 ft (L/360 deflection) | Uncoupling waterproof membrane | Not required (dry storage) | Polymer-modified thin-set mortar |
| Laminate Flooring | 3/16″ over 10 ft | Integrated or separate vapor underlayment | 48 hours in sealed packaging | Angle-tap or drop-lock floating system |
Luxury Vinyl Plank and Floating Floor Requirements
Luxury Vinyl Plank (LVP), particularly Stone Plastic Composite (SPC) flooring, has become a top choice for busy households due to its waterproof core and resilient wear layer. Rigid-core floating floors depend entirely on the flatness of the underlying subfloor. Thorough leveling ensures click-lock joints engage securely, delivering a solid, quiet feel underfoot.
Professional installers maintain a consistent 1/4-inch to 3/8-inch expansion perimeter along all walls, vertical fixtures, and cabinetry bases. This perimeter allows the entire floor system to expand and contract naturally with temperature shifts. Baseboards and shoe moldings are then fastened directly to the wall studs—never through the flooring itself—allowing uninhibited movement beneath the trim.
Hardwood, Tile, and Custom Transition Details
Hardwood brings unmatched organic warmth to residential interiors. Whether installing tongue-and-groove engineered planks or solid timber, installers calculate precise expansion spacing based on room width and average humidity levels.
For kitchens, laundry rooms, and primary baths, porcelain and ceramic tiles offer timeless elegance. Success relies on selecting the right setting compounds, choosing appropriate trowel notch sizes for full mortar coverage, and integrating specialized uncoupling membranes. For an in-depth look at selecting specialized masonry and tile experts, explore our guide to hiring a tile installer to streamline your planning process. You can also review the Flooring overview for additional background on material categories and installation standards.

Frequently Asked Questions About Hiring Floor Installers
How long does a typical flooring installation take from start to finish?
Most residential flooring projects take between two and five days of on-site labor, depending on the overall square footage, tear-out requirements, and subfloor conditions. A standard 1,500-square-foot luxury vinyl plank installation usually requires one day for old floor removal and subfloor prep, followed by two days of installation and trim work. Hardwood projects may require several additional days for pre-installation acclimation inside your home.
Do installers handle subfloor leveling and old floor removal?
Full-service floor installation contractors handle the entire demolition and preparation process. This includes removing old carpeting, tackling stubborn tack strips, scraping dried adhesive, grinding concrete ridges, applying leveling underlayments, and hauling away construction debris. Always confirm that your written estimate explicitly lists tear-out and subfloor leveling tasks within the scope of work.
What payment structures and warranties are standard for installation?
Industry-standard billing for residential installation projects usually involves a staged payment schedule. Homeowners typically provide an initial deposit to secure project scheduling and order custom materials, followed by a midpoint progress draw, and a final balance payment due upon completion after a comprehensive walkthrough. Reputable contractors back their projects with a minimum one-year written labor warranty in addition to honoring all manufacturer product guarantees.
Conclusion
Upgrading your home’s flooring is a transformative milestone that enhances everyday comfort, elevates interior aesthetics, and boosts long-term property value. By partnering with vetted, licensed professionals who prioritize subfloor preparation, moisture management, and precise craftsmanship, you protect your investment for years to come.
At Trussell’s Transformations, we bring over 25 years of hands-on remodeling experience to homeowners across Albuquerque, Rio Rancho, and Bernalillo County. As your complete one-stop renovation partner, we coordinate every phase of your project—from design renderings to final installation—with flexible 0% financing options to keep your dream remodel accessible.
Visit our expansive showroom at 8023 Edith Blvd NE in Albuquerque to explore premium materials in person. Browse custom cabinetry collections from industry leaders like Dura Supreme Cabinetry, Waypoint Living Spaces, Sollid Cabinetry, and Kitchen Cabinet Distributors, alongside stunning quartz and natural stone countertops from Caesarstone, Cambria, Silestone, and The Stone Collection. Ready to bring your design vision to life? Connect with our team to schedule an estimate with our professional flooring installation specialists today!
Recent Comments