

The Fastest Way to Transform Your Kitchen? New Cabinet Hardware
Adding hardware to kitchen cabinets is one of the simplest, most affordable upgrades you can make to your home — and the visual payoff is huge.
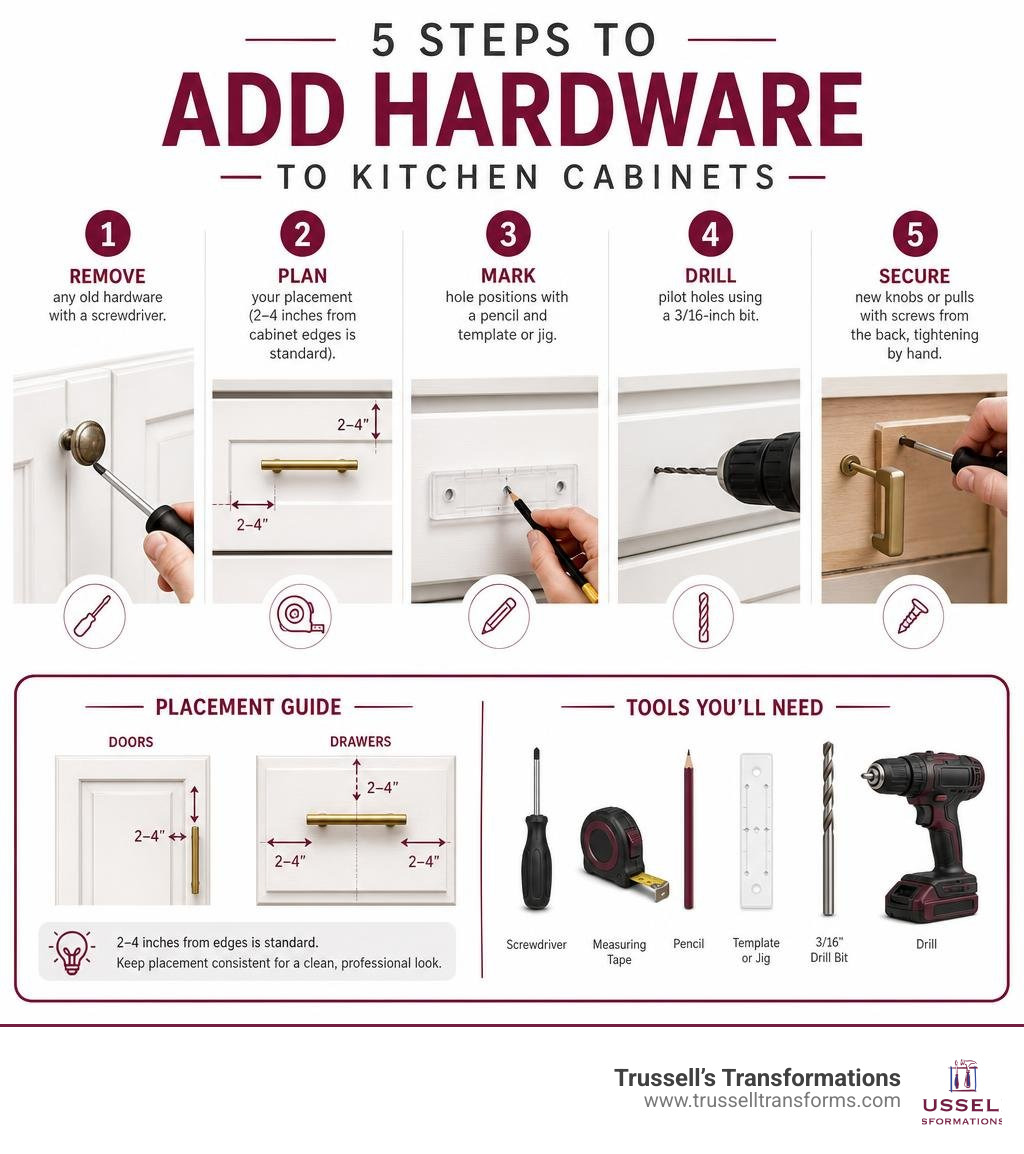
Quick answer — here’s how to add hardware to kitchen cabinets:
- Remove any old hardware with a screwdriver
- Plan your placement (2–4 inches from cabinet edges is standard)
- Mark hole positions with a pencil and template or jig
- Drill pilot holes using a 3/16-inch bit
- Secure new knobs or pulls with screws from the back, tightening by hand
That’s the short version. The full process takes a bit more care — especially if you want clean, consistent results across every door and drawer in your kitchen.
Cabinet hardware is one of the most-touched surfaces in your home. High-quality finishes maintain their beauty for years. The right hardware, installed correctly, can make your kitchen look professionally designed — without a full remodel. In fact, a full kitchen hardware update often costs under $200 and can make a bigger visual difference than a fresh coat of paint.
Whether you’re doing a quick style refresh or pairing new hardware with cabinetry from a showroom, this guide walks you through every step.
Planning Your Upgrade: How to Choose the Right Knobs and Pulls
Before you pick up a drill, you need to select the perfect hardware to match your home’s aesthetic. Your hardware is the “jewelry” of your kitchen. It ties together your appliances, lighting fixtures, and plumbing to create a cohesive, intentional environment.

Choosing the right hardware starts with understanding your layout and personal style. If you are starting from scratch or exploring a complete redesign, visiting a showroom can help you visualize how different styles interact with your cabinet doors. For those in the Albuquerque area, browsing options in person is highly recommended. You can learn more about what to look for in our guide on 5 Questions to Ask When Shopping for Cabinets at a Cabinet Store in Albuquerque.
When choosing hardware, consider the following:
- Knobs vs. Pulls: Knobs are classic, cost-effective, and require only a single screw hole. Pulls (or handles) are modern, highly functional, and make pulling heavy drawers much easier.
- Proportions: A tiny knob on an oversized drawer looks out of place, while a massive bar pull can overwhelm a small cabinet door. Standard pulls usually measure between 3 to 5 inches from center-to-center, but larger drawers (over 24 inches wide) benefit from longer pulls.
- Materials & Finishes: High-quality materials like solid brass, bronze, and stainless steel offer long-term durability. Bronze hardware develops a beautiful natural patina over time, which looks exceptional in rustic or farmhouse kitchens, while stainless steel is highly durable and incredibly easy to clean.
Why You Should Add Hardware to Kitchen Cabinets During a Remodel
If you are updating your kitchen with premium cabinets from top-tier brands like Durasupreme Cabinetry, Waypoint Living Spaces, Sollid Cabinetry, or Kitchen Cabinet Distributors, adding premium hardware is non-negotiable.
High-end cabinetry is an investment. Adding hardware protects the factory-finish wood or paint from the natural oils, dirt, and moisture on your fingertips. It also elevates the overall design, transforming beautiful cabinet doors into a stunning, integrated masterpiece. When planning a remodel, it is helpful to weigh your options carefully. Check out our resource on whether you Should I Choose Pre-Made or Custom Built Cabinets to find the best foundation for your dream kitchen.
Mixing Knobs and Pulls for a Custom Look
You do not have to choose strictly one or the other. Mixing knobs and pulls adds rich visual interest and depth to your kitchen design.
To keep the look intentional and cohesive rather than chaotic, follow these simple guidelines:
- Establish a Consistent System: A popular approach is to use knobs on all vertical cabinet doors and pulls on all horizontal drawer fronts. Alternatively, you can use knobs for upper cabinets and pulls for lower cabinets and drawers.
- Match the Finishes: Ensure every piece of hardware shares the exact same finish and texture (e.g., all matte black, satin nickel, or brushed brass) to tie the room together.
- Stay Within the Same Design Family: Choose knobs and pulls from the same manufacturer line so that the edge profiles, curves, and metal tones match perfectly.
If you love custom woodwork projects, you might also be interested in how custom elements come together. Read more about creating custom storage in this guide to DIY Built In Cabinets for the Kitchen – Angela Marie Made.
Essential Tools and Materials for the Project
To add hardware to kitchen cabinets with professional-grade precision, you need to gather the right tools before you begin.

Here is your essential project checklist:
- Power Drill: For boring clean holes through your cabinet fronts.
- Screwdriver: A manual Phillips-head screwdriver is best for tightening hardware screws without stripping them.
- Cabinet Hardware Template or Jig: Essential for achieving repeatable, perfectly measured holes.
- 3/16-inch Twist Drill Bit: The standard size for cabinet hardware screws.
- Pencil: For marking your drill points.
- Painter’s Tape: To protect the cabinet surface and prevent wood splintering.
- Loctite (Thread Locker): A secret weapon to prevent your hardware from loosening over time.
- Wood Filler & Sandpaper: Only needed if you are patching old holes from previous hardware.
Selecting the Correct Drill Bit Size
Most standard cabinet hardware screws (typically size 8/32) require a 3/16-inch drill bit (or a 5mm bit).
Using a bit that is too small will make it incredibly difficult to push the screws through. Using a bit that is too large will cause the hardware to wobble, even when fully tightened. Always drill a quick test hole in a scrap piece of wood first to verify that your screw slides through smoothly without excess wiggle room.
Step-by-Step Guide to Add Hardware to Kitchen Cabinets
Ready to transform your space? Follow these steps to install your new hardware flawlessly.
Before you begin drilling, it is helpful to review proper layout techniques. For a deeper dive into avoiding common placement errors, read our article on How to Place and Install Cabinet Hardware Without Making Extra Holes.
Removing Old Hardware and Preparing the Surface
If you are replacing existing handles or knobs, start by opening the cabinet doors and using a manual screwdriver to remove the fastening screws from the back. Avoid using a power drill for removal to ensure a smooth, controlled process.
If your new hardware has different hole spacing than your old hardware, you will need to patch the old holes. Fill them with high-quality wood filler that matches your cabinet color, let it dry completely, sand it flush with 220-grit sandpaper, and touch up the paint or stain. If you are refacing your cabinets or replacing the doors entirely, you can learn more about those processes through resources like Cabinet Door Replacement Albuquerque, NM – N-Hance or Cabinet Refacing Albuquerque, NM – N-Hance.
Measuring and Marking Placement on Doors and Drawers
Consistency is what separates a DIY job from a professional installation.
- For Cabinet Doors: Pulls and knobs are typically placed on the stile (the vertical frame piece) on the side opposite the hinges. Standard placement is 2 to 3 inches up from the bottom edge for upper cabinets, and 2 to 3 inches down from the top edge for lower cabinets.
- For Drawers: For drawers under 16 inches wide, center a single knob or pull both horizontally and vertically. For drawers wider than 16 inches, you may want to install two pulls. In this case, divide the drawer front into thirds and place the hardware in the center of the outer left and right thirds.
If you are modifying your cabinet layout, such as converting doors to drawers for better accessibility, you can find excellent structural advice in How we converted cabinet doors into drawers – ELLINGTON HOME.
Using a Template to Add Hardware to Kitchen Cabinets Accurately
Do not measure every single door individually with a tape measure. This takes too long and increases the risk of human error. Instead, use a plastic cabinet hardware template or a precision metal jig. A high-quality jig can be calibrated to within 0.005 inches, allowing you to replicate your measurements across dozens of doors in seconds.
You can also make a simple cardboard template for a quick DIY project. For expert visual guidance on using templates, check out Nathan Gilbert’s pro installation tips.
Drilling and Securing Your New Hardware
Once your marks are placed, it is time to drill:
- Apply Painter’s Tape: Place a piece of painter’s tape over your pencil marks on both the front and back of the door. This protects the finish and prevents the wood from splintering as the drill bit exits.
- Use a Backer Block: Hold a scrap piece of wood tightly against the backside of the door where you are drilling. This acts as a support and ensures a perfectly clean exit hole without blowout.
- Drill Straight: Keep your drill perfectly level and perpendicular to the door. Drill from the front to the back.
- Install the Screws: Remove the tape, push the screws through from the back, and thread the hardware on by hand.
- Add Loctite: Apply a tiny drop of Loctite thread locker to the screw threads before final tightening. This prevents the hardware from wobbling loose over years of daily use.
- Tighten by Hand: Use a manual screwdriver to tighten the screws. Never use a power drill to tighten hardware, as manual tightening ensures a perfect, secure fit and protects the integrity of the cabinet wood.
Why Professional Installation Outperforms DIY
While adding hardware is a great weekend project, achieving a truly flawless finish across an entire kitchen is harder than it looks. Professional installation ensures perfect alignment and a seamless look across every single door.
If you are installing brand-new cabinetry, hiring a professional ensures your warranty remains intact and your kitchen looks immaculate. For a complete look at what goes into a professional cabinet setup, read our comprehensive guide: Can I Install Cabinets Myself DIY Guide to Cabinet Installation.
The Value of Expert Craftsmanship
At Trussell’s Transformations, our licensed contractors bring over 25 years of experience to every home remodel in Albuquerque, Rio Rancho, and Bernalillo County. We use precision-machined jigs, professional-grade dust collection, and expert techniques to ensure every knob, pull, and hinge is aligned down to the millimeter. Learn more about our standards in Proper Cabinet Installation 3 Things You Need to Know.
Furthermore, we can help you coordinate your high-end cabinetry with premium countertops from world-class brands like Caesarstone, Cambria, Silestone, and The Stone Collection, creating a seamless, luxury aesthetic.
Frequently Asked Questions About Cabinet Hardware
What is the standard placement for cabinet knobs and pulls?
For upper cabinet doors, hardware is typically placed 2 to 3 inches up from the bottom corner opposite the hinge. For lower cabinet doors, place it 2 to 3 inches down from the top corner. On drawers, hardware is usually centered both horizontally and vertically, though some designs place pulls slightly higher on the top third of the drawer face.
How do I prevent cabinet hardware from loosening over time?
The best way to prevent loose hardware is to apply a single drop of thread locker (like blue Loctite) to the screw threads before tightening. This binds the metal components together securely, ensuring your handles stay tight through years of frequent use.
Should I hire a professional to install my cabinet hardware?
If you have expensive custom cabinets, complex layouts, or simply want to save time and guarantee perfect alignment, hiring a professional is highly recommended. Professional installers use highly accurate jigs and heavy-duty tools to complete the job quickly and flawlessly. You can read more about homeowner experiences with finding help in the Finding an installer for cabinet hardware | Houzz Forum.
Conclusion
Upgrading your kitchen hardware is a small detail that makes a massive impact. Whether you decide to tackle this project yourself or trust the experts to bring your vision to life, investing in quality materials and precise placement will elevate your kitchen’s style and functionality for years to come.
If you are ready to take your kitchen to the next level, we invite you to visit our showroom at 8023 Edith Blvd NE, Albuquerque, NM 87113. At Trussell’s Transformations, we are your true one-stop shop, offering premium cabinetry, professional installation by licensed contractors, and 0% financing options.
Transform Your Kitchen with Trussell’s Transformations today, and let us help you build a space you love!
Recent Comments