

Secure Countertops Start With a Level, Supported Cabinet Base
Attaching a countertop to cabinets begins with a flat, firmly anchored cabinet run. Dry-fit the top, confirm the overhang, then use the attachment method made for its material: screws through cabinet corner blocks for laminate, movement-friendly clips or slotted fasteners for butcher block, and silicone with proper brackets for granite or quartz.
A countertop should sit on cabinets that are level, plumb, and secured to the wall. Even a small dip can leave seams uneven or place stress on a heavy slab. This matters especially for stone: a typical granite slab can weigh more than 250 pounds.
The right fastener is not just about holding the top in place. It also protects the finished surface, supports appliance spans and overhangs, and lets natural wood expand and contract with seasonal humidity.
For Albuquerque homeowners planning a kitchen or bathroom update, careful prep is where a clean, long-lasting installation begins. Complex stone tops, long seams, and large overhangs are often best handled by a competent, licensed installer.
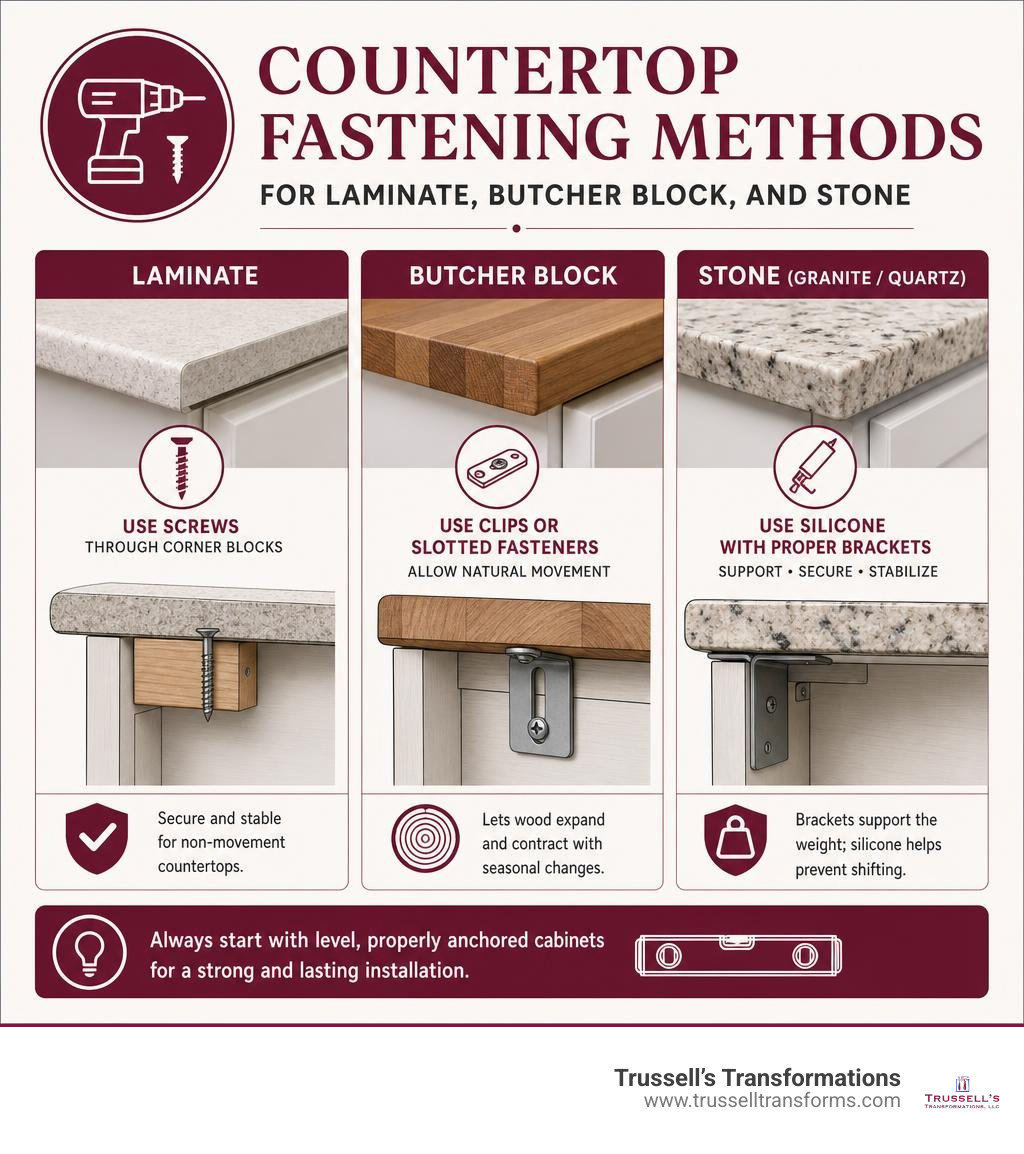
Attaching a countertop to cabinets vocab to learn:
Preparing and Leveling Before Attaching a Countertop to Cabinets
Every successful countertop installation depends entirely on the stability of the cabinetry underneath. According to National Kitchen & Bath Association (NKBA) planning guidelines, base cabinets must sit within a tolerance of plus or minus 1/8 inch across the full run for level and plumb. When installing rigid surfaces like quartz or natural granite, industry standards require the foundation to remain strictly within a 1/4-inch level baseline. If a cabinet run sags or bows, your countertop will experience uneven tension points, resulting in misaligned seams or rocking surfaces.
Before securing your surfaces, verify that your cabinetry is anchored firmly to wall studs. Utilizing the best way to install cabinets like a pro ensures that individual boxes are joined through their face frames and back rails using washer-head screws rather than brittle drywall fasteners.
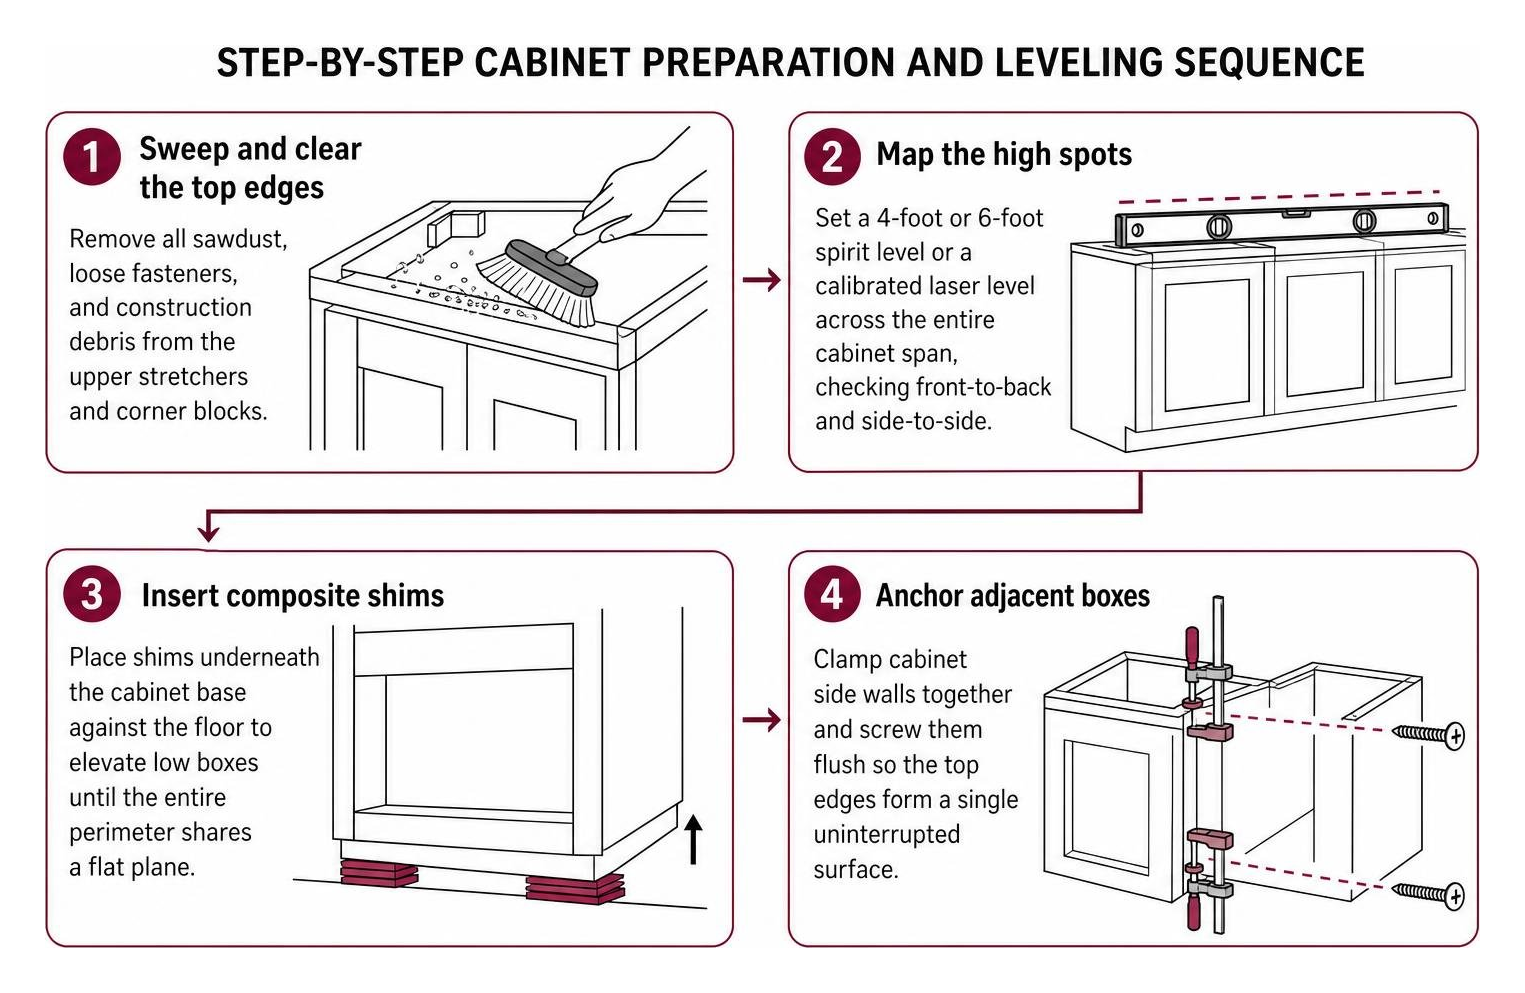
To prep your run:
- Sweep and clear the top edges: Remove all sawdust, loose fasteners, and construction debris from the upper stretchers and corner blocks.
- Map the high spots: Set a 4-foot or 6-foot spirit level or a calibrated laser level across the entire cabinet span, checking front-to-back and side-to-side.
- Insert composite shims: Place shims underneath the cabinet base against the floor to elevate low boxes until the entire perimeter shares a flat plane.
- Anchor adjacent boxes: Clamp cabinet side walls together and screw them flush so the top edges form a single uninterrupted surface.
- Perform a dry fit: Set your countertop piece in place without adhesives or mechanical fasteners. Verify wall scribe lines, check corner alignments, and confirm uniform front overhangs before proceeding with how to attach base cabinets like a pro.
Investing in a thorough design and planning phase makes all the difference during installation. Paying for a professional remodeling estimate provides detailed 3D design renderings, exact appliance clearances, and comprehensive site measurements. This dedicated planning stage eliminates expensive trial-and-error, ensuring your cabinet layouts perfectly support your chosen slab weight and custom edge details.
Visiting our Albuquerque showroom at 8023 Edith Blvd NE allows you to explore factory-finished cabinetry lines built with rigid structural corner braces. We proudly feature premium cabinetry from industry-leading brands including Dura Supreme Cabinetry, Waypoint Living Spaces, Sollid Cabinetry, and Kitchen Cabinet Distributors.
Core Fasteners and Fastening Methods
Selecting the correct fastening method depends on the structural density, flexibility, and natural movement of your countertop material. While softer substrates accept direct mechanical screws, dense mineral slabs demand non-invasive chemical bonding systems.
| Countertop Material | Primary Fastener / Method | Secondary Support Hardware | Movement Allowance Required |
|---|---|---|---|
| Laminate (Particleboard/MDF) | No. 8 x 1-1/4″ Pan-head Screws | Corner gusset blocks | Minimal |
| Butcher Block / Solid Wood | Figure-8 Clips or Slotted Brackets | #10 Pan-head screws with washers | High (up to 3/16″ across grain) |
| Engineered Quartz | 100% Pure Silicone adhesive beads | Front perimeter support strips | Low (thermal expansion only) |
| Natural Granite / Quartzite | 100% Neutral-cure Silicone dabs | Low-profile steel support plates | Low (thermal expansion only) |
| Solid Surface (Acrylic) | Flexible Silicone dabs | Perimeter wood mounting blocks | Moderate |
Fastener Guidelines for Attaching a Countertop to Cabinets
When securing solid surface tops, laminate, or wood substrates, mechanical fasteners provide exceptional holding power against upward lifting.
- Screw Sizing: Standard base cabinet corner blocks and top stretcher rails are 3/4 inch thick. Pairing this with standard 3/4-inch to 1-1/2-inch countertop substrates makes No. 8 x 1-1/4 inch coarse-thread screws the industry standard.
- Pilot Holes and Depth Stops: Always pre-drill pilot holes from inside the cabinet upward into the substrate using a drill bit matched to the screw’s root diameter (typically 1/8 inch). Attach a mechanical depth stop collar or a high-visibility painter’s tape flag to your drill bit. This prevents accidentally drilling through the decorative top surface.
- Torque Limits: Set your cordless driver’s clutch to a low-to-medium torque setting. Drive screws snug against the wood corner brace without over-torquing to ensure optimal holding strength and a clean mechanical fit.
Structural Adhesive and Silicone Placement
For dense materials like engineered quartz and natural granite, 100% pure silicone adhesive is the preferred bonding agent.
Apply pea-sized dabs or continuous beads roughly 1/4 inch thick along the cabinet perimeter, focusing on corner gussets and intermediate stretcher rails. Silicone provides high tensile holding strength while maintaining elastic flexibility, cushioning the stone and dampening sound vibrations. Avoid aggressive rigid construction adhesives on materials that require natural flex or seasonal movement. Always allow the silicone a full 24-hour cure time before connecting plumbing fixtures or placing heavy loads on the counter surface.
Material-Specific Installation Techniques
Step-by-Step for Attaching a Countertop to Cabinets with Wood or Laminate
Solid wood surfaces require specialized installation methods due to environmental moisture shifts. According to data from the USDA Forest Products Laboratory, tangential shrinkage and expansion across the grain ranges from 4.4% in soft maple to over 7% in dense species like white oak. On a standard 25-inch-deep wood countertop, seasonal humidity fluctuations can create up to 3/16 inch of lateral dimensional change.
To accommodate this natural movement and maintain proper alignment, review wood movement data and expansion rates and implement mechanical relief techniques:
- Acclimate and Seal: Let the butcher block rest inside your climate-controlled home for 48 to 72 hours before installation. Ensure all six sides—including the underside and cut ends—are completely sealed with a quality protective finish to balance moisture absorption.
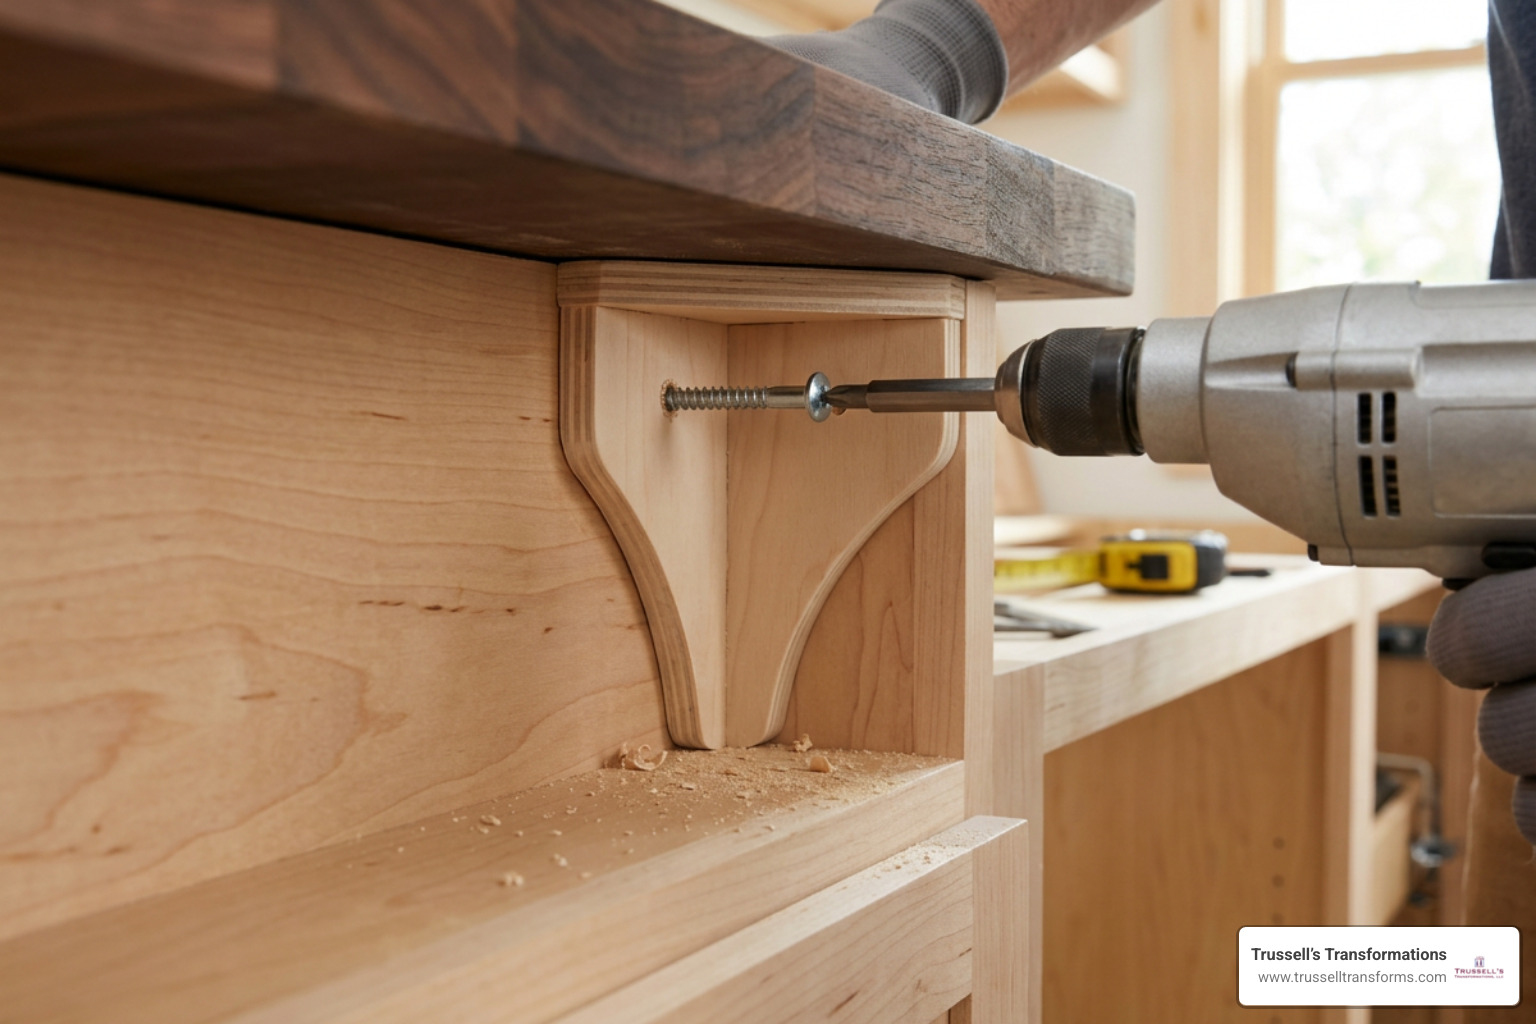
- Install Figure-8 Fasteners or Slotted Brackets: Recess one loop of a steel figure-8 fastener into the top edge of the cabinet stretcher rail using a Forstner bit, securing it with a short screw. The remaining loop extends under the countertop, pivoting freely as the wood expands.
- Drill Elongated Clearance Holes: If driving screws directly through cabinet stretchers, drill oversized 3/8-inch or slotted holes through the cabinet rails. Drive No. 10 pan-head screws upward through heavy fender washers into pre-drilled pilot holes in the wood. Tighten them snug, leaving enough clearance for the screw shank to slide along the slot.
- Fastening Laminate: For laminate tops with integrated backsplashes, position buildup strips along the cabinet tops to ensure drawer clearance. Secure the top by driving 1-1/4 inch screws straight through the four corner blocks of each base cabinet.
Stone, Quartz, and Solid Surface Mounting
Natural stone and engineered quartz offer distinct aesthetic and performance advantages over standard laminate surfaces. High-end quartz from brands like Caesarstone, Cambria, and Silestone, alongside exotic slabs from The Stone Collection, delivers superior scratch resistance, zero porosity, and unmatched heat resilience compared to post-formed laminate sheets.
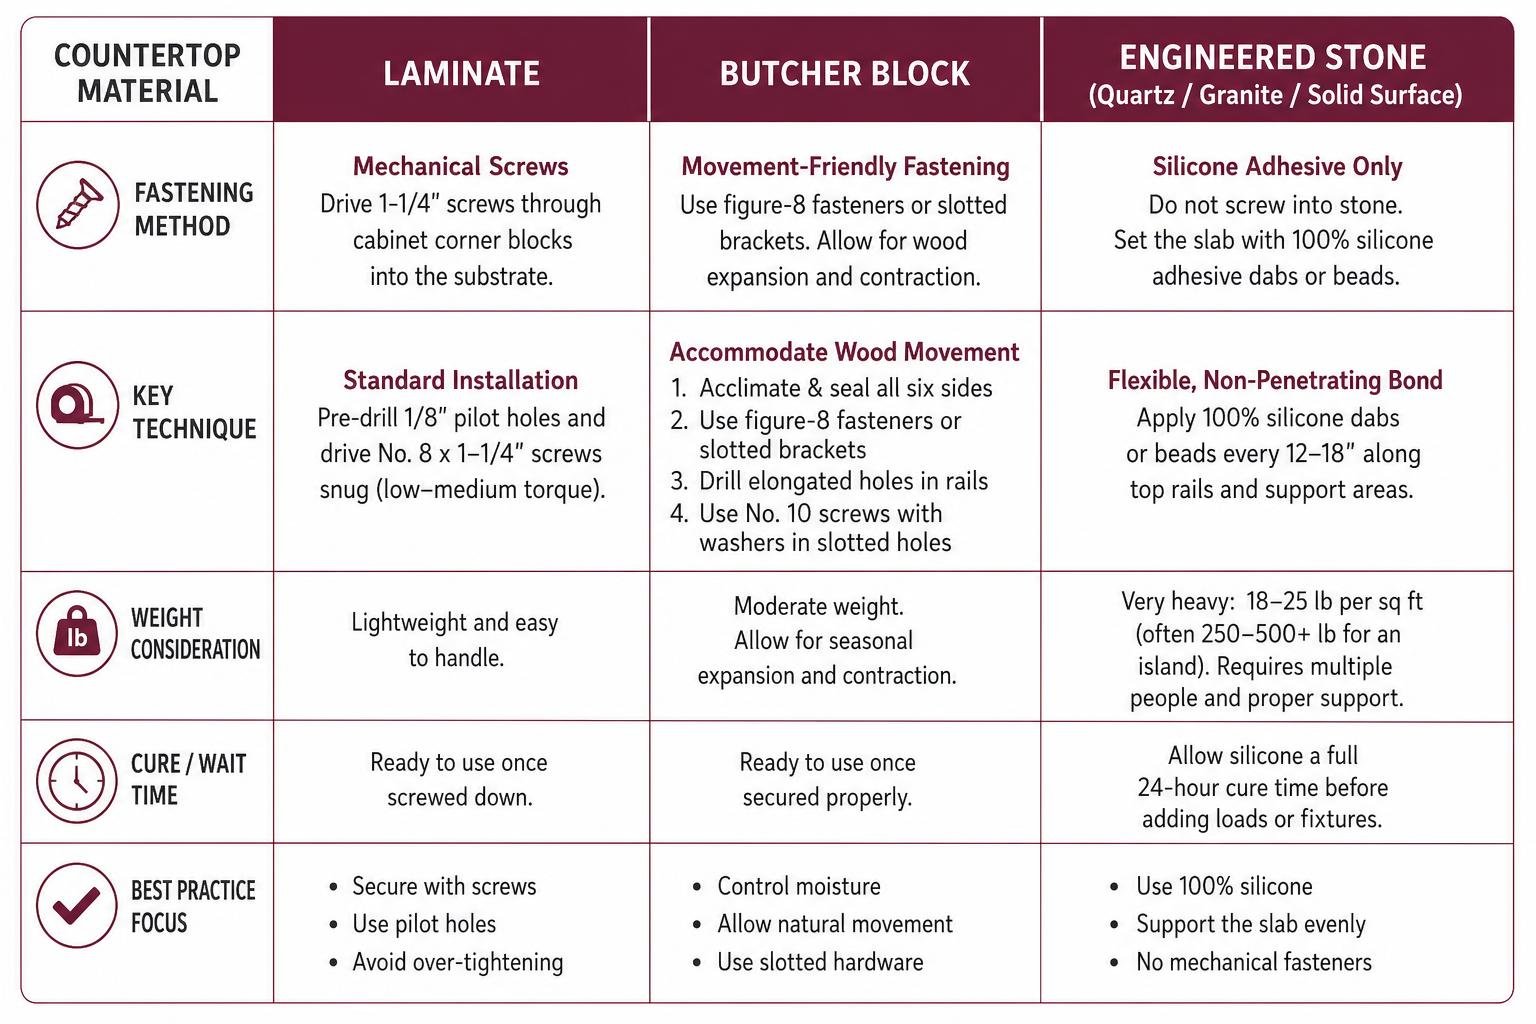
Because a single quartz or granite slab can weigh between 18 and 25 pounds per square foot (often exceeding 250 to 500 pounds for a kitchen island layout), mechanical screws are never driven directly into the stone.
- Silicone Positioning: Apply flexible 100% silicone dabs every 12 to 18 inches across the top rails of the base cabinetry.
- Setting the Slab: Carefully lower the slab straight down into position with the help of suction grips and multiple installers to prevent point-loading the cabinet corners.
- Specialized Materials: For alternative surfaces, reviewing concrete countertop specialties and installation highlights the value of rigid perimeter frames and non-penetrating mechanical anchors.
- Professional Precision: When executing complex mitered edge profiles or massive waterfall legs, finding the best local countertop companies near me guarantees seamless, long-lasting results.
Managing Overhangs, Seams, and Appliance Spans
Kitchen islands and breakfast bars frequently feature extended countertop overhangs to accommodate barstool seating. However, unsupported spans create immense leverage on your cabinetry and stone edges.
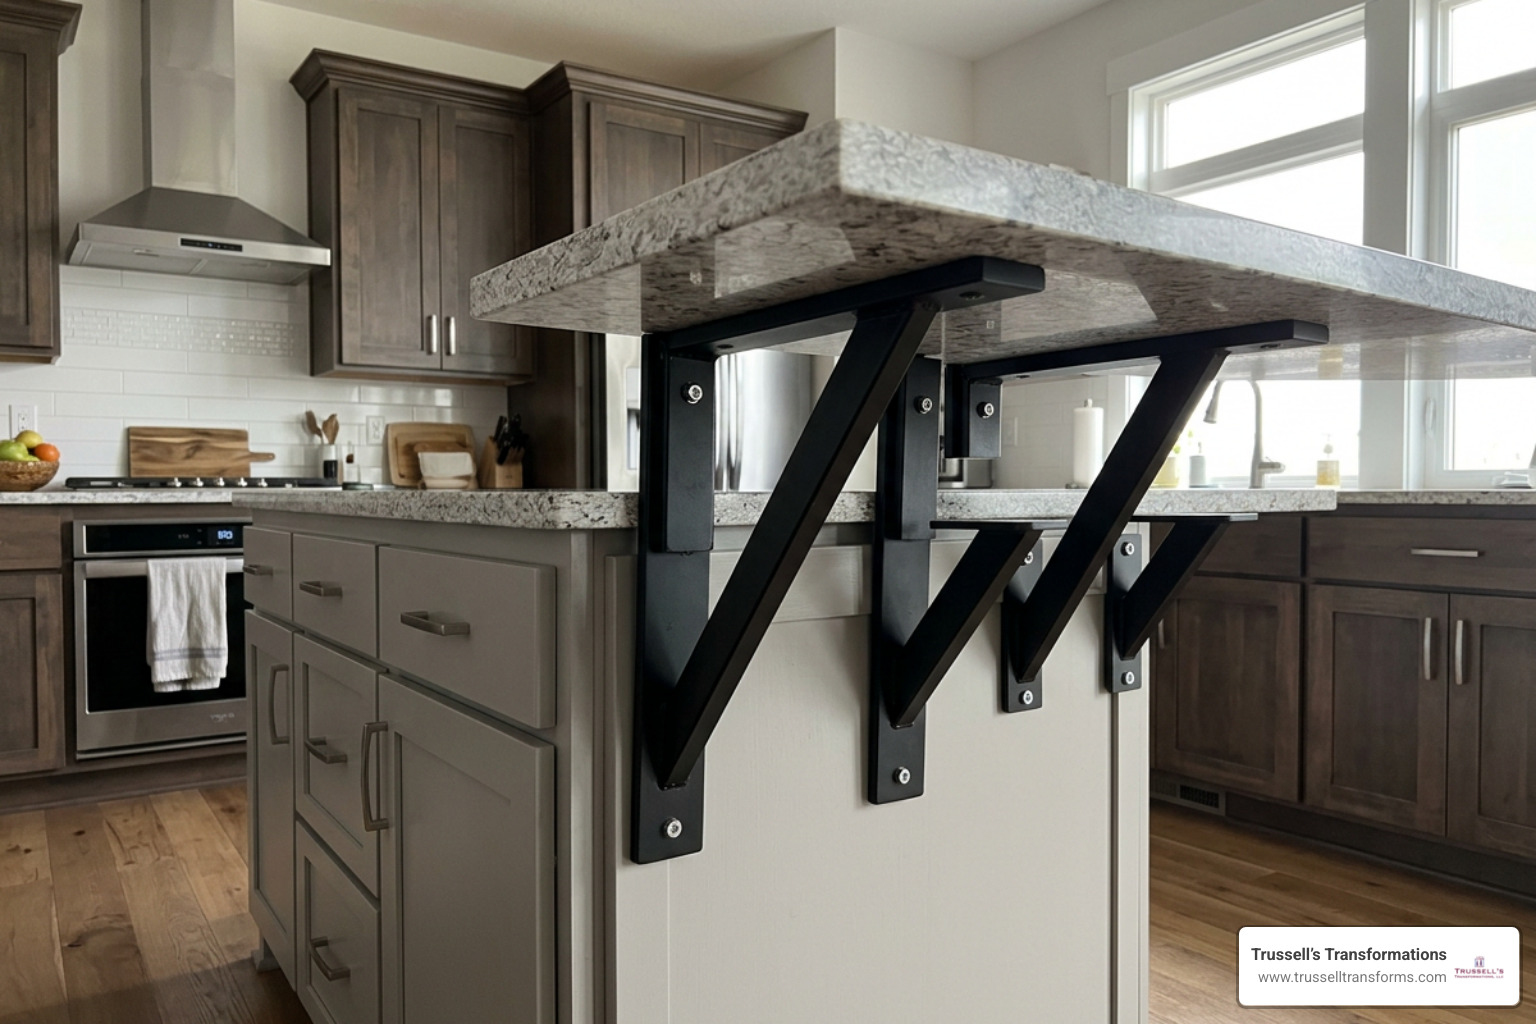
The Architectural Woodwork Institute recommends structural reinforcement for solid surfaces extending beyond 8 to 10 inches to ensure complete stability under downward load. When an adult leans on an unsupported 12-inch overhang, they can exert between 150 and 200 pounds of direct point load onto the cantilevered edge.
To properly reinforce extended overhangs and vulnerable appliance voids:
- Steel Support Plates: For stone overhangs between 10 and 18 inches, rout shallow channels into the top of the cabinet subtop and install hidden 1/4-inch-thick, 12-gauge structural steel brackets spaced every 16 to 24 inches.
- Corbels and Legs: For overhangs exceeding 18 inches, install decorative structural corbels or load-bearing island posts tied directly into the subfloor framing.
- Seam Assembly: When joining multiple countertop sections at inside corners or along long runs, use specialized mechanical draw bolts (miter bolts) seated in factory-routed dog-bone pockets underneath the seam. Pull the joint flush with epoxy or color-matched seam adhesive.
- Appliance Spans: Dishwashers and under-counter beverage centers leave an open 24-inch void without cabinet framework. Install 3/4-inch hardwood build-up strips anchored to adjacent cabinets along with a vapor-barrier heat shield to protect wood and stone substrates from moisture and heat.
Frequently Asked Questions About Countertop Installation
How do you secure a butcher block countertop without restricting natural wood movement?
To attach butcher block without restricting movement, use slotted steel angle brackets or pivoting figure-8 desktop fasteners. Drill oversized pilot holes in the cabinet stretchers and use pan-head screws with broad washers. This allows the screw shank to glide sideways as the wood expands across its grain during seasonal humidity swings, ensuring a lasting, stable fit.
Can stone countertops like quartz and granite be attached using only screws?
No, stone countertops cannot be secured with direct screws because mechanical fasteners are not engineered for solid mineral substrates. Instead, heavy stone tops rely on their substantial dead weight combined with strategically placed beads of 100% pure silicone adhesive applied along the cabinet perimeter.
How do you attach build-up strips over dishwashers or standard base cabinets?
Build-up strips—typically made from 3/4-inch-thick Baltic birch or solid hardwood—are secured to the top front and rear rails of the adjacent base cabinets using 1-1/4-inch coarse-thread screws and wood glue. Over open dishwasher spaces, anchor a structural steel or hardwood spanning cleat to the adjacent cabinet side panels to bridge the gap and support the countertop edge evenly.
Conclusion
A beautiful kitchen or bathroom transformation relies on a stable, properly leveled foundation. Ensuring your base cabinets are plumb and using material-specific fasteners—from flexible silicone beads for quartz to movement-friendly clips for solid wood—creates a rock-solid, durable work surface.
While straightforward laminate runs can be tackled with standard tools, handling heavy stone slabs, invisible seam joints, and structural overhangs demands professional precision. Partnering with a licensed contractor protects your investment and ensures your project runs smoothly from initial templating to final polish.
At Trussell’s Transformations, our team brings over 25 years of trusted home renovation experience to homeowners across Albuquerque, Rio Rancho, and Bernalillo County. As your local one-stop shop, we provide premium cabinetry, custom countertops, professional installation by licensed contractors, and convenient 0% financing options to bring your dream kitchen to life.
Explore our extensive selection of cabinetry and stone surfaces by visiting our showroom or scheduling a design consultation with our professional cabinet and countertop installation services team today!
Recent Comments