

Drip Edge and Shingle Installation: A Complete Guide
Why a Proper Roof Drip Edge Install Can Save You Thousands
Roof drip edge install is one of the most overlooked steps in residential roofing — yet it is essential for ensuring long-term roof integrity and optimal water shedding.
Here’s the quick answer on how to install roof drip edge correctly:
- Install drip edge along the eaves first — before rolling out the underlayment
- Lay the underlayment over the eave drip edge
- Install drip edge along the rakes (gable ends) on top of the underlayment
- Overlap each piece by at least 2 inches and nail every 12 inches into the sheathing
- Extend shingles 1/4 to 3/4 inch beyond the drip edge
This sequence isn’t optional — it follows the International Residential Code (IRC) Section R905.2.8.5, which has required drip edge on all asphalt shingle roofs since 2012.
Without drip edge, water wraps around the edge of your roof deck through capillary action. Installing a drip edge ensures that water is directed safely away from the fascia, sheathing, and soffit, preserving the structural components of your roof. Homeowners who prioritize this installation early on enjoy a highly durable roof system that stands the test of time.
More than 70% of homes built before 2012 are estimated to have missing or improperly installed drip edge. If your Albuquerque home falls into that category, the good news is that a retrofit is possible without tearing off your shingles.
This guide walks through everything: profiles, materials, installation sequence, cutting techniques, retrofit methods, and real costs — so you know exactly what to expect whether you’re planning a new roof or updating an existing one.
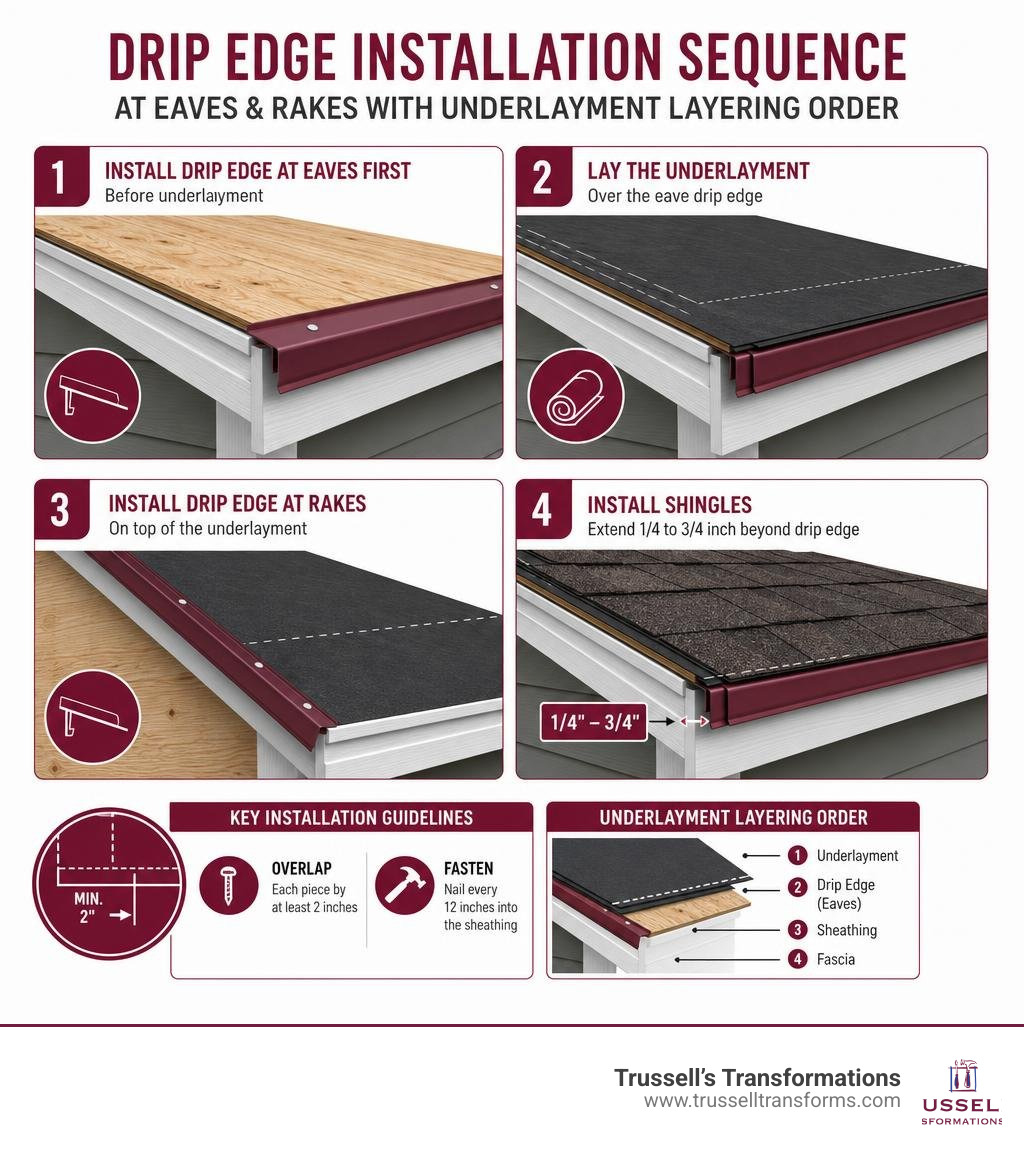
Basic Roof drip edge install vocab:
Understanding Roof Drip Edge Profiles and Materials
When planning a roof drip edge install, selecting the proper profile and material is critical. The drip edge acts as a structural bridge at your roof’s perimeter, managing water shedding using gravity and surface tension.
| Material | Typical Lifespan | Key Strengths & Characteristics | Best Suited For |
|---|---|---|---|
| Aluminum | 20–30 Years | Lightweight, completely rust-proof, matches standard asphalt shingle lifespans. | Standard residential installations in Albuquerque. |
| Galvanized Steel | 15–25 Years | High wind resistance, heavy-duty, minimum 24-gauge recommended for stability. | High-wind areas or heavy commercial roofing. |
| Copper | 50–70+ Years | Virtually indestructible, beautiful natural patina, highly durable (minimum 20-ounce). | Premium historic homes and luxury metal roofing systems. |
Choosing the right material ensures compatibility with your entire roof assembly. If you are exploring various roofing options for your home, review our guide on Choosing the Best Roofing Material for Your Albuquerque Home to see how these metal selections align with different roof coverings.
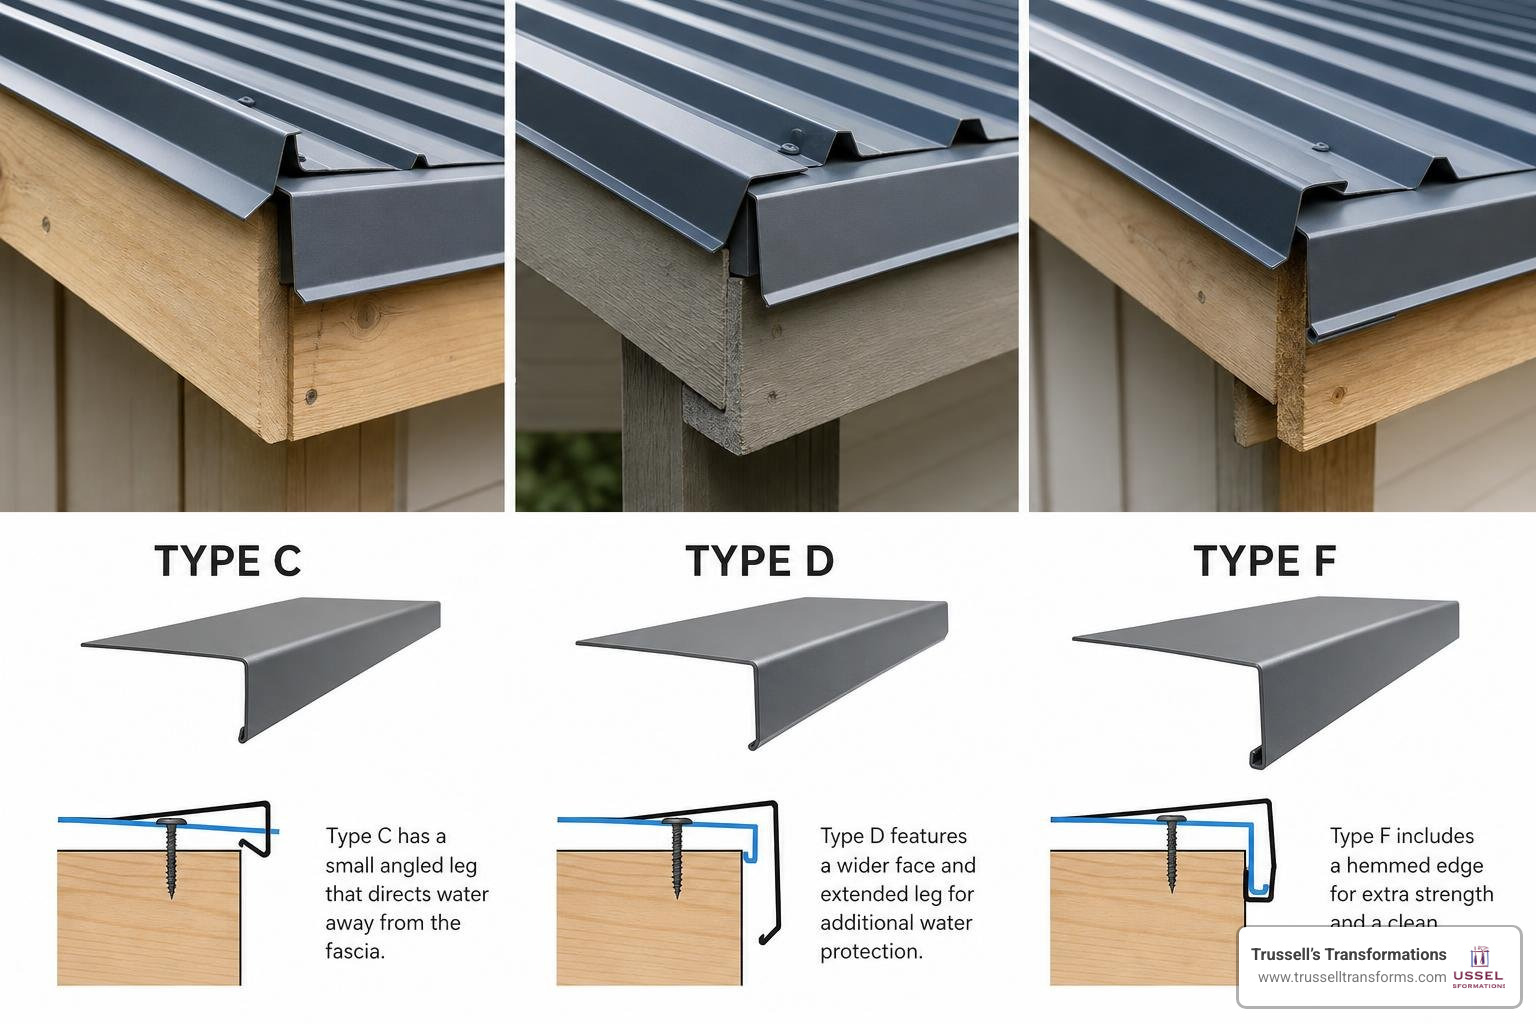
Type C, Type D, and Type F Profiles
Drip edge flashing comes in three primary profiles, each designed to handle water in specific ways:
- Type C (L-Style): This is a classic L-shaped flashing bent at a 90-degree angle. It features a small lower flange (or “kicker”) at the bottom to push water away from the wood. It is highly effective on rake edges (gables) where water flows parallel to the edge.
- Type D (T-Style / D-Metal): Shaped like a “T”, this profile features a wider top flange and an extended metal lip that pushes water significantly further away from the fascia board. Organizations like the Asphalt Roofing Manufacturers Association (ARMA) strongly prefer Type D at eaves because it manages heavy, cascading water runoff much better than standard L-style flashing.
- Type F (F-Style / Gutter Apron): Featuring a longer downward leg, Type F is designed to extend directly into your gutter system. It is the premier choice for retrofitting existing roofs because its extended upper flange can slide smoothly under existing shingles without disturbing the roof deck.
For more technical details on profile designs and water shedding physics, read the Drip Edge Installation: Protect Roof Edges 2026 industry overview.
Material Selection: Aluminum vs. Steel vs. Copper
Selecting the right metal is about balancing longevity, regional weather patterns, and budget:
- Aluminum: This is the go-to choice for roughly 90% of residential projects in the Rio Rancho and Albuquerque areas. It is lightweight, easy to cut, and will never rust.
- Galvanized Steel: If you are building in a high-wind zone within Bernalillo County, galvanized steel offers superior structural rigidity. Be sure to select a minimum of 24-gauge steel to prevent buckling or bending under wind load.
- Copper: For high-end architectural projects, copper offers unmatched durability, lasting up to 70 years. It must be fastened with copper or stainless steel nails to prevent galvanic corrosion.
For a deeper dive into metal flashing specifications and metal roof system designs, check out our resource on Metal Roofing Installation in Albuquerque: From Supplies to Success.
The Critical Installation Sequence for Eaves and Rakes
Understanding the correct layering sequence of your drip edge and underlayment is the single most critical factor in a successful roof drip edge install. Proper sequencing ensures that water is directed seamlessly off the roof, maximizing the protective benefits of your underlayment and flashing.
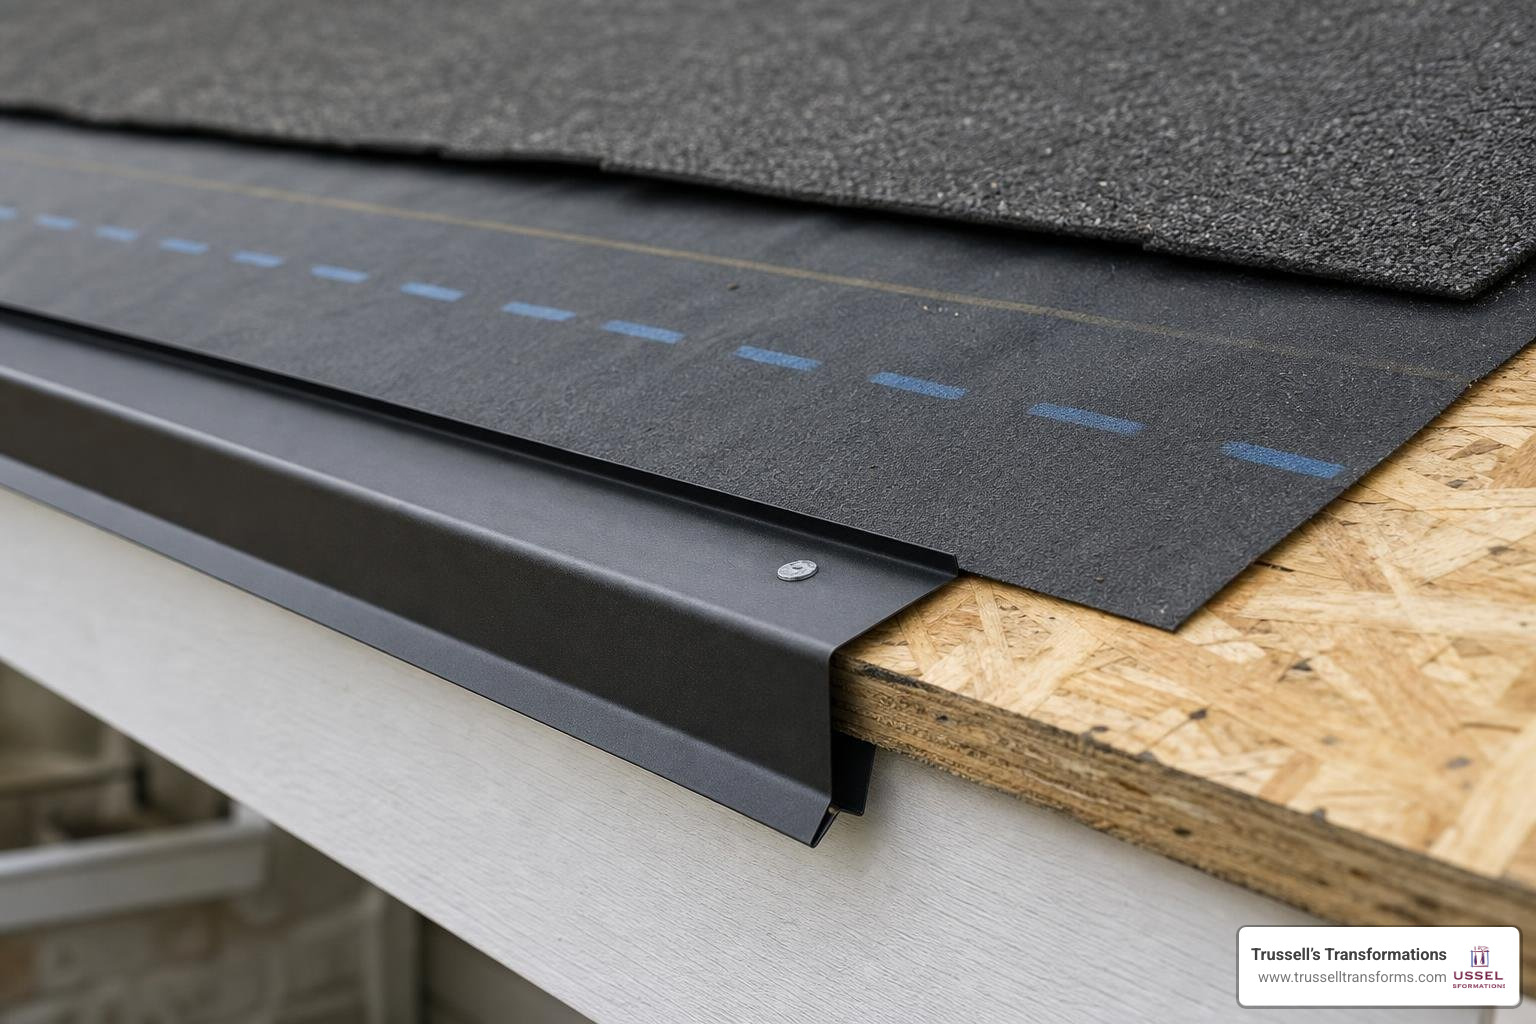
The sequence changes depending on whether you are working on the eaves (the horizontal bottom edges where gutters go) or the rakes (the sloped side edges of a gable roof). For a visualization of how these layers interact, you can consult How to Install a Drip Edge | Roof Edge Protection Guide | Roofs Wiki .
Eave Installation: Under the Underlayment
At the eaves, the drip edge must be installed under the underlayment:
- Bare Deck: The drip edge is fastened directly to the wood sheathing.
- Underlayment Layer: The roofing felt or synthetic underlayment is installed on top of the drip edge flange.
- The Physics: With this setup, water runs down the face of the underlayment, slides over the top of the drip edge, and falls safely into the gutter, keeping the fascia board completely dry.
If you are working with specialized low-slope systems, see our step-by-step instructions in The Ultimate Guide to Installing TPO Like a Boss.
Rake Installation: Over the Underlayment
At the rakes, the sequence is completely reversed. The drip edge must be installed over the underlayment:
- Underlayment First: Roll the underlayment all the way to the edge of the rake deck.
- Drip Edge Second: Fasten the drip edge on top of the underlayment.
- The Physics: Wind-driven rain pushing sideways across a gable roof will try to slide under the shingles. With the drip edge on top, water is blocked from blowing under the felt. Instead, it hits the metal flange and is directed down the slope of the roof.
To understand how proper edge sealing integrates with comprehensive attic ventilation systems, read our guide on Venting Your Frustrations with a New Ridge Vent.
Step-by-Step Roof Drip Edge Install for New Roofs
A professional-grade installation requires the right tools, careful measurement, and precise fastening techniques.
Tools and Materials Checklist
- High-quality aviation snips (tin snips)
- Standard hammer or pneumatic roofing nailer
- 1-1/4 inch galvanized roofing nails (or stainless steel ring shank nails)
- Measuring tape and chalk line
- Flat pry bar
- Roofing sealant/cement
- Safety gloves and eye protection
For an outstanding visual overview of the setup, refer to the Step by Step Guide to Installing a Drip Edge on Your Roof – This Old House .
Preparing the Roof Deck for a Roof Drip Edge Install
Before installing any metal, the roof deck must be completely clean, dry, and free of debris. Ensure that the wood sheathing is structurally sound along the perimeter.
If you are coordinating a large-scale project, working with certified professionals ensures every phase of preparation meets strict building codes. Learn more about what to look for in our article Everything You Need to Know About Certified Roofing Specialists.
Measuring, Cutting, and Fastening Techniques
- Measure and Plan: Standard drip edge comes in 10-foot or 10.5-foot lengths. Calculate your total linear footage and add a 10% waste factor to account for overlaps and corners.
- First Piece Placement: Align the first eave piece flush against the fascia. The lower flange should hang about 1/4 to 3/4 inch away from the fascia board.
- Nailing Pattern: Drive roofing nails high on the deck flange so they will eventually be covered by shingles. Place nails every 12 inches (never exceeding 16 inches apart). Ensure you leave about 1/32 inch of clearance under the nail head to allow for the metal’s natural thermal expansion and contraction.
- Overlapping Joints: When joining two pieces of drip edge, overlap them by a minimum of 2 inches (3 inches is best practice in high-wind regions). Apply a thin bead of roofing sealant between the overlapping metal layers.
- Corner Mitering: At the corners where the eave meets the rake, do not simply butt the pieces together. Cut the rake profile at a 45-degree angle, folding the metal around the corner for a clean, seamless transition.
For highly detailed commercial specifications regarding continuous cleats and splice plates, check out the Drip Edge LT Installation Guide .
Retrofitting an Existing Roof with a Roof Drip Edge Install
If your home was built without a drip edge, you can retrofit one without a full roof tear-off:
- Loosen the Shingles: Use a flat pry bar to gently lift the first course of shingles along the eave. Carefully pry up any existing nails or loosen the tar strip holding them down.
- Slide in Type F Flashing: Slide the wide upper flange of a Type F (or gutter apron) drip edge underneath the underlayment and shingles.
- Fasten Securely: Gently lift the shingles and nail the metal flange into the roof deck every 12 inches.
- Reseal: Apply roofing cement to the underside of the shingles to bond them securely back down to the new metal flashing.
To watch a practical demonstration of this retrofitting process, see the video guide at Drip Edge Installation on an Existing Roof .
Cost Analysis: New Construction vs. Retrofit Projects
Budgeting for a roof drip edge install depends heavily on whether you are installing it during a complete roof replacement or retrofitting it onto an existing roof.
New Installation Pricing Breakdown
When installed as part of a new roofing project, labor costs are incredibly low because the roof deck is already fully exposed:
- Material Cost: Aluminum ranges from $0.30 to $0.80 per linear foot, galvanized steel ranges from $0.50 to $1.20 per linear foot, and copper ranges from $3.50 to $9.50 per linear foot.
- Total Installed Cost: Typically runs $1.00 to $3.00 per linear foot (labor and materials combined).
- Average Home Example: A standard 2,000-square-foot home in Rio Rancho with 200 linear feet of perimeter will cost between $300 and $600 for a brand-new drip edge installation.
For additional planning resources and product details, you can view How to Install Drip Edge on Your Roof .
Retrofit Installation Pricing Breakdown
Retrofitting is significantly more labor-intensive because installers must meticulously lift existing shingles, remove old nails, and work around established gutters:
- Total Installed Cost: Typically runs $5.00 to $9.00 per linear foot.
- Average Home Example: Retrofitting that same 200-linear-foot perimeter will cost between $1,000 and $1,800.
While retrofitting is more expensive up front, it is a highly protective upgrade that shields your home’s structural framing from moisture. For advice on selecting a qualified team to handle this delicate process, read A Practical Guide to Choosing a Roofing Contractor.
Frequently Asked Questions About Roof Drip Edge Installation
Is a drip edge required by building code?
Yes. Since the adoption of the 2012 International Residential Code (Section R905.2.8.5), a drip edge is strictly required at both eaves and rakes on all asphalt shingle roofs. Local building departments in Albuquerque, Rio Rancho, and across Bernalillo County enforce this standard during any new roof installation or full re-roofing project.
What is the difference between a drip edge and a gutter apron?
A standard drip edge (such as Type C or Type D) is designed to protect the immediate edge of the roof deck and push water slightly away from the fascia. A gutter apron (Type F) features a much longer downward leg bent at an angle, designed specifically to direct water deep into the center of your gutter channel, preventing any water from slipping behind the gutter itself.
For quick tips on choosing between these profiles, consult the DRIP EDGE manufacturer guide.
Can you install a drip edge without replacing the shingles?
Yes, using the retrofitting method with Type F flashing. By using a flat bar to loosen the starter shingles, a skilled professional can slip the new drip edge underneath, secure it to the deck, and seal the shingles back down without needing a full roof tear-off.
Work with Albuquerque’s Premier Exterior Experts
A proper roof drip edge install is a small detail that makes a massive difference in the lifespan and integrity of your home. At Trussell’s Transformations, we bring more than 25 years of experience to every home improvement project in Albuquerque, Rio Rancho, and Bernalillo County.
As a true one-stop shop, we provide both professional installation by fully licensed contractors and support for our DIY community. Beyond our high-performance roofing services, we invite you to visit our local showroom at 8023 Edith Blvd NE, Albuquerque, NM 87113 to explore our premium interior lines, featuring:
- Custom Cabinetry: Durasupreme Cabinetry, Waypoint Living Spaces, Sollid Cabinetry, and Kitchen Cabinet Distributors.
- Luxury Countertops: Caesarstone, Cambria, Silestone, and selections from The Stone Collection.
To make your home transformation seamless and affordable, we are proud to offer 0% financing options.
Ready to secure your home’s exterior or start planning your next interior remodel? Explore our professional services and schedule your consultation today by visiting our Services Roofing page.
Recent Comments