

Putting Handles on Cabinet Drawers: A Quick, Clean Upgrade
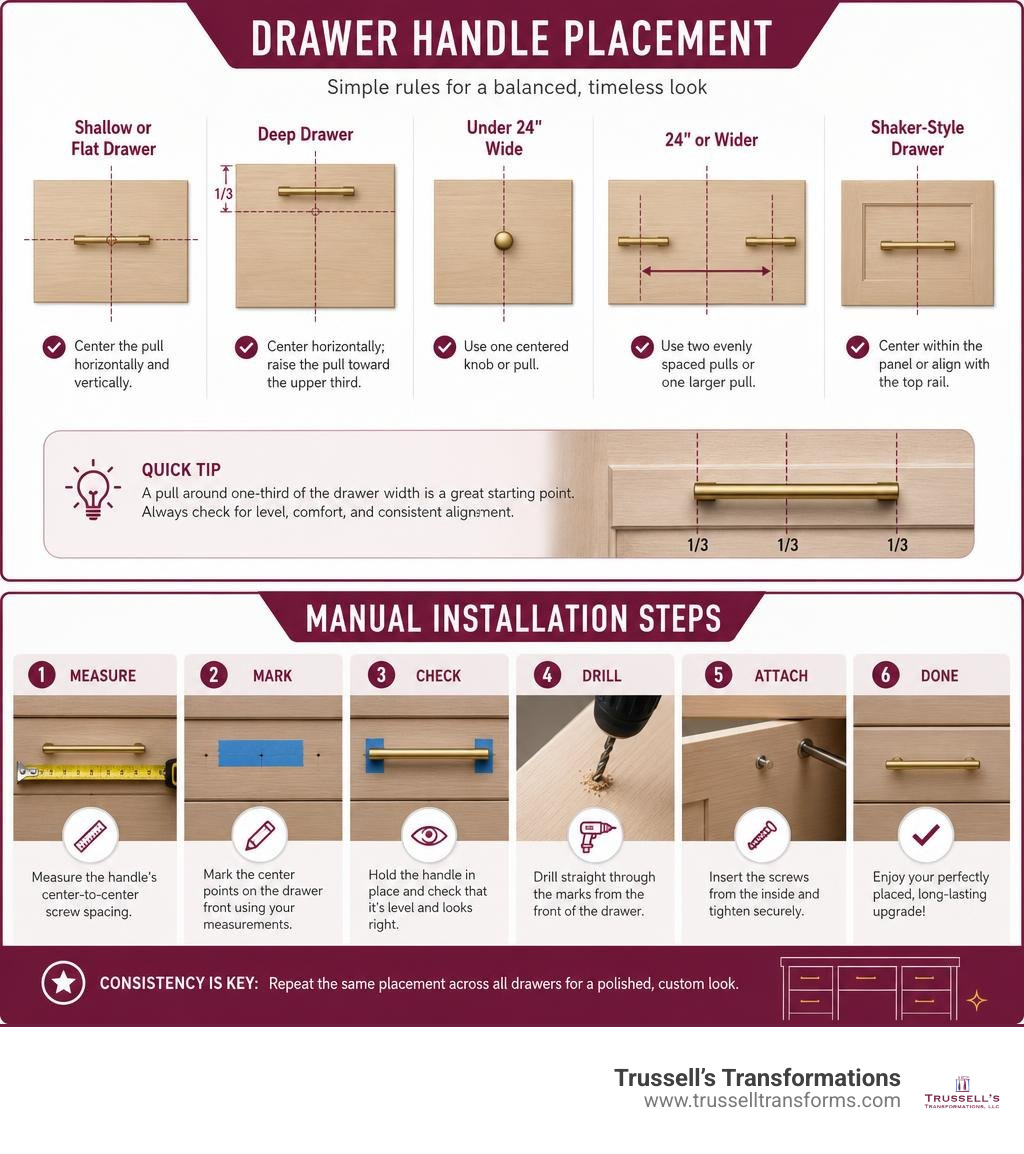
Putting handles on cabinet drawers is a simple way to make a kitchen or bathroom feel more finished. The key is consistent placement: center a standard drawer pull left to right, use the pull’s exact center-to-center screw spacing, and drill straight through the drawer front before fastening the screws from inside.
For a quick placement guide:
| Drawer type | Recommended handle placement |
|---|---|
| Shallow or flat drawer | Center the pull horizontally and vertically |
| Deep drawer | Center horizontally; raise the pull toward the upper third if that fits the cabinet style |
| Drawer under 24 inches wide | Use one centered knob or pull |
| Drawer 24 inches or wider | Use two evenly spaced pulls or one larger pull |
| Shaker-style drawer | Center within the panel or align with the top rail for a consistent look |
A pull around one-third of the drawer width is a useful starting point, though comfort and the overall cabinet style matter too. Before drilling, temporarily hold the hardware in place with painter’s tape or removable adhesive. This small check can confirm that the handles look level, feel comfortable, and line up across the room.
For homeowners planning a cabinet refresh as part of a larger Albuquerque kitchen or bath project, careful hardware placement gives new cabinetry a more custom, intentional finish.
Putting handles on cabinet drawers vocab explained:
Essential Tools and Placement Rules for Putting Handles on Cabinet Drawers
When taking on a DIY hardware project without a factory jig, having the right setup guarantees clean, accurate execution. Putting handles on cabinet drawers manually requires basic hand and power tools you likely already have in your garage or toolbox.

To get started, gather these essential items:
- Cordless drill: A standard 12V or 18V variable-speed drill offers precise control.
- 3/16-inch twist drill bit: The standard size for 8-32 cabinet hardware screws (a 5mm bit works identically).
- Tape measure or metric ruler: Metric measurements can often be easier when working with imported hardware center-to-center spacings like 96mm or 128mm.
- Painter’s tape: Protects delicate cabinet finishes, ensures clean hole edges, and provides an easy surface for pencil marks.
- Pencil and eraser: Sharp graphite ensures fine, exact layout lines.
- Small torpedo level: Helps verify horizontal alignment on flat slab fronts.
- Manual screwdriver: Critical for final tightening without over-torquing screw heads or stressing cabinet wood.
- Scrap backing block: A piece of smooth hardwood held against the back of the drawer face to produce clean drill exit holes.
While manufactured jigs speed up repetitive production, learning to measure and mark manually gives you complete control over custom placements. Here is how manual installation compares with other techniques:
| Method | Measuring Time | Precision Tolerance | Tool Cost | Ideal Project Scope |
|---|---|---|---|---|
| Manual Measuring | 2–4 minutes per drawer | Extremely high (when double-checked) | $0 (uses existing basic tools) | Custom layouts, mixed handle sizes, unique drawer fronts |
| Cardboard Template | 1 minute per drawer | Moderate (hole can wear out over time) | Under $2 | Standard kitchen setups with uniform drawer dimensions |
| Commercial Hardware Jig | 15 seconds per drawer | Highly precise (.005 in.) | $20 – $200 | Large-scale installs, whole-home remodels, professional use |
If you want to understand how professionals tackle layout and drilling accuracy, read this resource on How To Drill Cabinet Handle Holes Perfectly.
Choosing Between Knobs and Pulls
Deciding between knobs and pulls comes down to ergonomics, accessibility, and visual balance. Knobs rely on a single screw mounting hole, making them fast to install and easy to align. Pulls require two mounting holes with precise center-to-center spacing—most commonly 3-3/4 inches (96mm)—and provide a firmer grip for heavy kitchen items.
For drawers carrying pots, heavy cookware, or deep pantry items, pulls offer superior ergonomic leverage. Pulling open a loaded 30-inch drawer with a single small knob puts unnecessary strain on a single screw point and can cause the drawer slides to bind unevenly. Pulls distribute opening force across both hands or a broader gripping area.
A good general guidelines ratio is the 1/3 proportion rule: choose a pull that spans roughly one-third the total length of the drawer face. For instance, a 15-inch drawer face looks visually balanced with a 5-inch pull. If your calculated measurement sits between manufactured pull sizes, sizing up creates a more modern, upscale appearance. For more insights on choosing matching hardware styles, explore our guide on Get a Grip: The Ultimate Guide to Adding Knobs and Handles to Your Cabinets.
Standard Placement Rules for Putting Handles on Cabinet Drawers
Where you position hardware on a drawer face determines the visual symmetry of your entire kitchen:
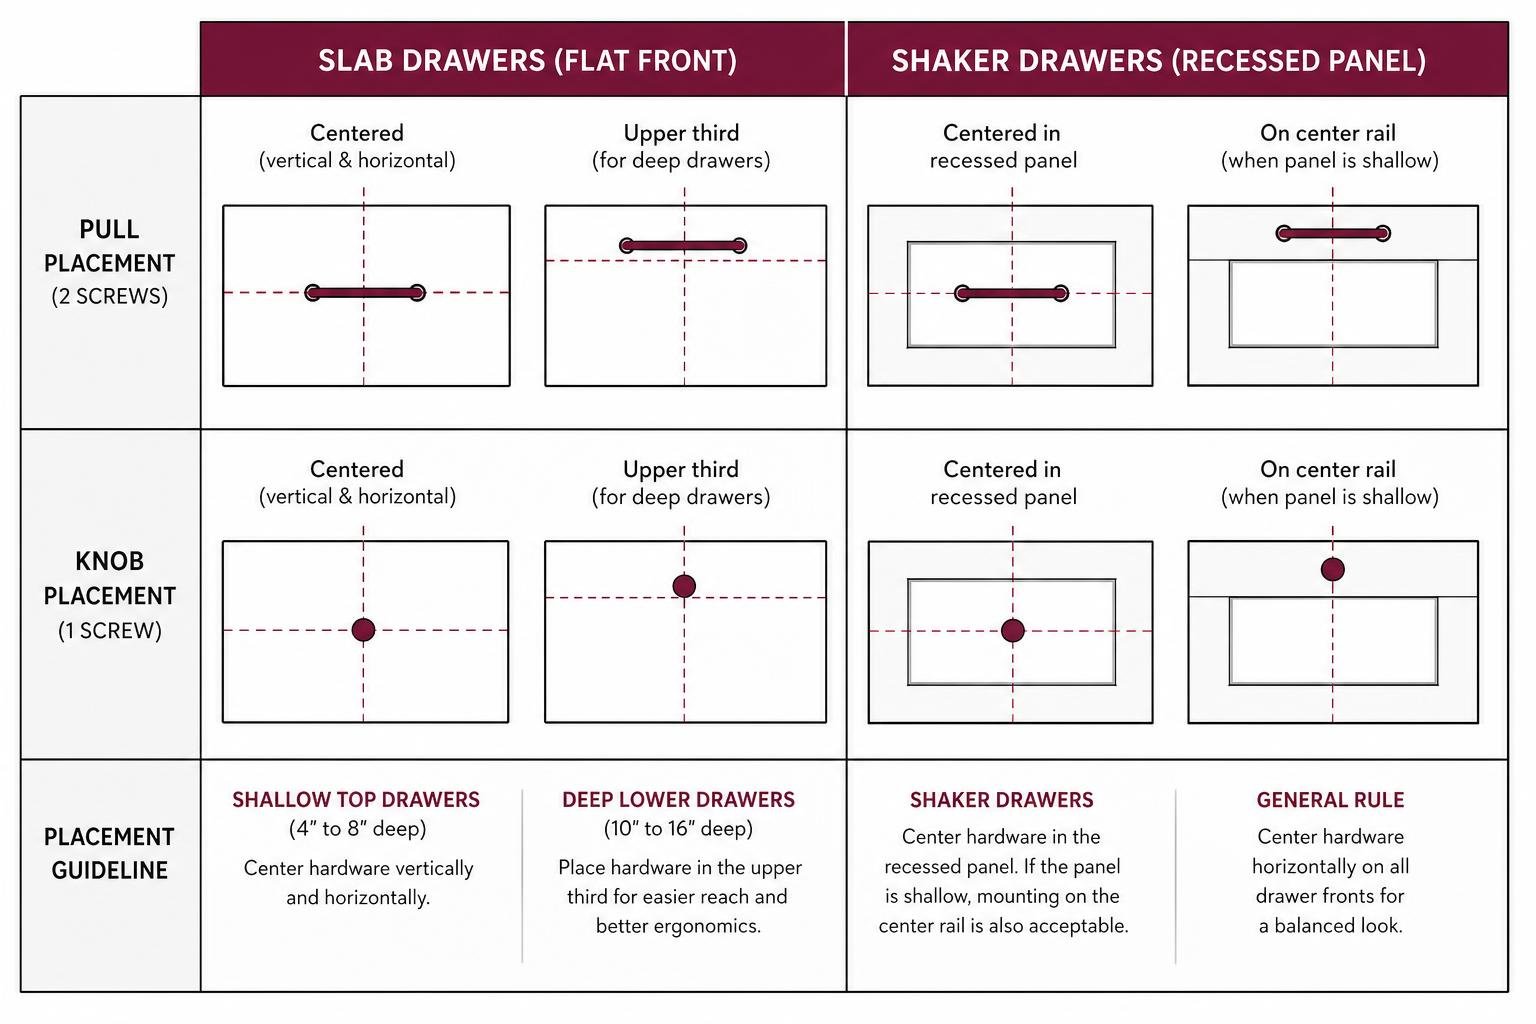
- Shallow Top Drawers (4 to 8 inches deep): Hardware is almost universally centered horizontally and vertically within the front face panel.
- Deep Lower Drawers (10 to 16 inches deep): Centering hardware vertically on a very deep drawer can make reaching down uncomfortable. Positioning the pull in the upper third of the drawer face improves ergonomic reach while keeping a clean design line across your base cabinets.
- Shaker-Style Recessed Panels: On traditional 5-piece Shaker drawer fronts, center the handle directly inside the recessed middle panel. However, if the top rail is narrow and the recessed panel is shallow, mounting directly onto the center rail of the drawer frame is also an acceptable design choice.
- Flat Slab Drawers: Sleek modern cabinets look best when hardware is centered dead-in-the-middle horizontally and vertically.
How to Measure and Mark Drawer Fronts Without a Template
Installing hardware without a pre-made jig is straightforward once you know how to locate exact center points. Taking a few extra minutes to double-check your math prevents permanent mistakes on expensive cabinet fronts.

Start by applying a strip of blue painter’s tape across the middle area of the drawer face. This protects the finish from pencil marks and prevents the drill bit from skidding across finished wood or laminate.
There are two effective methods to find the center of any drawer face:
The Width Division Method:
- Measure the total width of the drawer front from left to right. Divide this number by 2 to find the vertical center line (e.g., a 24-inch drawer face has its centerline at 12 inches).
- Measure the total height of the drawer front from top to bottom. Divide by 2 to find the horizontal center line (e.g., an 8-inch high drawer has its centerline at 4 inches).
- Draw a light crosshair on the painter’s tape where these two lines intersect.
The Diagonal Corner-to-Corner Method:
- Align a long straightedge from the top-left corner to the bottom-right corner of the drawer face and light pencil a line near the middle.
- Align the straightedge from the top-right corner to the bottom-left corner and draw an intersecting pencil line.
- The exact geometric center sits right where those two diagonal lines cross.
Once you have established the center mark, measure your handle’s center-to-center distance—the exact distance between the centers of the two threaded screw holes. The most common standard pull spacing is 3-3/4 inches (96mm).
Divide your center-to-center measurement by 2. Using your drawer center point as the origin, measure that half-distance to the left and to the right along your horizontal line, and mark your drill points clearly. For example, for a 3-3/4-inch pull (3.75 inches), mark 1-7/8 inches (1.875 inches) to the left and 1-7/8 inches to the right of your center point.
Before drilling, stick a small piece of removable sticky-tack or painter’s tape onto the back of your handle and press it directly onto your pencil marks. Stand back 5 to 10 feet to visually inspect the handle placement from across the room.
Ensuring Consistent Alignment Across Multiple Drawers
When working across a full bank of cabinet drawers, consistency is what separates DIY projects from custom professional installations. Measuring each drawer individually from top-left and top-right edges ensures every pull sits at the exact same relative position.
Never assume every drawer box or face in a cabinet run is identical down to the millimeter. Always measure from the outer finished edges of the specific drawer face you are marking. Check out this guide on How to Install Cabinet Pulls Perfectly Straight with No Mistakes for additional alignment tips.
Step-by-Step Guide to Manual Handle Installation
Once your marks are measured and verified, it is time to drill and mount your new drawer pulls.
Step-by-Step Manual Technique for Putting Handles on Cabinet Drawers
Follow this step-by-step process to ensure a clean finish:
- Prepare the Drawer: Remove drawer contents or pull the drawer box out slightly so you have clean access to both the front and back of the drawer face.
- Apply Face Protection: Confirm painter’s tape covers the entire drill zone.
- Indent the Drill Points: Use a sharp nail or center punch to make a tiny indentation at each pencil crosshair. This small divot keeps the tip of your drill bit centered so it won’t walk or wander when starting.
- Set Up Backing Protection: Clamp or hold a smooth scrap block of wood tightly against the inside of the drawer front directly behind your drill points. When the drill bit breaks through the back of the drawer face, pushing into scrap wood ensures a clean, smooth exit hole.
- Drill the Hole Perpendicularly: Chuck a 3/16-inch twist bit into your cordless drill. Hold the drill perfectly level and 90 degrees square to the drawer face. Drill through slowly at medium speed, allowing the bit to slice cleanly through the wood.
- Clean and Inspect: Pull away the painter’s tape and clean away wood dust from both sides of the hole.
- Thread Screws by Hand: Insert the mounting screws (typically size 8-32) through the back of the drawer box into your handle. Hand-tighten using a manual Phillips screwdriver until snug.
Using a manual screwdriver for the final turn prevents over-torquing, which can strain screw threads or mark wood finishes. For step-by-step detail on avoiding unneeded holes, see How to Place and Install Cabinet Hardware Without Making Extra Holes.
Common Installation Mistakes to Avoid
Even careful DIYers can run into small snags. Avoiding these common mistakes keeps your project running smoothly:
- Angled Drilling: Holding the drill at an angle causes the exit holes on the back of the drawer box to misalign with the handle, forcing screws to bind or sit crooked.
- Overtightening Screws: Avoid using impact drivers or high-torque power drills to sink hardware screws. Too much torque can stress internal brass threads or mar painted cabinet doors.
- Omitting Backing Boards: Drilling straight through solid wood, veneered plywood, or MDF without a scrap backing block almost always leaves uneven exit hole edges.
- Incorrect Screw Lengths: Standard cabinet hardware ships with 1-inch screws meant for single 3/4-inch door panels. Drawers consist of both a drawer box face and an outer decorative front (totaling 1-1/2 inches), so they require longer 1-1/2 inch or breakaway truss-head screws.
Managing Wide Drawers, False Fronts, and Old Screw Holes
Standard single pulls work well on drawers under 24 inches wide. However, wider pot-and-pan drawers require a modified approach to maintain strength and scale.
When putting handles on cabinet drawers that measure 24 inches or wider, you have two primary options:
- Install Two Separate Handles: Divide the total drawer width into four equal quarters. Place one handle at the 1/4 mark and the second handle at the 3/4 mark. For example, on a 32-inch wide drawer, place the centers of your two handles 8 inches in from the left edge and 8 inches in from the right edge.
- Install One Oversized Pull: Modern kitchen designs frequently feature wide bar pulls spanning 50% to 66% (one-half to two-thirds) of the overall drawer width, creating an elegant linear look.
For false drawer fronts—such as the decorative panels underneath kitchen or bathroom sinks—installation requires slightly different planning. Because there is no functional drawer box behind a false front, you only drill through the single decorative panel. Ensure screw heads behind false fronts clear sink basins and plumbing lines cleanly. Learn more about professional drawer hardware techniques in How to Install Cabinet Handles and Knobs.
Filling Previous Holes for Hardware Swaps
If you are replacing old single-hole knobs with new double-hole handles, you will need to fill existing holes before drilling new ones:
- Clear out dust from the old screw hole.
- Fill the hole using high-quality stainable or paintable wood filler, pressing it firmly into the cavity with a putty knife.
- Allow the filler to dry completely according to manufacturer instructions.
- Sand the surface smooth using 220-grit sandpaper until it sits flush with the cabinet face.
- Touch up the spot with matching cabinet stain or paint prior to marking and drilling your new pull locations.
Frequently Asked Questions About Drawer Handle Installation
What drill bit size should I use for cabinet drawer handles?
The standard drill bit size for standard cabinet hardware screws (size 8-32) is 3/16 inch (or a 5mm bit). This creates a clean hole that allows the screw shaft to pass through easily without forcing or damaging threads. If your hardware uses heavier 1/4-inch screws, step up to a 7/32-inch or 9/32-inch drill bit. Always test your drill bit size on a piece of scrap wood before drilling into your actual cabinets.
How do I install handles on wide drawers over 24 inches?
For drawers 24 inches or wider, use two handles spaced at the 1/4 and 3/4 horizontal marks across the drawer face, or choose a single long pull that covers 1/2 to 2/3 of the drawer width. Using two handles or an oversized bar pull makes opening heavy, loaded drawers easier and prevents drawer glides from racking over time.
Can I install drawer handles on false drawer fronts?
Yes! Installing matching handles on false drawer fronts—such as sink base fronts or tip-out trays—creates visual continuity across your cabinetry. Since false fronts are single-layer panels, use standard 1-inch cabinet screws rather than the longer 1-1/2-inch screws needed for functioning drawer boxes.
Conclusion
Putting handles on cabinet drawers manually is an approachable DIY upgrade that brings immediate personality and convenience to your space. By measuring carefully, verifying centerlines with painter’s tape, backing your drill holes, and hand-tightening hardware, you can achieve clean, square results across every room in your home.
When planning a larger kitchen or bathroom transformation in the Albuquerque area, partnering with experienced local specialists saves time and eliminates guesswork. At Trussell’s Transformations, we bring over 25 years of experience as licensed contractors providing complete home renovations. We believe thorough planning up front pays off for homeowners—which is why investing in a comprehensive initial design estimate with detailed 3D renderings helps eliminate unexpected errors and ensures long-term cost savings.
Visiting our local Albuquerque showroom at 8023 Edith Blvd NE allows you to explore top-tier cabinetry brands like Durasupreme Cabinetry, Waypoint Living Spaces, Sollid Cabinetry, and Kitchen Cabinet Distributors. If you are selecting surfaces, we feature premium quartz and granite countertop options from Caesarstone, Cambria, Silestone, and The Stone Collection. Natural stone and engineered quartz provide superior durability, scratch resistance, and timeless elegance compared to basic laminate countertops.
Whether you prefer hands-on DIY options or full pro installation backed by 0% financing options, our team is ready to help you craft your dream home. Explore our custom cabinet services or contact Trussell’s Transformations today to start planning your project!
Recent Comments