

Preparing Your Space and Layout for Upper Cabinets
Before lifting a single cabinet box, taking the time to map out your room layout ensures everything lines up cleanly. Floors are rarely perfectly flat, and walls are almost never straight. Finding reference points early prevents compounding alignment errors across a long bank of cabinetry.
Start by locating the highest point of your floor across the entire installation area. Take a 6-foot spirit level or a reliable laser level, place it along the wall base, and measure outward about 21 inches (the standard toe-kick depth for lower units). Snap a level reference line across the wall. The shortest measurement down to the subfloor indicates your highest floor point.
From this high spot, establish your standard kitchen cabinet heights. A standard base cabinet stands 34-1/2 inches tall. Add a standard clearance space of 18 to 19-3/8 inches between the base countertop line and the bottom of your upper wall units. This typically puts your lower wall cabinet benchmark line right around 54 inches above the floor’s high point.
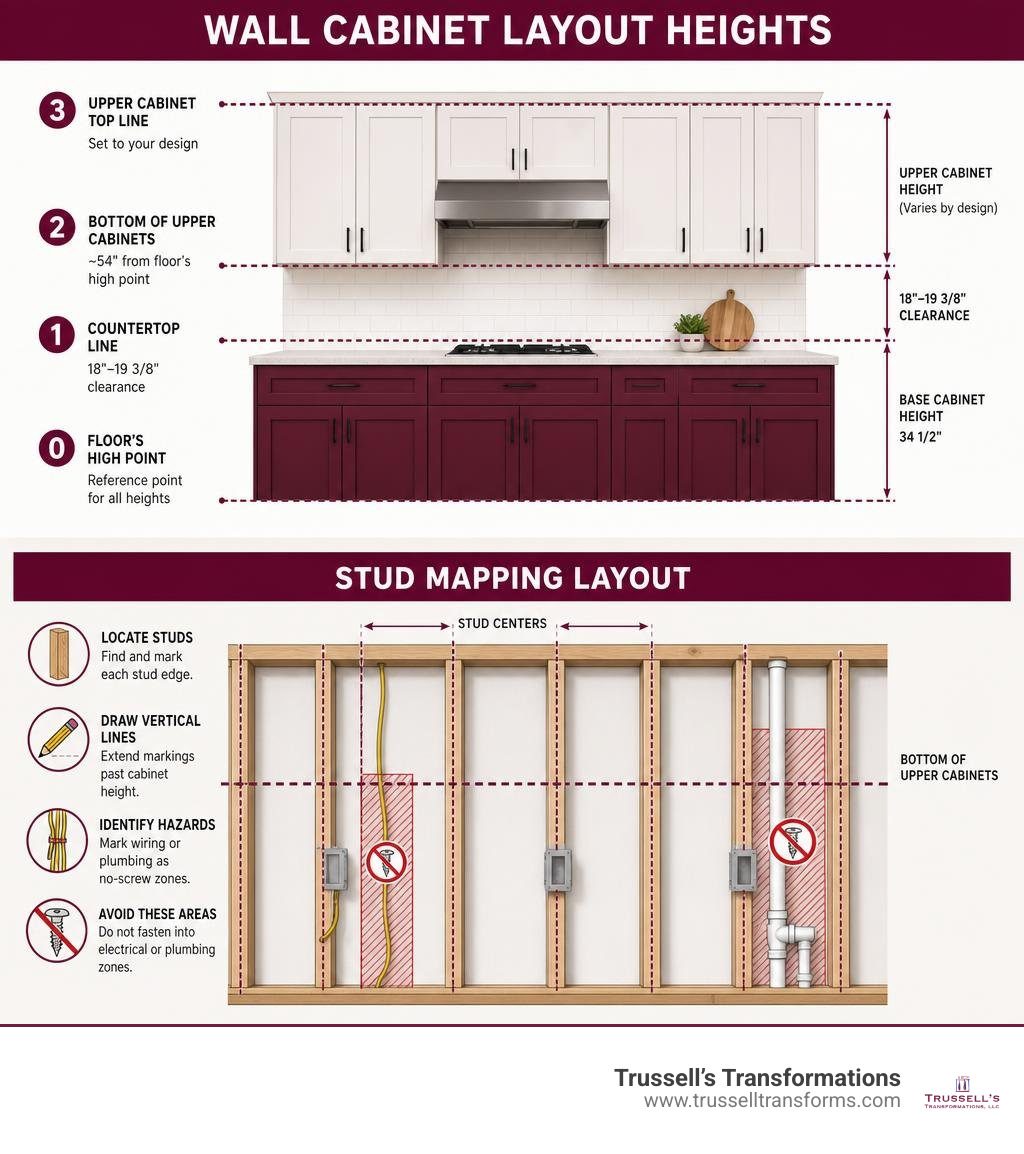
Take a stud finder and locate every wall stud along the path. Verify the stud centers, mark their edges clearly with a pencil, and run vertical chalk lines up past your planned upper cabinet height. Check for hidden hazards: identify vertical runs where electrical cabling or plumbing pipes travel inside the wall cavity, and mark those areas as strictly no-screw zones.
When planning a full kitchen remodel, pairing high-quality cabinetry with premium solid surfaces creates a cohesive, durable space. In our Albuquerque showroom, we showcase premium cabinetry lines such as Durasupreme Cabinetry, Waypoint Living Spaces, Sollid Cabinetry, and Kitchen Cabinet Distributors. Matching these builds with durable quartz or granite countertops—sourced from top brands like Caesarstone, Cambria, Silestone, and The Stone Collection—elevates your kitchen far above dated laminate surfaces. Quartz and granite deliver superior heat and scratch resistance, non-porous hygiene, and long-term structural resilience that laminate simply cannot match.
Investing in a comprehensive, paid design estimate before purchasing materials ensures these elements come together seamlessly. A paid estimate covers detailed 3D design renderings, precise field measurements, and thorough mechanical planning. This upfront preparation eliminates costly field mistakes, guarantees exact cabinet fits, and saves thousands of dollars over the lifespan of your renovation.
Locating Wall Studs and Setting the Ledger Board
Residential framing studs are typically spaced 16 inches apart on center. Once your stud centers are confirmed, install a temporary wooden ledger board along your 54-inch baseline. A straight, knot-free 1×4 piece of lumber works best for this purpose.
Fasten the ledger board directly into the wall studs using 2-1/2-inch wood screws, checking continuously with a level to guarantee it is completely flat. This temporary support rail acts as an extra pair of hands, taking on the downward vertical weight of each upper box while you align, clamp, and fasten them.
Reviewing proper cabinet installation 3 things you need to know helps reinforce how critical solid stud anchorage and proper support fixtures are to long-term safety.
Mounting Systems: Direct Fastening, French Cleats, and Suspension Rails
There are several methods for hanging cabinetry securely, depending on whether you require permanent attachment or an easily removable setup.
| Mounting System | Best Use Case | Weight Capacity | Removability | Wall Clearance Profile |
|---|---|---|---|---|
| Direct Stud Fastening | Permanent kitchen upper & base runs | High (Framing-limited) | Low (Must unscrew directly) | Flush to drywall |
| Wooden French Cleat | Workshops, vanities, solo DIY hangs | High (Bevel interlock) | High (Lift-off design) | 3/4-inch standoff (requires filler) |
| Steel Suspension Rail | Frameless cabinetry runs, modular units | High (Continuous rail) | High (Bracket release) | Flush to minimal standoff |
| Aluminum Z-Clips | Low-profile hanging, accent units | Medium to High | High (Lift-off design) | 1/4-inch low clearance |
Exploring the best way to install cabinets like a pro will help you determine which mechanical system fits your specific room conditions.
Essential Hardware for Attaching a Cabinet to the Wall
Fastener selection is critical. Never use standard drywall screws or common nails to hang wall cabinets. Drywall screws are made from brittle, hardened steel designed to hold gypsum board; they lack shear strength and will snap under the lateral and downward weight of fully loaded cabinets.
Always choose dedicated structural fasteners, such as #10 x 2-1/2-inch pan-head screws with integrated washer faces or heavy-duty structural wood screws (like GRK RSS fasteners). Structural washer-head screws provide a wide clamping surface that pulls the cabinet frame firmly against the wall without punching through the wood hanging rails. Fasteners should penetrate at least 1 to 1-1/2 inches into the center of solid wood wall framing studs. Consult the manufacturer’s Cabinet Installation Guide for specific load ratings and hardware requirements.
Fabricating and Installing Custom French Cleats
A French cleat is a two-part mounting system consisting of interlocking 45-degree beveled strips. It is an effective option for solo installers hanging heavy cabinets or for applications where a cabinet needs to be easily removed for maintenance.
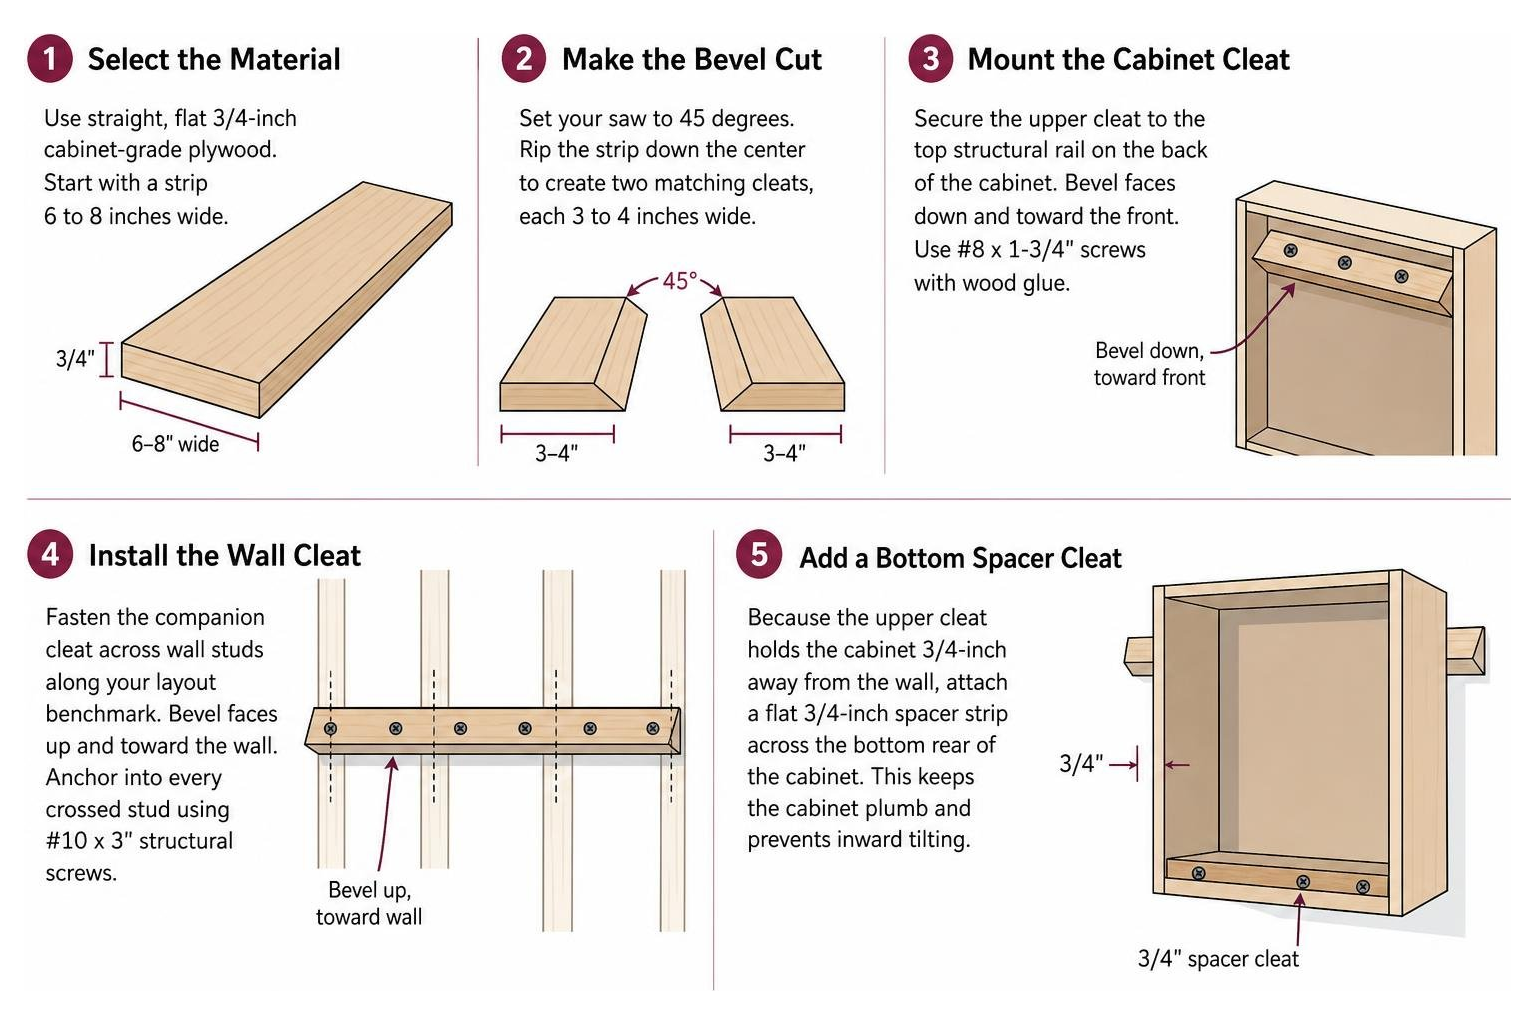
- Select the Material: Use a straight, flat strip of 3/4-inch cabinet-grade plywood rather than solid wood, as plywood resists warping and splitting. Start with a strip 6 to 8 inches wide.
- Make the Bevel Cut: Set your table saw or track saw blade to a precise 45-degree angle. Rip the plywood strip directly down the center to produce two matching interlocking cleats, each at least 3 to 4 inches wide.
- Mount the Cabinet Cleat: Secure the upper cleat to the top structural rail on the back of the cabinet box. Orient the 45-degree beveled edge facing downward and pointing toward the front of the cabinet. Use #8 x 1-3/4-inch wood screws paired with wood glue.
- Install the Wall Cleat: Fasten the companion cleat horizontally across your wall studs along your layout benchmark. The 45-degree bevel must face upward and angle toward the wall. Anchor it into every crossed wall stud using #10 x 3-inch structural screws.
- Add a Bottom Spacer Cleat: Because the upper cleat holds the cabinet 3/4-inch away from the wall, attach a flat 3/4-inch wooden spacer strip across the bottom rear of the cabinet. This keeps the cabinet plumb and prevents inward tilting.
- Secure Against Lift-Off: Once the cabinet is hung onto the wall cleat, drive a vertical locking screw through the interlocking joint or run a retaining screw through the bottom rail into a wall stud. This stops the cabinet from accidentally shifting upward or climbing off the cleat.
- Conceal the Edge Gaps: Close the 3/4-inch standoff gap on visible cabinet ends by attaching an extended decorative side end panel or a scribed wooden filler strip flush against the drywall.
Step-by-Step Process for Attaching a Cabinet to the Wall

If you are considering whether can i install cabinets myself diy guide to cabinet installation is the right approach for your project, following standard structural procedures makes the job manageable.
- Remove Doors and Hardware: Before lifting any cabinet boxes, remove all cabinet doors, drawers, and adjustable interior shelves. This reduces the box weight significantly and makes positioning much easier during installation.
- Pre-Drill Hanging Rails: Measure the distance from your reference corner to each marked wall stud. Transfer these dimensions to the upper and lower hanging rails inside the cabinet box. Pre-drill 7/32-inch pilot holes through the hanging rails, positioning them roughly 3/4-inch down from the top and 3/4-inch up from the bottom rail edges.
- Mount the Corner Cabinet First: Always start your run from a corner or blind-corner cabinet. Lift the corner box onto your level ledger board. Push it back against the wall, check plumb in both directions, and drive #10 x 2-1/2-inch pan-head screws loosely into the studs through your pre-drilled holes. Do not tighten the screws all the way down yet.
- Set Adjacent Cabinets: Lift the next adjacent cabinet onto the ledger board and slide it tight against the corner unit.
- Clamp and Align Face Frames: Use dynamic C-clamps or face-frame clamps to align the front stiles of both cabinets until they are flush. Pre-drill 3/32-inch pilot holes through the hinge pockets of the face frames, then secure the units together using #8 x 2-1/2-inch trim-head screws. Joining the face frames unifies the separate boxes into a rigid structure.
Handling Cabinets with Thin or Flimsy Backing
Many stock and ready-to-assemble (RTA) cabinets feature thin 1/8-inch or 1/4-inch hardboard back panels. These center panels are designed purely as dust barriers and have no load-bearing strength. Screwing directly through thin center backing will result in the screw tearing through the material, causing the cabinet to pull off the wall.
Always locate the solid 1 to 1-1/2-inch structural hanging rails integrated into the top and bottom of the cabinet carcass. Fasteners must pass through these structural rails directly into the wall framing. Furthermore, clamping and interlocking adjacent cabinet face frames and side jambs distributes the hanging load across multiple wall studs, reducing stress on any individual box.
Leveling, Shimming, and Securing Cabinet Runs
Drywall surfaces frequently feature crowns, dips, and bows. As highlighted by How to Install Kitchen Cabinets – This Old House, never pull a cabinet back tight against an uneven wall without support, as doing so will rack the cabinet box, pull the face frames out of square, and cause doors to bind.
Slide tapered wood shims behind the cabinet hanging rails directly along the marked stud lines wherever a gap exists between the box and the drywall. Check across the front faces of your entire cabinet run using a 6-foot level.
Once the run is plumb, level, and square, fully tighten your #10 x 2-1/2-inch structural wall screws into the studs. Score any excess protruding shims with a sharp utility knife and snap them off flush with the cabinet edges. Finally, remove the temporary ledger board and patch any small screw holes left in the drywall.
Fastening Cabinets to Non-Wood Substrates and Special Wall Types

When attaching cabinetry to non-standard surfaces—such as concrete block, solid brick, or metal-stud framing—standard wood screws cannot be used. Similar careful fastener selection applies when learning how to attach base cabinets like a pro across varying room substrates.
For solid concrete block or masonry walls, pre-drill pilot holes using a masonry bit, then drive 3/16-inch by 2-3/4-inch Tapcon concrete screws fitted with 1/4-inch stainless steel washers directly through the cabinet hanging rails. Place at least four anchors per cabinet box (two along the top rail and two along the bottom rail), positioning them roughly 2 inches inward from the side panels.
Attaching a Cabinet to the Wall with Metal Studs or Plasterboard
In residential spaces with light-gauge steel framing, standard coarse-thread wood screws will strip the metal. Fasten through the structural cabinet rails using self-tapping fine-thread metal screws engineered to tap into steel studs.
If a cabinet spans a hollow drywall section where framing is inaccessible due to electrical conduits or non-standard stud spacing, do not rely on standard plastic wall plugs. Instead, bridge the span using a solid wood backer cleat anchored across the nearest accessible studs, or install heavy-duty toggle anchors (such as 1/4-inch steel snap toggles) spaced every 10 to 12 inches along the hanging rail. Always tie adjacent cabinet boxes together through their side stiles to share the vertical load across all available attachment points.
Frequently Asked Questions About Attaching Wall Cabinets
Why should you never use drywall screws to hang wall cabinets?
Drywall screws are made from brittle, hardened steel designed to secure drywall sheets to framing. They lack the shear strength necessary to support the downward and lateral loads of heavy wooden cabinets loaded with dishes and cookware. Under dynamic weight, drywall screw heads can shear off cleanly, creating an immediate collapse hazard. Always use heavy-duty #10 pan-head or washer-head structural cabinet screws.
Should you install upper wall cabinets before base cabinets?
Yes. Installing upper wall cabinets before lower base cabinets provides an open workspace. This allows you to position ladders, set up ledger boards, and lift heavy upper units without having to reach awkwardly over base cabinets or risk scratching new base units and countertops.
How do you prevent cabinets hung on a French cleat from lifting off?
To prevent a cabinet on a French cleat from creeping upward or accidentally unhooking, drive a vertical locking screw down through both interlocking beveled cleats, or run a secondary structural screw through the bottom hanging rail directly into a wall stud after the cabinet is seated.
Conclusion
Hanging upper kitchen cabinets securely requires proper structural fasteners, accurate stud layout, and careful leveling across the entire run. Taking the time to establish clean reference lines, support boxes on a straight ledger board, and shim behind framing gaps ensures your cabinetry hangs square, true, and plumb.
For homeowners in Albuquerque, Rio Rancho, and Bernalillo County, NM, Trussell’s Transformations brings over 25 years of licensed general contracting experience to every project. Whether you want to purchase premium materials for a DIY build or prefer turn-key, professional custom cabinet installation backed by 0% financing options, our team is here to help you bring your dream kitchen to life. Stop by our showroom at 8023 Edith Blvd NE in Albuquerque to explore our extensive displays and begin planning your renovation with our experienced design team today.
Recent Comments