

Why Installing Pull-Out Drawers Is One of the Best Kitchen Upgrades You Can Make
Installing pull-out drawers in your kitchen cabinets is one of the highest-return upgrades you can make — and it doesn’t have to be complicated. Here’s a quick overview of what’s involved:
- Measure your cabinet’s clear interior width, depth, and height
- Choose the right drawer kit or slide type (base-mount, side-mount, or undermount)
- Prepare the cabinet by clearing shelves and drilling pilot holes
- Mount drawer slides level on both sides of the cabinet interior
- Install the drawer box onto the slides and test for smooth operation
- Adjust alignment until the drawer opens and closes without binding
Most DIY projects cost $50–$100 and take 1 to 4 hours per cabinet, depending on the method.
If you’ve ever had to empty an entire cabinet just to reach something at the back, you already know the problem. Standard base cabinets are typically 24 inches deep — but most people only use the front 8 inches. Everything else disappears into the back.
Pull-out drawers solve this by bringing your storage to you. Instead of crouching on the floor and reaching into a dark cabinet, you simply pull the drawer forward and look straight down into it.
The upgrade also matters more than you might think when you’re planning a full kitchen remodel. Cabinets from premium brands — like Durasupreme Cabinetry, Waypoint Living Spaces, Sollid Cabinetry, and Kitchen Cabinet Distributors — are designed to accommodate pull-out hardware beautifully. Getting the drawer installation right from the start ensures your cabinetry investment performs the way it should for years to come.
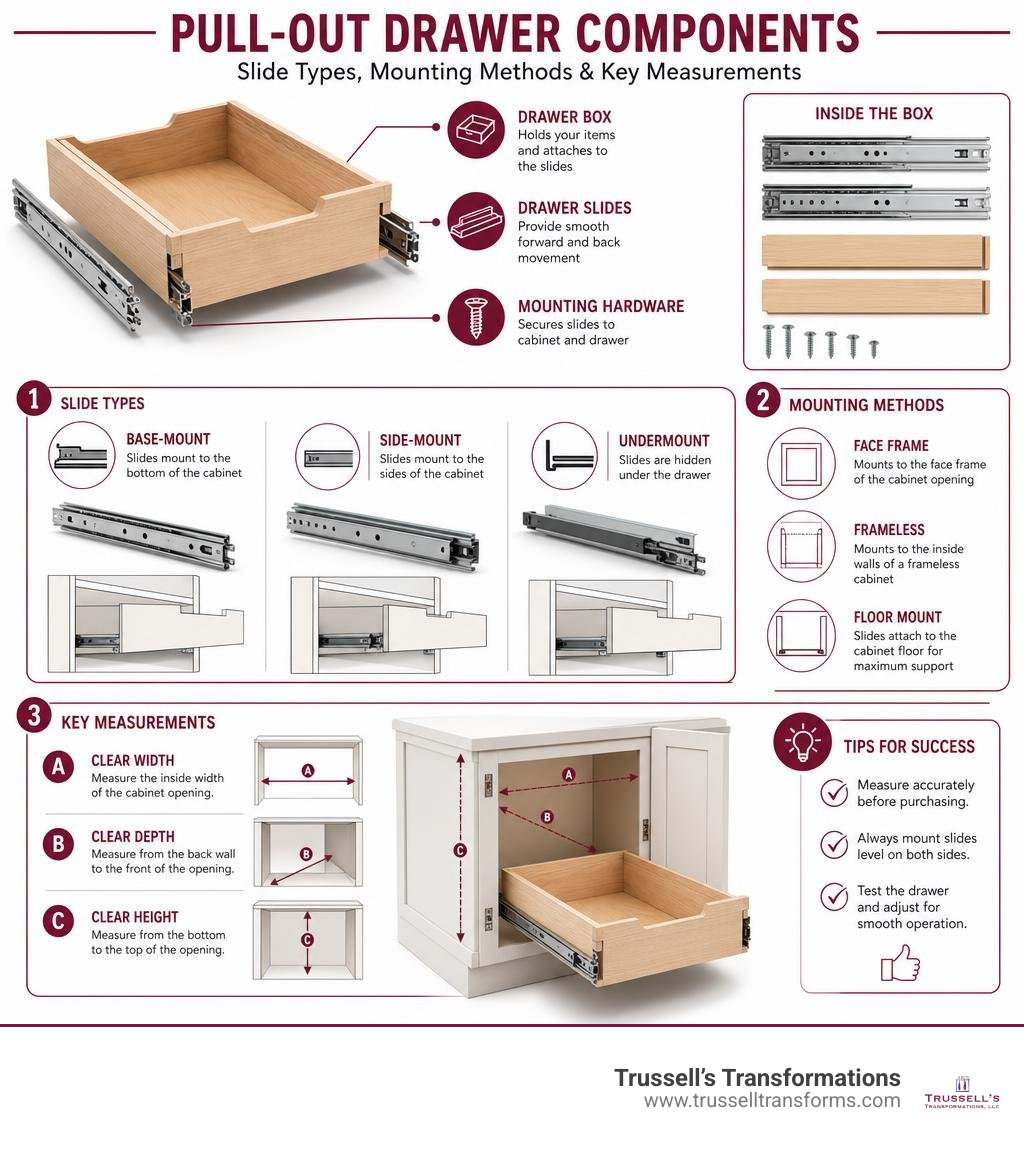
Installing pull out drawers word guide:
Choosing the Best Pull-Out Drawers for Your Kitchen
When you decide to add pull-out organization to your kitchen or pantry, choosing high-quality materials makes all the difference in performance. A cabinet drawer box takes a lot of daily use, especially when loaded up with cast iron skillets, heavy appliances, or stacked canned goods.
We always recommend choosing solid wood dovetail box construction over pinned or glued particle board boxes. Dovetail joinery locks solid wood sides together tightly, ensuring optimal strength and seamless daily operation. Pair that sturdy box with heavy-duty full-extension ball-bearing glides or soft-close undermount slides, and your drawer will glide effort-free under heavy weight.
Whether you are building custom drawers from 3/4-inch birch plywood or retrofitting pre-assembled wood pull-out organizers, matching the hardware to your cabinet construction is critical. Premium lines from Durasupreme Cabinetry, Waypoint Living Spaces, Sollid Cabinetry, and Kitchen Cabinet Distributors offer integrated roll-out trays built directly into the cabinet order, saving you measuring time while guaranteeing an exact fit.
| Slide Type / Mount | Weight Rating | Mounting Surface | Best For | Key Advantage |
|---|---|---|---|---|
| Base-Mount L-Brackets | 50 – 75 lbs | Cabinet Floor / Fixed Shelf | Quick DIY Retrofits | Simple 4-screw floor attachment |
| Side-Mount Ball-Bearing | 75 – 100 lbs | Cabinet Sidewalls / Spacers | Standard Dovetail Boxes | Full extension & budget-friendly |
| Undermount Soft-Close | 90 – 100+ lbs | Box Bottom / Side Cleats | Custom & Premium Cabinets | Hidden hardware & ultra-smooth soft-close |
| Rear Socket Mount | 50 – 75 lbs | Back Wall & Face Frame | Face-Frame Vanities (< 22" D) | No full side walls needed |
| Vertical Cleat System | 75 – 100 lbs | Cabinet Interior Walls | Height-Adjustable Trays | Tool-free height reconfiguration |
Understanding Drawer Slide Options
Selecting the right drawer slides determines how far your drawer pulls out, how smoothly it operates, and how much weight it safely holds.
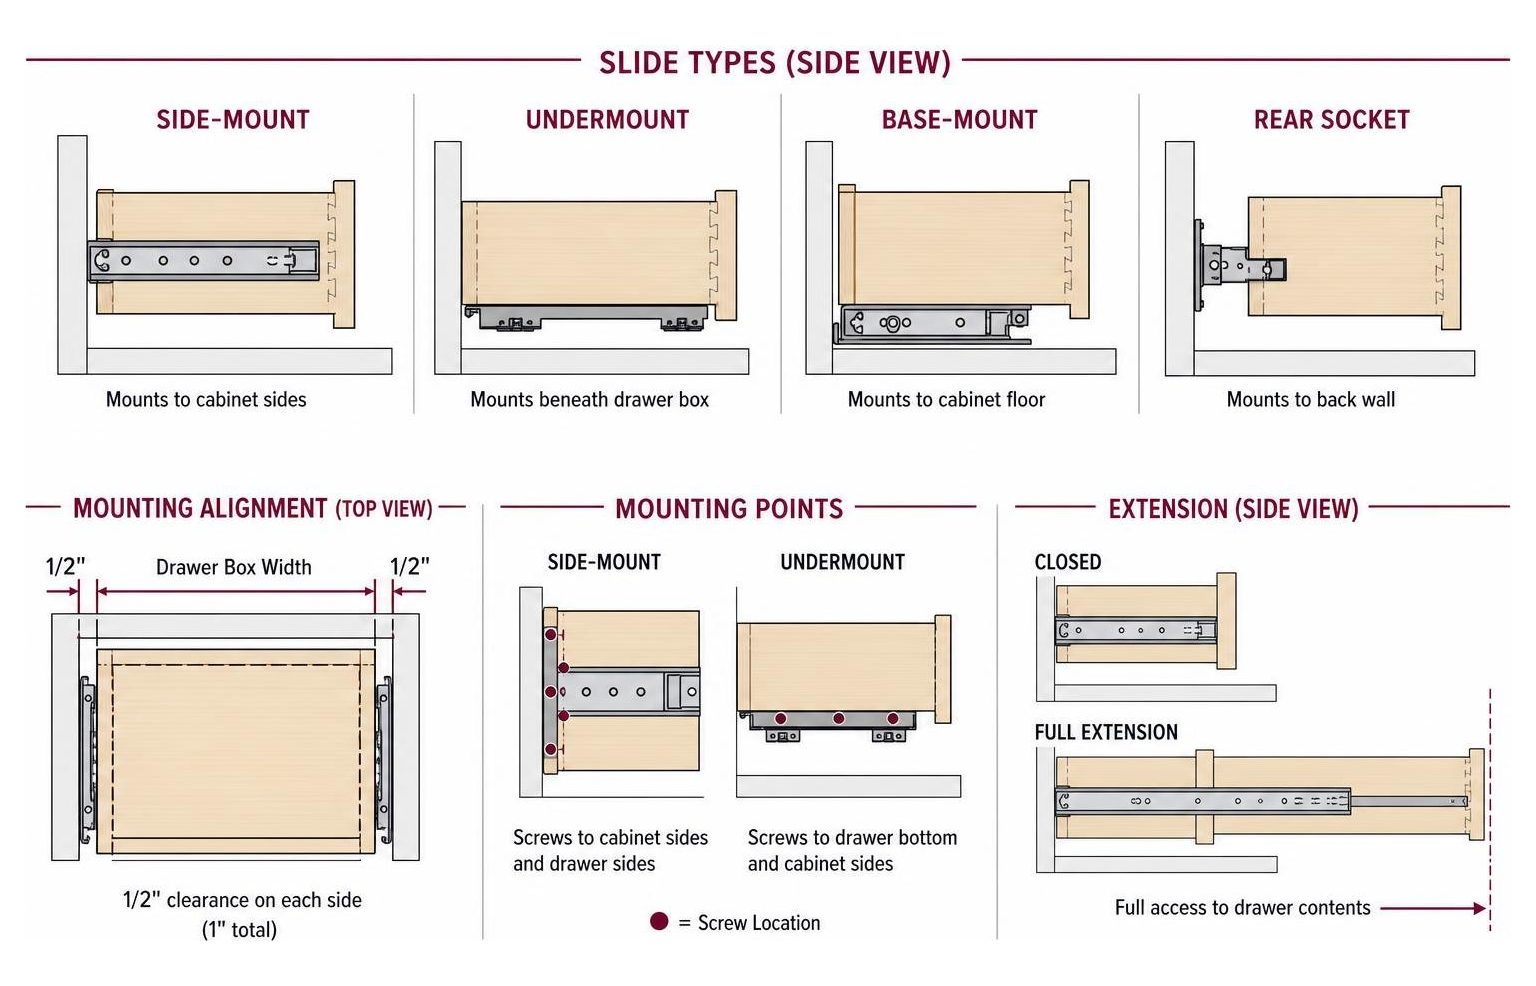
- Side-Mount Ball-Bearing Glides: Standard side-mount slides attach directly to the sides of the drawer box and the cabinet walls (or side spacers). They typically require a 1/2-inch clearance on each side (1 inch total) and offer sturdy full-extension access.
- Undermount Slides: Mounted beneath the drawer box, undermount slides remain hidden from view when the shelf is extended. They deliver a clean look, exceptional lateral stability, and built-in soft-close dampening mechanisms.
- Base-Mount L-Brackets: Ideal for retrofits, base-mount brackets attach directly to the cabinet floor or an existing fixed shelf using L-shaped steel brackets. This eliminates the need to build out side walls with thick wooden blocks.
- Weight Ratings & Soft-Close: For standard kitchen storage, look for slides rated for at least 75 to 100 pounds. If you plan to store heavy stand mixers, crockpots, or iron cookware, opt for heavy-duty slides rated for 100+ pounds featuring soft-close technology to stop drawers from slamming shut.
Matching Pull-Out Drawers with Premium Countertops
Upgrading your lower cabinet functionality naturally turns your focus toward the surfaces sitting right above them. Pairing smooth pull-out drawers with luxury countertops elevates your entire kitchen experience.
At our Albuquerque showroom located at 8023 Edith Blvd NE, we display top-tier engineered quartz and natural granite surfaces alongside custom cabinetry:
- Engineered Quartz (Caesarstone, Cambria, Silestone): Quartz is non-porous, highly stain-resistant, and requires zero sealing. It provides a consistent pattern and incredible durability for everyday household use.
- Natural Granite (The Stone Collection): Granite brings unmatched, one-of-a-kind natural beauty into your kitchen. Each slab features unique veining and colors that resist high surface heat.
Quartz and granite deliver far superior durability, effortless cleanability, and exceptional long-term home resale value.
Step-by-Step Guide: Installing Pull Out Drawers Like a Pro
Whether you are a seasoned DIY enthusiast or planning a custom build, installing pull out drawers requires careful measuring and clean execution. To learn more about standard cabinet setups, review our guide on Proper Cabinet Installation Guide or check out How to Install a Pull-Out Kitchen Shelf.
Key Tools and Preparation for Installing Pull Out Drawers
Having the right tools ready ensures your project goes smoothly from start to finish:
- Tape Measure (metal, locking standard tape)
- Spirit Level or small magnetic torpedo level
- Power Drill & Driver with pilot drill bits (1/8″ and 1/4″) and #2 Phillips driver bits
- Pencil & Carpenter’s Square
- Wood Screws (1 1/8″ to 1 5/8″ cabinet head screws; never use short pin nails or brads!)
- Wood Glue & Clamps (if assembling drawer boxes from scratch)
- Masonite / Cardboard Shims (1/8-inch thickness for elevating slides)
- Safety Glasses
Before diving into installation, clear out the cabinet entirely and wipe down the interior. Check out our detailed Slide Into Convenience Guide for additional structural preparations.
Step-by-Step Instructions for Installing Pull Out Drawers in Existing Cabinets
Here is the exact step-by-step procedure for retrofitting a standard kitchen base cabinet with a wood pull-out drawer using side-mount or base-mount glides:
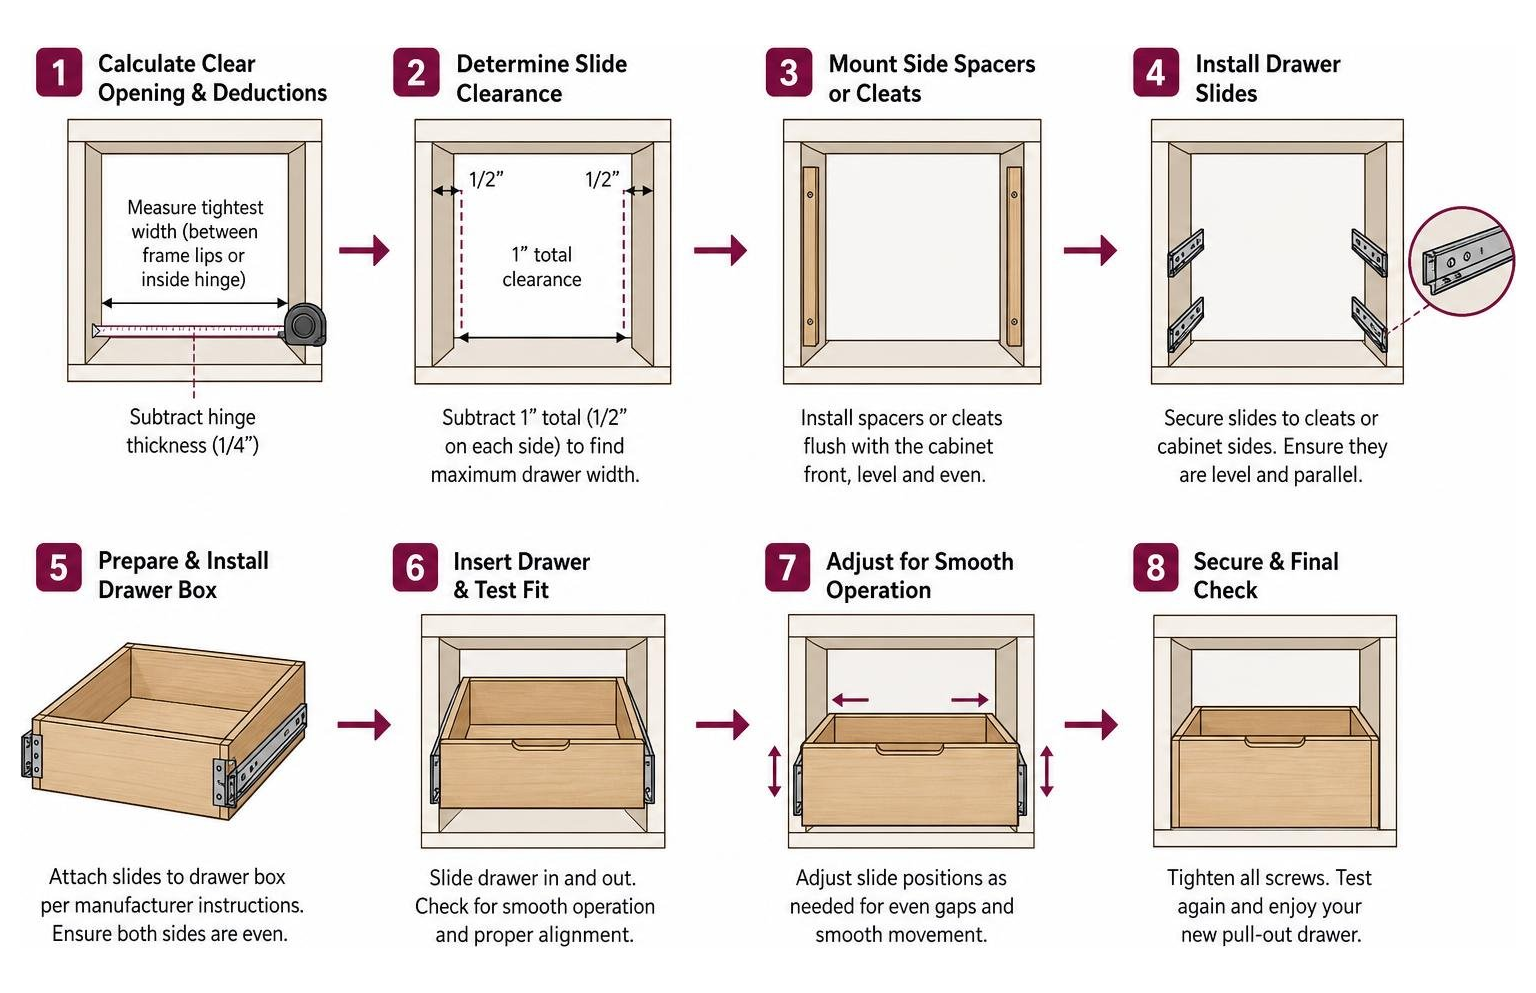
- Calculate Clear Opening & Deductions: Measure the tightest distance across the cabinet opening. In face-frame cabinets, measure between the frame lips. If a cabinet door rests in front of the opening, measure from the inside edge of the extended door hinge to the opposite frame. Subtract the exact hinge thickness (typically 1/4 inch) to establish your clear width.
- Determine Slide Clearance: Standard side-mount ball-bearing slides require 1 inch total clearance (1/2 inch on each side). Subtract 1 inch from your clear opening width to find your maximum drawer box width.
- Mount Side Spacers or Cleats (For Face-Frame Cabinets): Because face frames overhang the interior side walls, you must install wood spacers or Euro spacers flush with the edge of the frame. Anchor these spacers firmly to the interior sidewalls using long cabinet screws and PVA wood glue.
- Separate the Drawer Slides: Extend full-extension slides until the center release lever is exposed. Push the lever up or down to disconnect the narrow drawer member from the wider cabinet member.
- Attach Slides to Cabinet Interior: Place 1/8-inch Masonite or cardboard shims on the cabinet floor to lift the slides slightly above the floor surface. Set the slide fronts back 1/2 inch from the front edge of frameless cabinets or face frames (or 2 inches back if installing behind closing doors). Ensure slides are level from front to back, drill pilot holes, and drive mounting screws through the horizontal slotted holes first.
- Attach Drawer Members to the Box: Position the narrow drawer member flush against the side or bottom edge of the drawer box (typically 7/8 inch from the bottom edge). Secure with wood screws.
- Insert and Dynamically Align the Drawer: Align the drawer slides with the cabinet tracks and slide the box into place until the release levers lock. Test the motion. If the drawer binds or feels tight on the left side, slightly loosen the rear bracket screws on that side, allow the track to self-align, and tighten securely into the center locking holes.
For systems using vertical clearing tracks, follow the manufacturer setup outlined in the Custom Pull Out Tray System Installation video tutorial.
Common Mistakes to Avoid When Installing Cabinet Pull-Outs
Even minor mistakes can turn an exciting home improvement project into a frustrating headache. Here are the most common pitfalls to watch for and how to avoid them:

- Relying on Pin Nails or Brad Nails: Never use 23-gauge pin nails or light brad nails to attach drawer slide spacers or rear joints. Pin nails lack the structural holding power required for heavy cookware and small appliances. Always anchor load-bearing hardware using long cabinet head screws driven into solid framing or birch cleats.
- Forgetting Door Hinge Protrusion: Failing to account for door hinges can prevent the drawer from extending smoothly past the cabinet opening. Always measure past the innermost point of the hinge hardware.
- Neglecting Slide Clearance Play: Ball-bearing slides require 1/16″ to 1/8″ play on the “free side” (typically the left slide track). Mounting slides too tightly together causes tracks to bind and jam under load.
- Overlooking Tipping Risks on Loose Shelves: If you install a pull-out shelf onto an existing adjustable shelf, pulling out a heavy tray will shift the weight forward. Secure the back of adjustable shelves using anti-tipping stop screws inserted 1/4 inch above the shelf back, or anchor the shelf down with locking clips.
For additional heavy-duty installation advice, read our comprehensive Slide Into Success Guide.
Why Professional Design Renderings and Paid Estimates Save Money

When planning a kitchen remodel or adding custom cabinetry upgrades, jumping straight into ordering parts without a precise plan can lead to costly mistakes. That is why professional design renderings and paid estimates are essential steps in the remodeling process.
Paying for a detailed estimate allows licensed design professionals to create photorealistic 3D renderings of your exact kitchen layout. Here is why this up-front investment saves you thousands in the long run:
- Eliminates Sizing & Clearance Surprises: 3D renderings map out every door swing, cabinet depth, filler strip, and hinge location before a single piece of wood is cut.
- Optimizes Custom Functionality: You can visualize how roll-out trays, trash pull-outs, and corner accessories interact with appliances before committing to purchase.
- Ensures Code & Structural Compliance: Professional estimates involve evaluating wall framing, electrical outlets, and plumbing pathways.
- Prevents Contractor Re-Works: Detailed technical blueprints ensure our licensed contractors install your Durasupreme, Waypoint, Sollid, or Kitchen Cabinet Distributors cabinetry perfectly on the first pass.
At Trussell’s Transformations, our experienced team provides full design services and expert installation across Albuquerque, Rio Rancho, and Bernalillo County. Read our advice on Can I Install Cabinets Myself Guide to understand when hiring licensed pros protects your home investment.
Frequently Asked Questions About Cabinet Pull-Out Drawers
How do I accurately measure my cabinet for pull-out drawers?
To accurately measure your cabinet, follow these key steps:
- Clear Opening Width: Measure the narrowest point of the cabinet opening from left to right. If your cabinet has face frames or door hinges that stick out into the opening, measure from the edge of the hinge to the opposite frame. Subtract 1/4 inch for hinge clearance.
- Interior Depth: Measure straight back from the inside face of the frame or cabinet front to the back wall. Standard base cabinets are 24 inches deep and usually accept 22-inch drawer slides.
- Internal Height: Measure from the cabinet floor or shelf surface up to any top obstructions (such as drawer web frames or sink plumbing).
- Hardware Clearance: For standard side-mount slides, subtract 1 inch total from your clear opening width to determine your maximum finished drawer box width.
Can I install pull-out drawers on existing adjustable shelves?
Yes, but you must take precautions to prevent tipping. When a fully loaded pull-out drawer extends, its center of gravity shifts forward.
To make existing adjustable shelves safe for pull-out drawers:
- Anchor the Shelf: Secure the shelf to the cabinet walls using locking shelf support clips or drive screws directly through the shelf into the side pegs.
- Install Rear Wall Anti-Tip Stops: Insert two screws into the back cabinet wall, leaving the heads protruding 1/4 inch just above the top edge of the shelf. Alternatively, screw a 1/4-inch thick plywood strip across the back wall right over the back of the shelf.
- Reinforce Lightweight Particle Board: If the shelf is made of thin particle board, consider replacing it with 3/4-inch Baltic birch plywood to ensure maximum stability under load.
What is the difference between face frame and frameless cabinet installation?
The mounting method varies based on cabinet style:
- Face Frame Cabinets: Face frame cabinets feature a solid wood border around the front opening that hangs over the interior side walls. To install side-mount slides, you must either install rear socket brackets attached to the back wall or attach wooden spacer cleats to the side walls to bring the slides flush with the face frame edge.
- Frameless (Euro-Style) Cabinets: Frameless cabinets have flat side walls with no front frame overhang. Drawer slides attach directly to the interior side walls, typically set back 1/2 inch from the front edge using Euro screws or standard wood screws.
Conclusion
Upgrading your kitchen with custom pull-out drawers transforms hard-to-reach, cluttered base cabinets into organized, accessible storage space. Whether you choose ultra-fast base-mount retrofit kits or full custom dovetail wood drawer boxes with soft-close undermount slides, taking precise measurements and using load-bearing screws guarantees decades of smooth performance.
If you’re getting ready for a complete kitchen transformation in Albuquerque, Rio Rancho, or Bernalillo County, visit the Trussell’s Transformations showroom at 8023 Edith Blvd NE in Albuquerque. As a licensed one-stop contractor with over 25 years of experience, we feature top cabinetry brands like Durasupreme, Waypoint, Sollid, and Kitchen Cabinet Distributors, alongside premium quartz and granite surfaces. We also offer 0% financing and DIY options tailored to your needs.
Ready to bring convenience into your home? Explore Custom Cabinet Solutions with our expert team today!
Recent Comments